Add Feature in Crud
Purpose
VaahCms offers a multitude of features when you're generating a CRUD (Create, Read, Update, Delete) application. Beyond its built-in capabilities, VaahCms provides the flexibility to seamlessly integrate your own custom features into the CRUD system. This means you can enhance the functionality provided by the built-in VaahCms CRUD, including features like filtering the list based on status (e.g., active or inactive), sorting the list in ascending or descending order, and accessing additional capabilities such as managing trashed items, among numerous others.
Features & Demos
The CRUD (Create, Read, Update, Delete) functionality offers a wide range of features, including the ability to display all data. Furthermore,
it provides bulk actions that allow you to delete multiple pieces of data with a single click and update data, offering the following features:
- Create a New
Data - Edit/Update the details of an already existing
Data. - Clone
Datadetails. - Autofill
Datafields. - Sort the
Datalist in ascending/descending order. - Perform Bulk Actions to change the status, trash, or delete
Data. - List All existing
Data. - Filter the
Datalist by searching using differentfields. - Filter the
Datalist by different status, including trashedData. - Delete an existing
Data. - Delete or temporarily trash an already existing
Data.
NOTE
If you are unsure how to generate CRUD: Click Here
Overview Of Crud
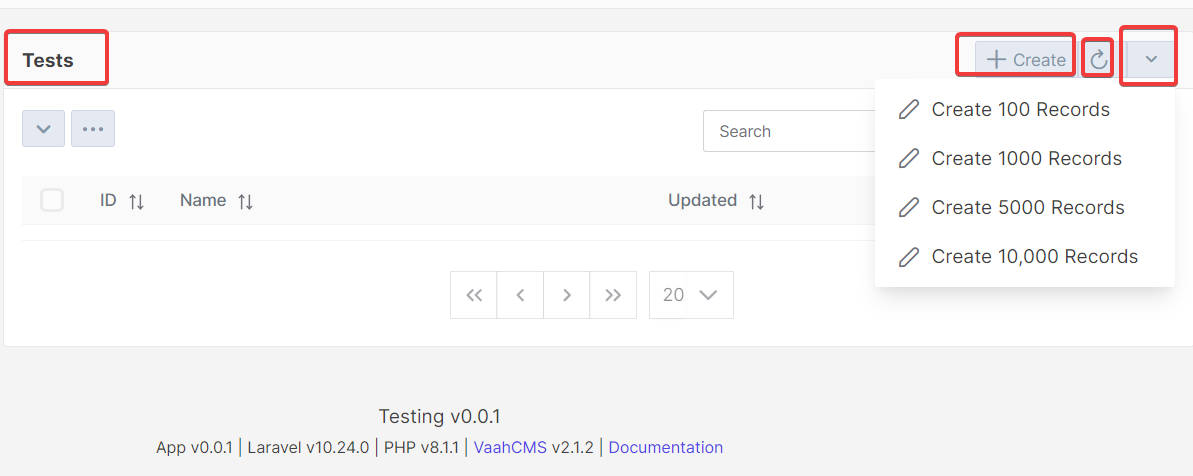
The first time you generate CRUD in VaahCms, it will appear like this: at the top,
you'll find your CRUD name, along with options such as a Create button for adding new data,
a Reload button for retrieving the entire list of data, and a dropdown button for creating multiple entries with a single click.
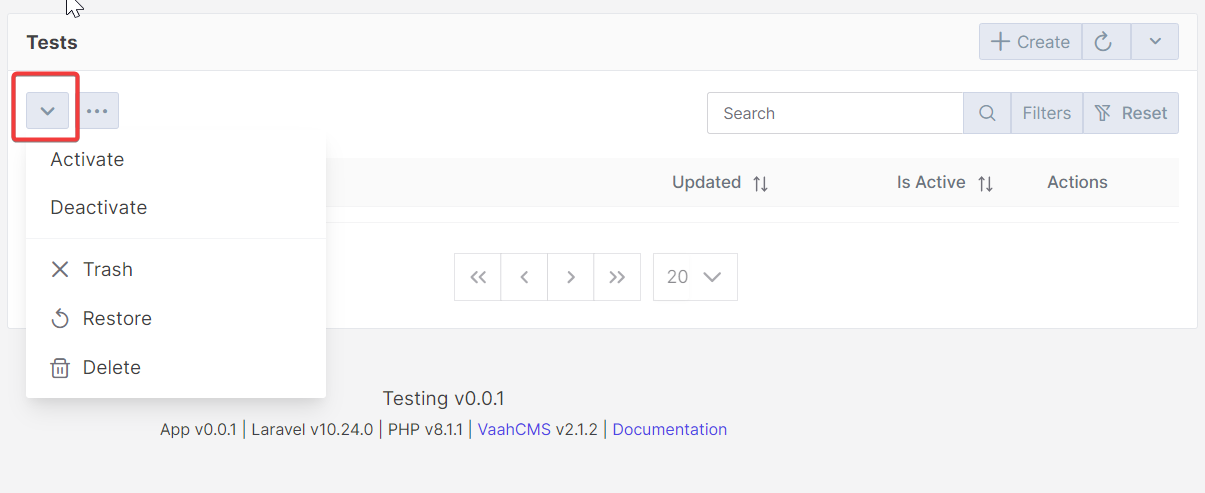
At the bottom, you'll find two toggle menus, each offering distinct features.
The first menu allows you to perform specific actions on individual data entries, such as activation, deactivation, deletion, and trashing.
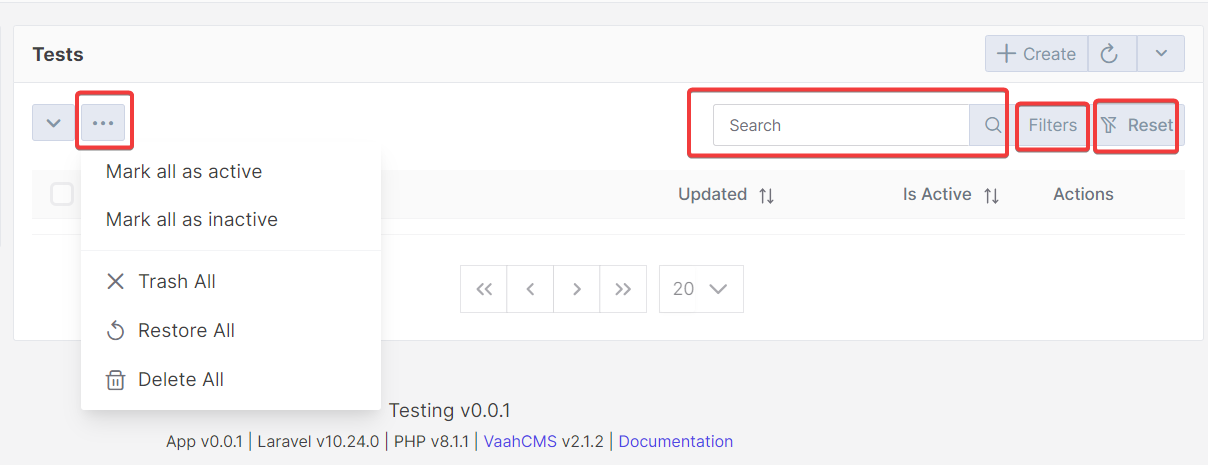
The other menu provides bulk actions, enabling you to perform actions on multiple data entries at once, such as deleting all data or activating all data. Additionally, in the right corner,
there is a search bar that allows you to search for specific data in the list. Further options include a filter button and a filter reset button for data filtering.
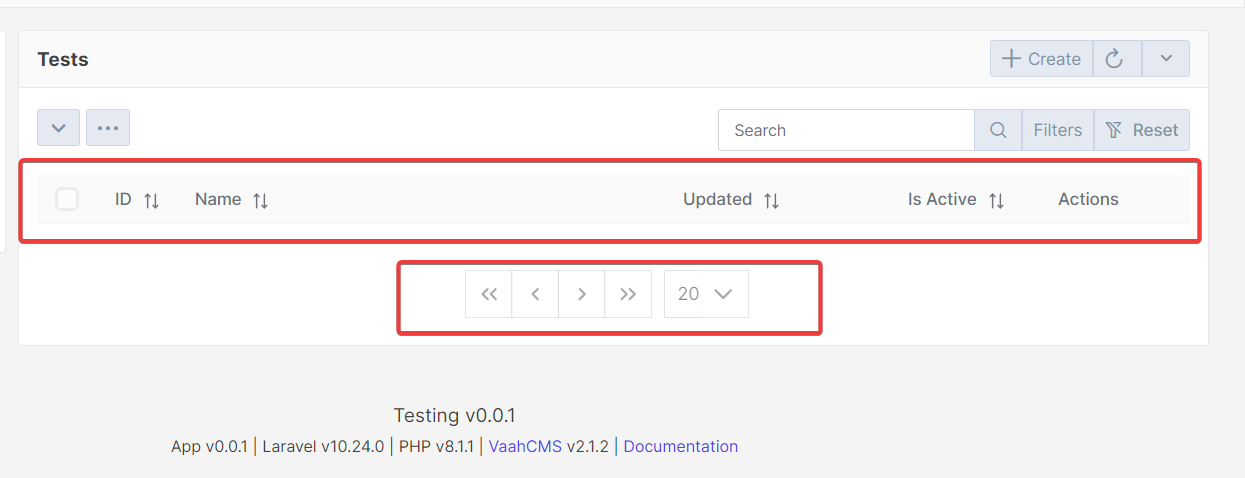
At the bottom, you'll find a table with column names, and there's also a pagination section. You have the option to customize the pagination according to your preference. By default, it displays 20 data entries per page, but you can adjust this setting to determine how many data entries you want to see on a single page. It's entirely up to you.
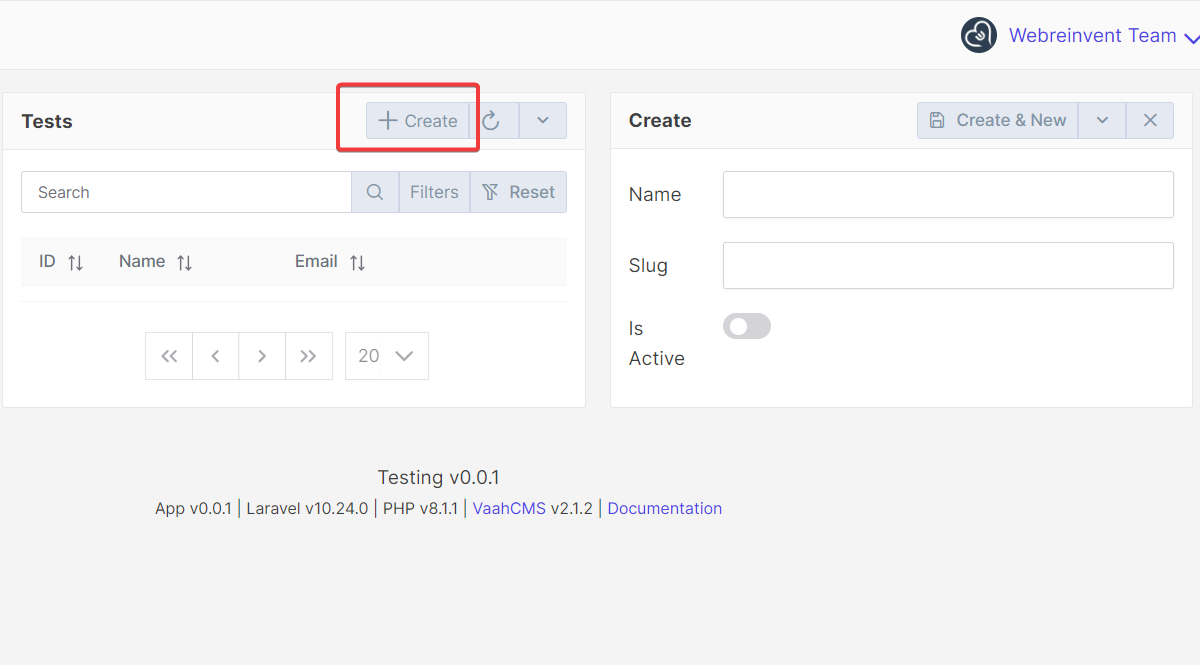
Add Field In Crud Form
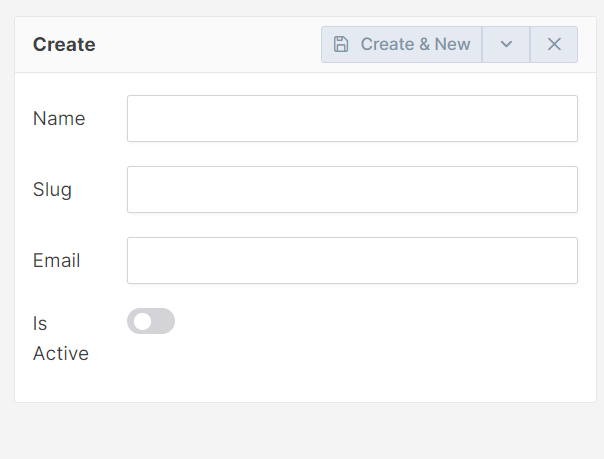
Initially, when you generate a CRUD, the form includes only two data fields: Name and Slug
The form becomes accessible when you click on the Create button.
You can refer to the image below for an illustration of the CRUD form:
Email Field to a Form
Now, in this section, we will guide you through the process of adding a new data field, specifically Email, to the existing form.
You can follow these step-by-step instructions to seamlessly integrate this additional field into the form.
NOTE
If you are not familiar with the VaahCms directory: Click Here
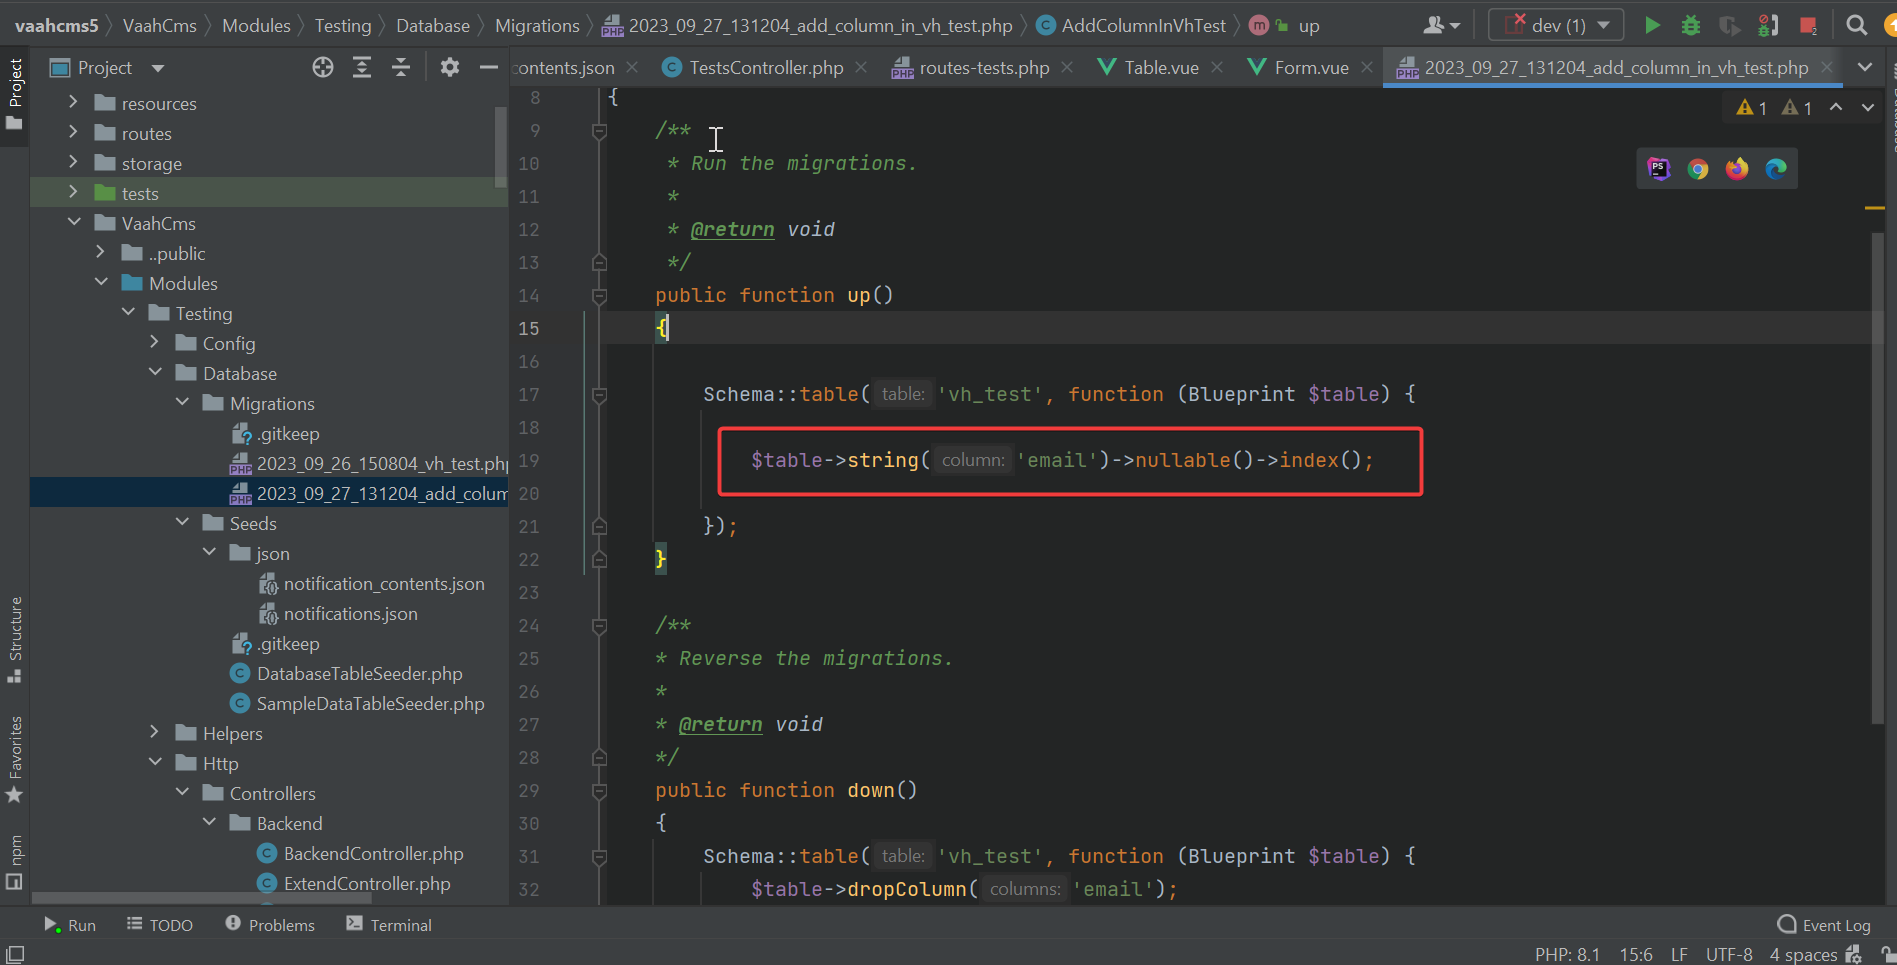
Adding a Field in the Migration
When you attempt to create a new field in a form, the data entered into that field needs to be stored in the database. This is essential because when you want to view or update that data later on, it should be readily accessible. To achieve this, you add the field name to the database migration, ensuring that the database structure accommodates the new field and its data.
NOTE
If you are not familiar with How To Create Migration in VaahCms: Click Here
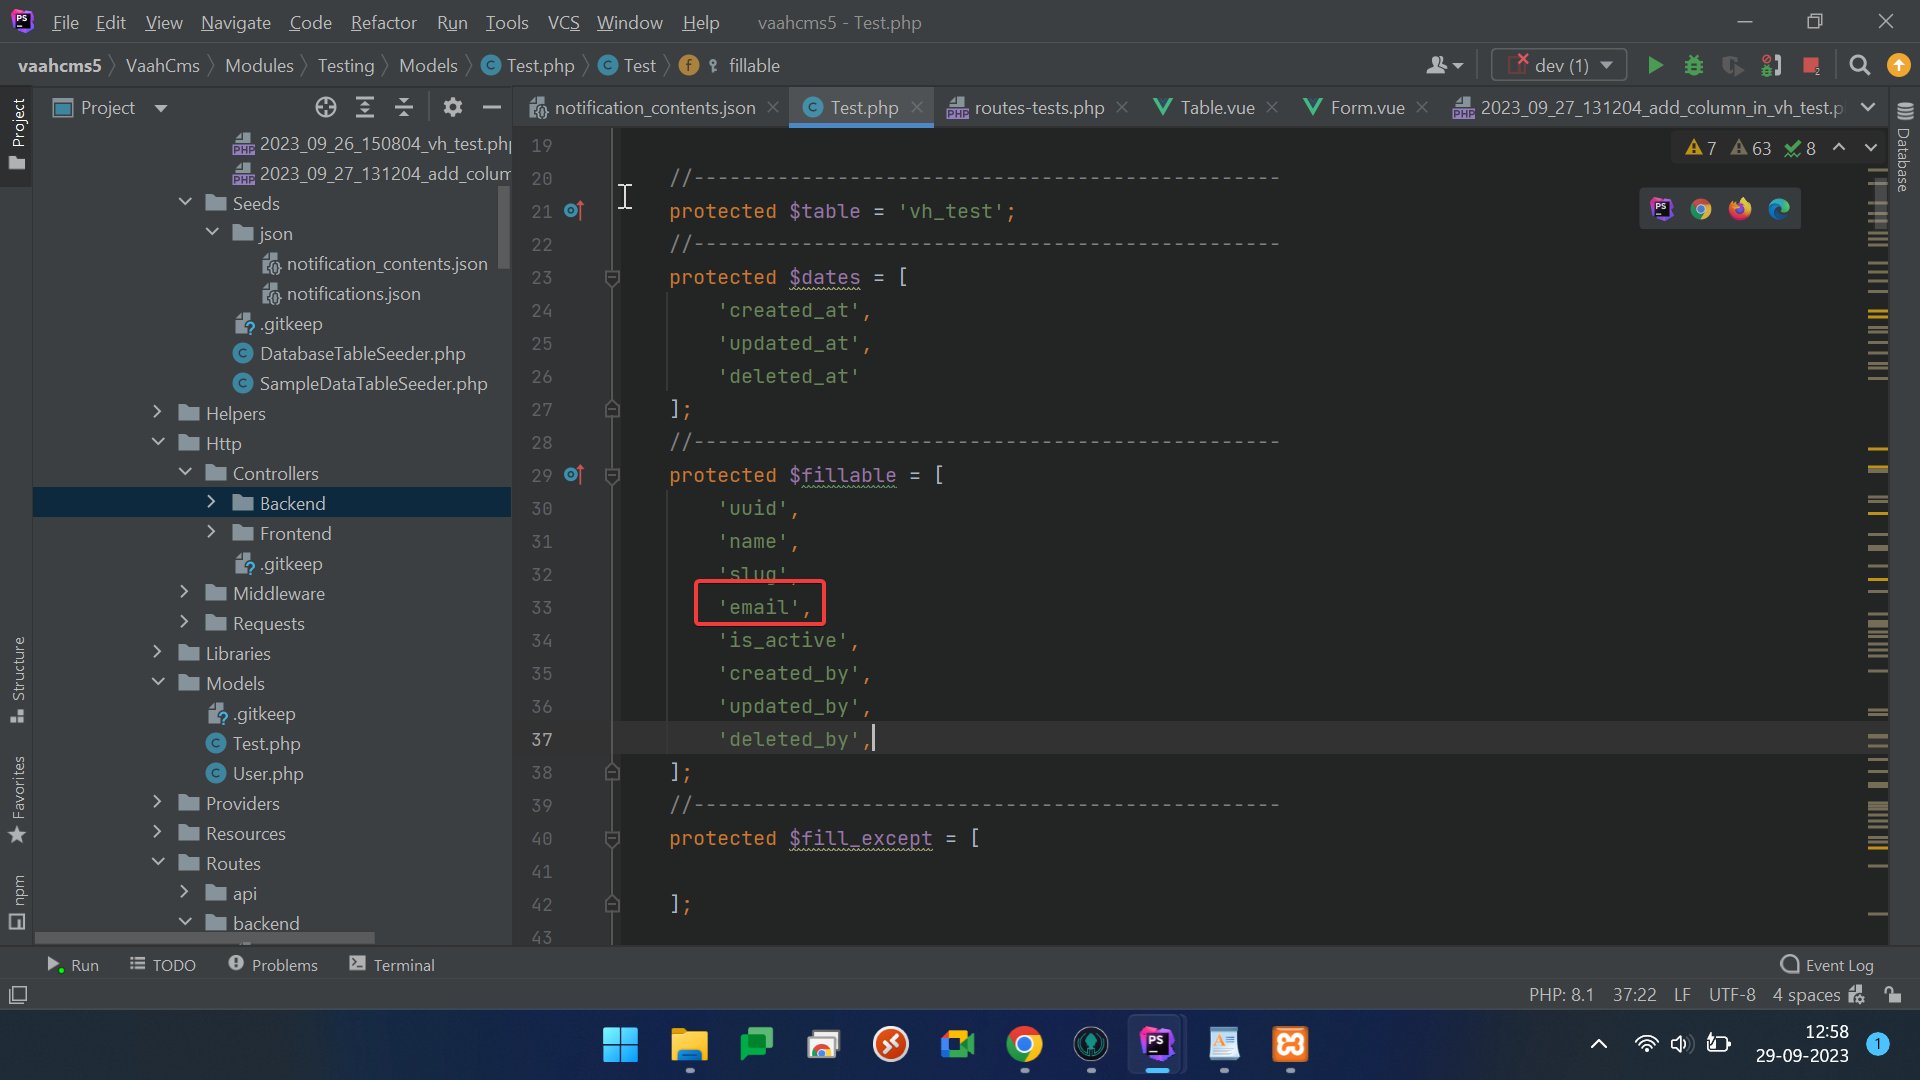
Now, you need to incorporate the newly added field's name into the CRUD model's fillable property.
This step is crucial to ensure that the field can be properly managed within the CRUD functionality.
By adding the field name to the fillable property, you explicitly specify that the field can accept and store data.
This enables seamless interaction with the field when working with the CRUD operations.
NOTE
Please deactivate and then activate your module from the backend.
This action is crucial as it initiates the creation of a new column in the database table for the newly added field.
Deactivating and reactivating the module refreshes its database schema, ensuring that recent changes, like adding a new field, are reflected in the database.
If you're unsure how to do this, follow these steps: Click on Extend > Module , choose the relevant module, and click Deactivate,then Activate.
Add Feild In Form.Vue File
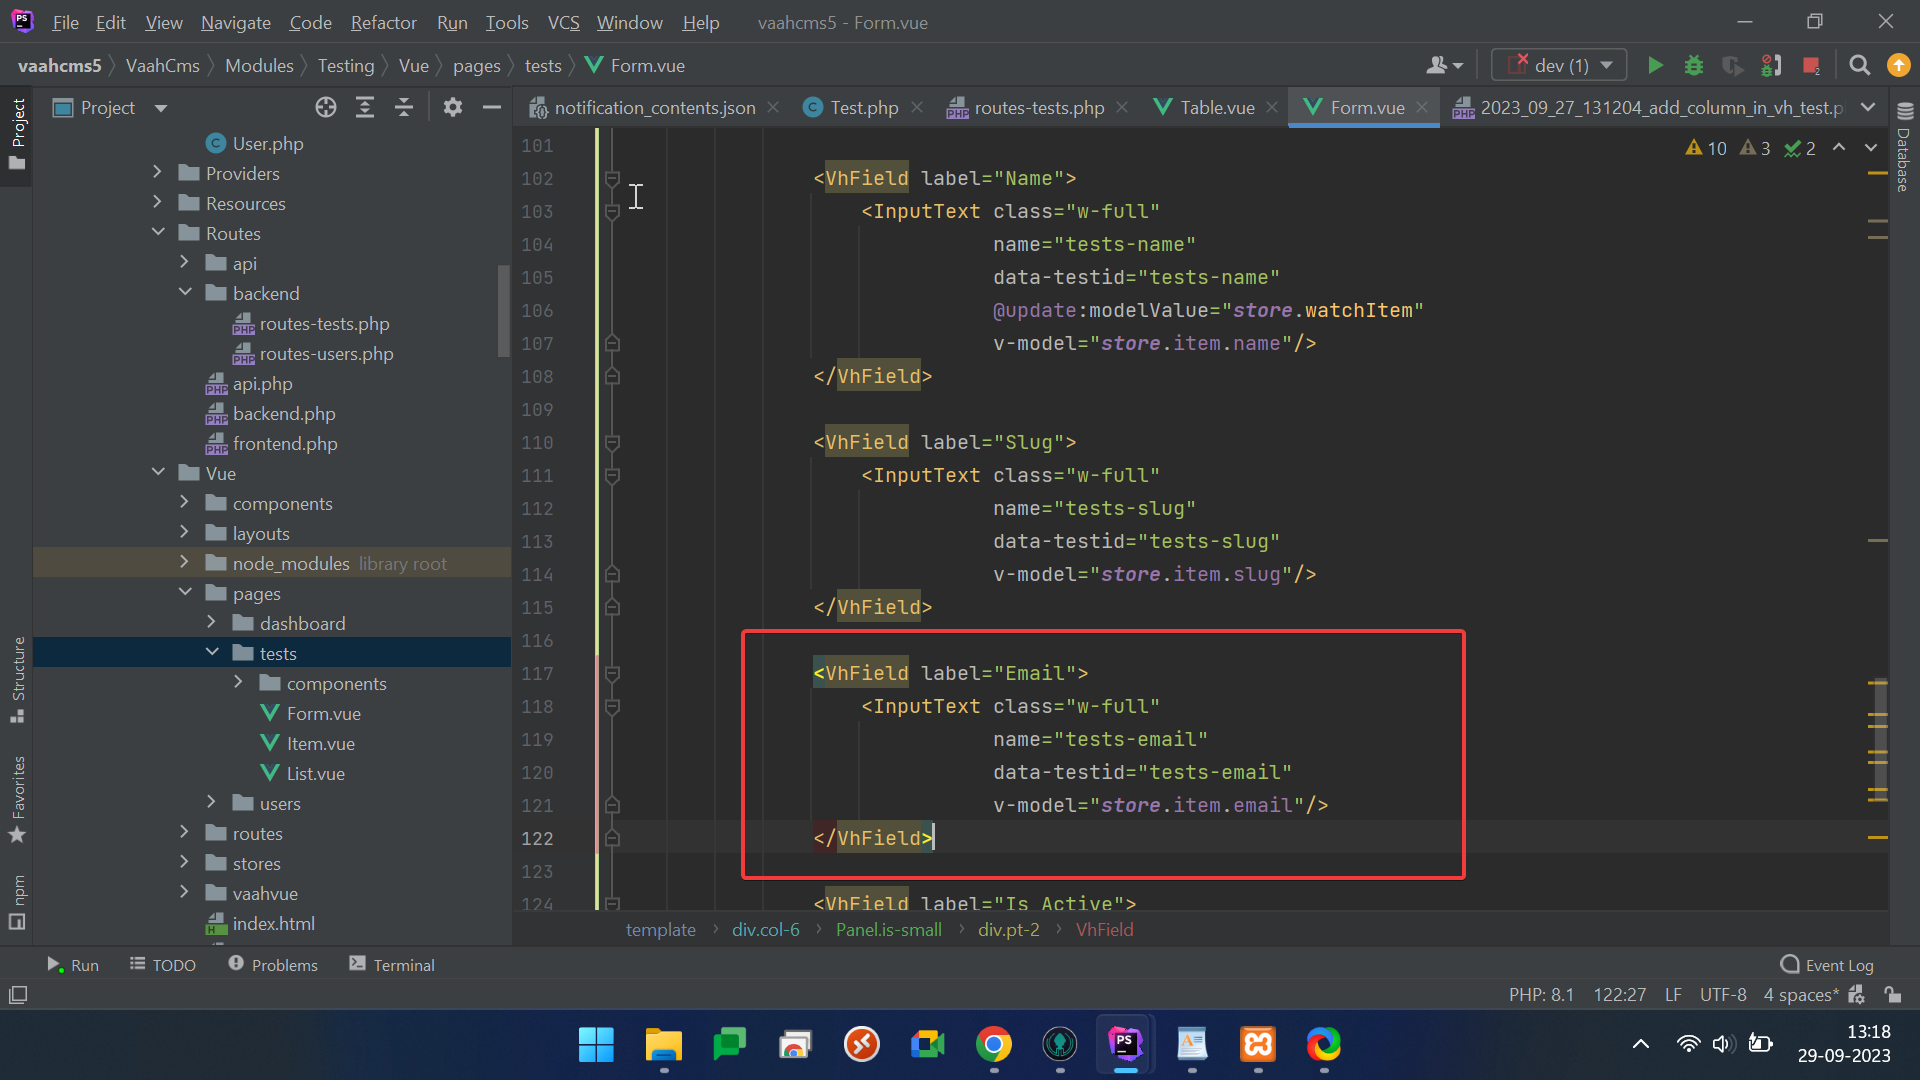
Now, you need to incorporate the Email field into the form.vue file where the form is rendered.
This addition allows users to fill in their email when interacting with the form. By including the Email field in the form's Vue component,
you enable users to input their email information as part of the data they provide within the form. You can refer to the image below for an illustration
After incorporating the Email field, your form has undergone a modification and now appears with an additional input field for email.
This means that users interacting with the form will now see and have the option to fill in their email information, enhancing the form's functionality and data collection capabilities.
NOTE
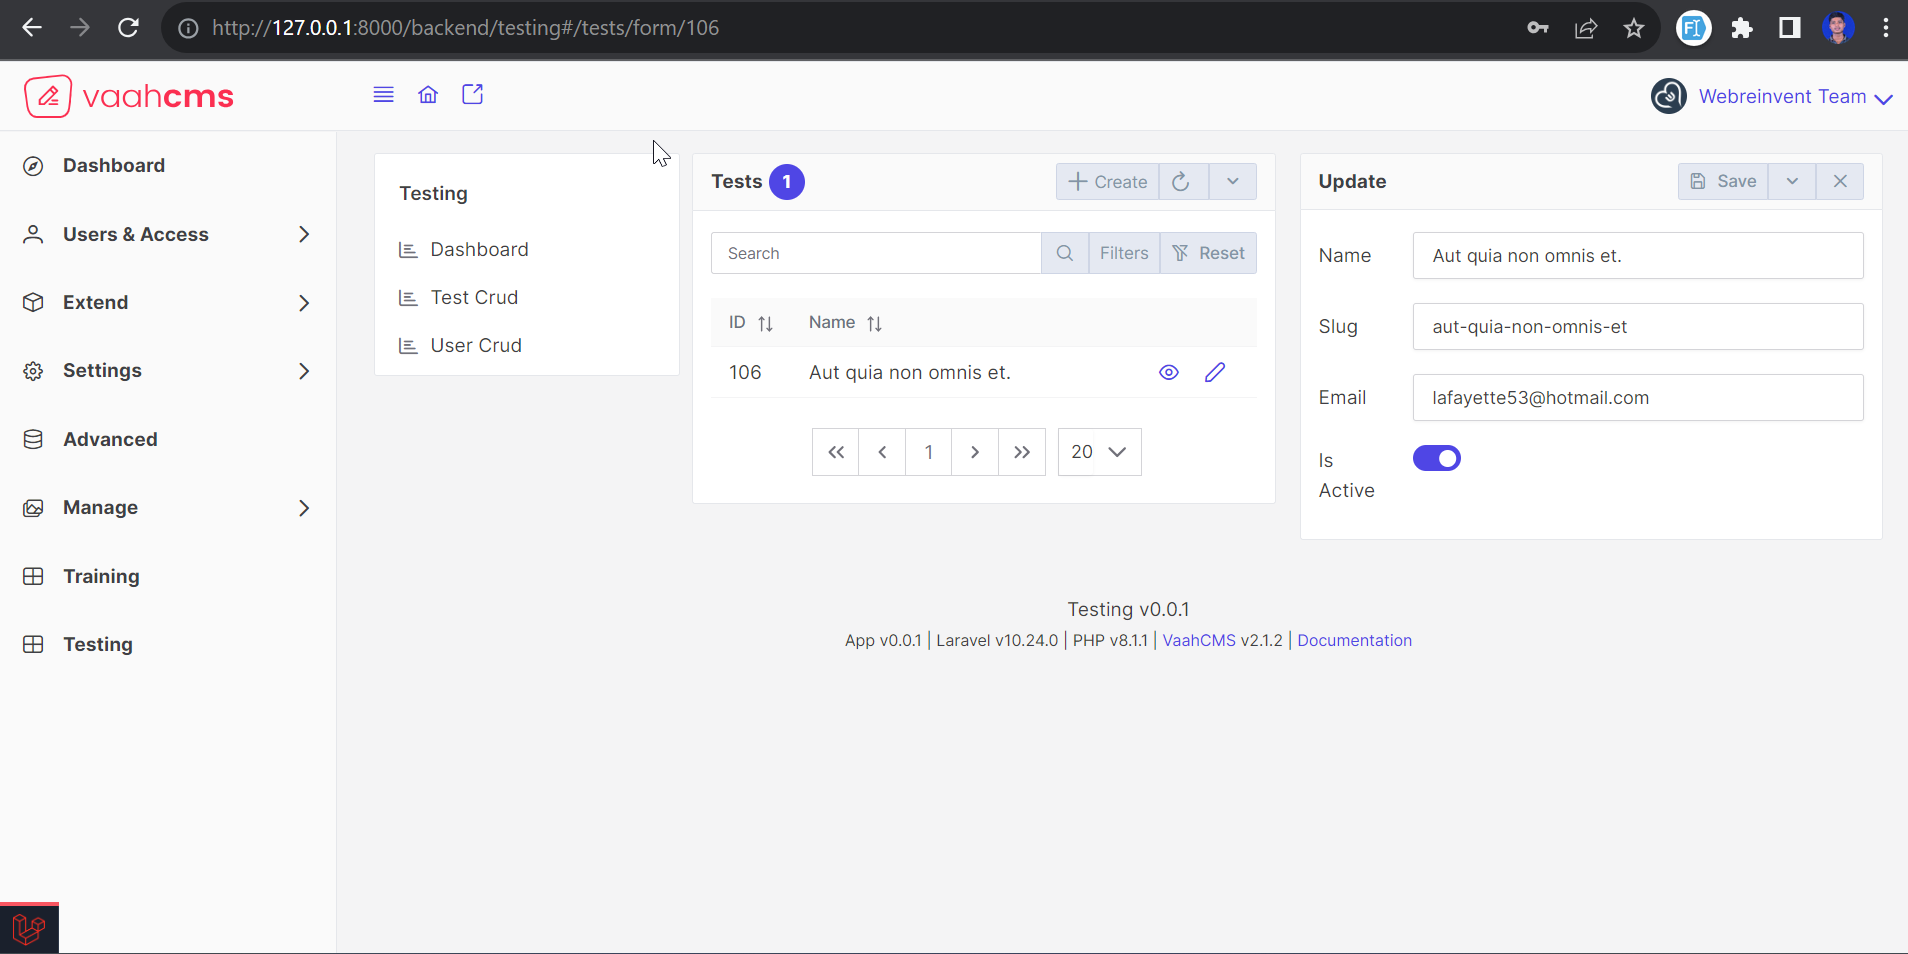
We are utilizing the same form for both updating and creating data.
When you click on the Update button within a table, you are directed to the update form.
In this form, you will also find the Email field, which allows you to view and potentially modify the email information associated with the data you are updating.
This is a representation of how the update form appears and is structured.
It showcases the fields and components that users will encounter when they choose to update data within the system.
The update form serves as an interface where users can view and modify existing data entries, including the newly added Email field.
Add Feild In table.Vue File
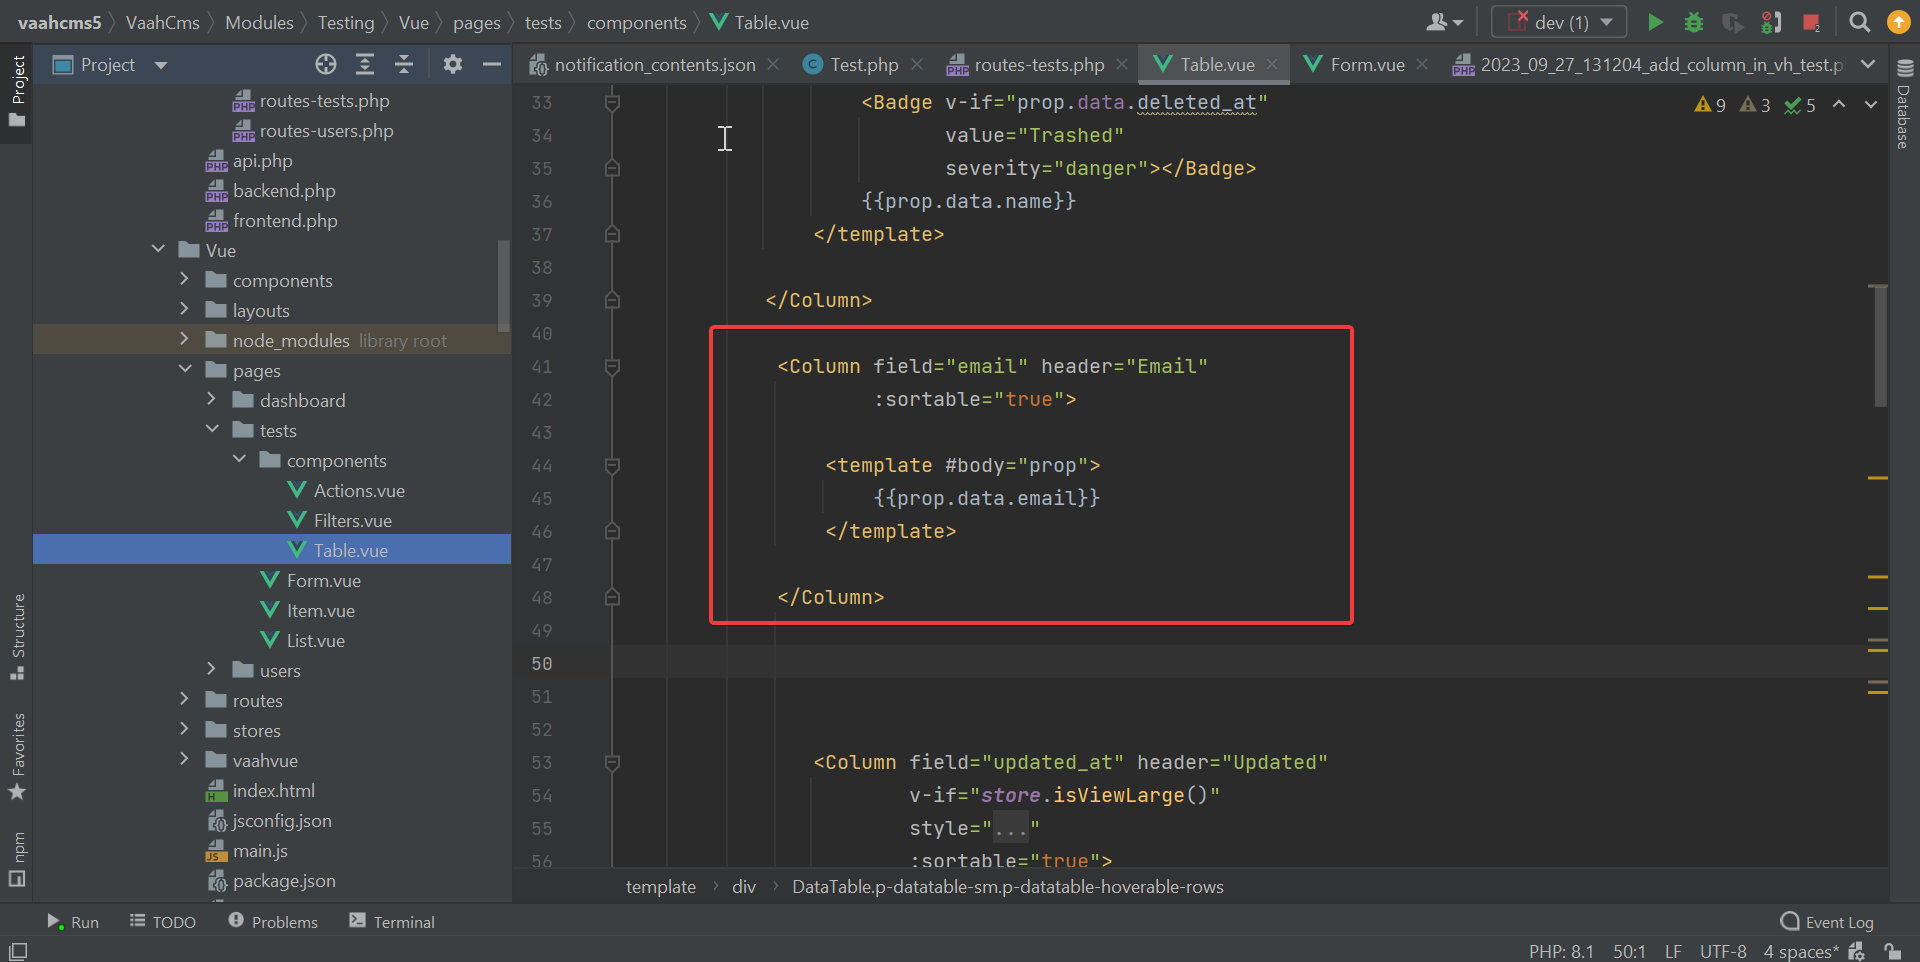
In this section, we will guide you through the process of adding the Email field to the table where all data entries are displayed.
To achieve this, you will need to access and modify the table.vue file. Specifically, you should insert the provided code snippet into your table.vue file.
This file serves as the control center for how data is presented within the table, including the addition of the Email field.
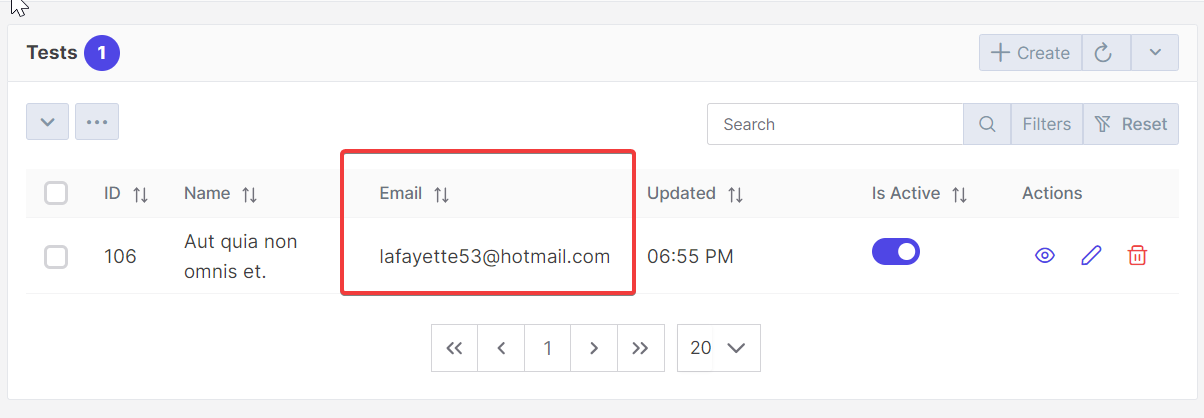
Once you have successfully added the Email field to your table.vue file as per the previous instructions, you will observe that the Email field is now visible within the table.
This means that when you view the table where all data entries are listed, the Email field will be included and displayed for each data entry, providing valuable email information alongside other data.
Add Taxonomy Data In Crud
In VaahCms, you have the capability to retrieve data from different modules and display it within your own module.
In this section, we will guide you through the process of adding taxonomy data to your CRUD (Create, Read, Update, Delete) functionality.
Previously, we learned how to add fields to a form. Now, we will enhance your form by incorporating a dropdown menu.
Within this dropdown, we will fetch and display taxonomy data sourced from other modules,
providing users with a convenient way to select and associate taxonomy information with their data entries."
NOTE
Learn more about the taxonomy click here
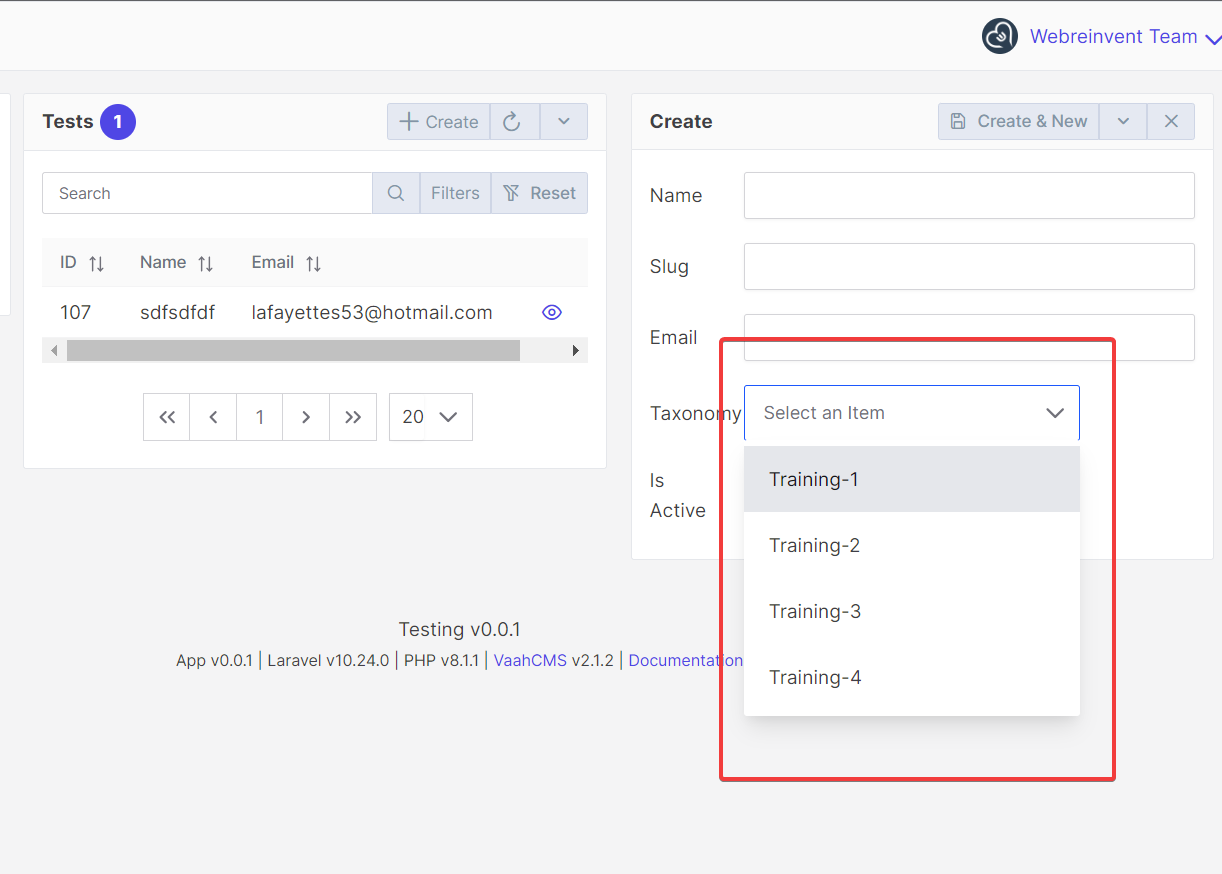
Add Taxonomy Dropdown In Crud
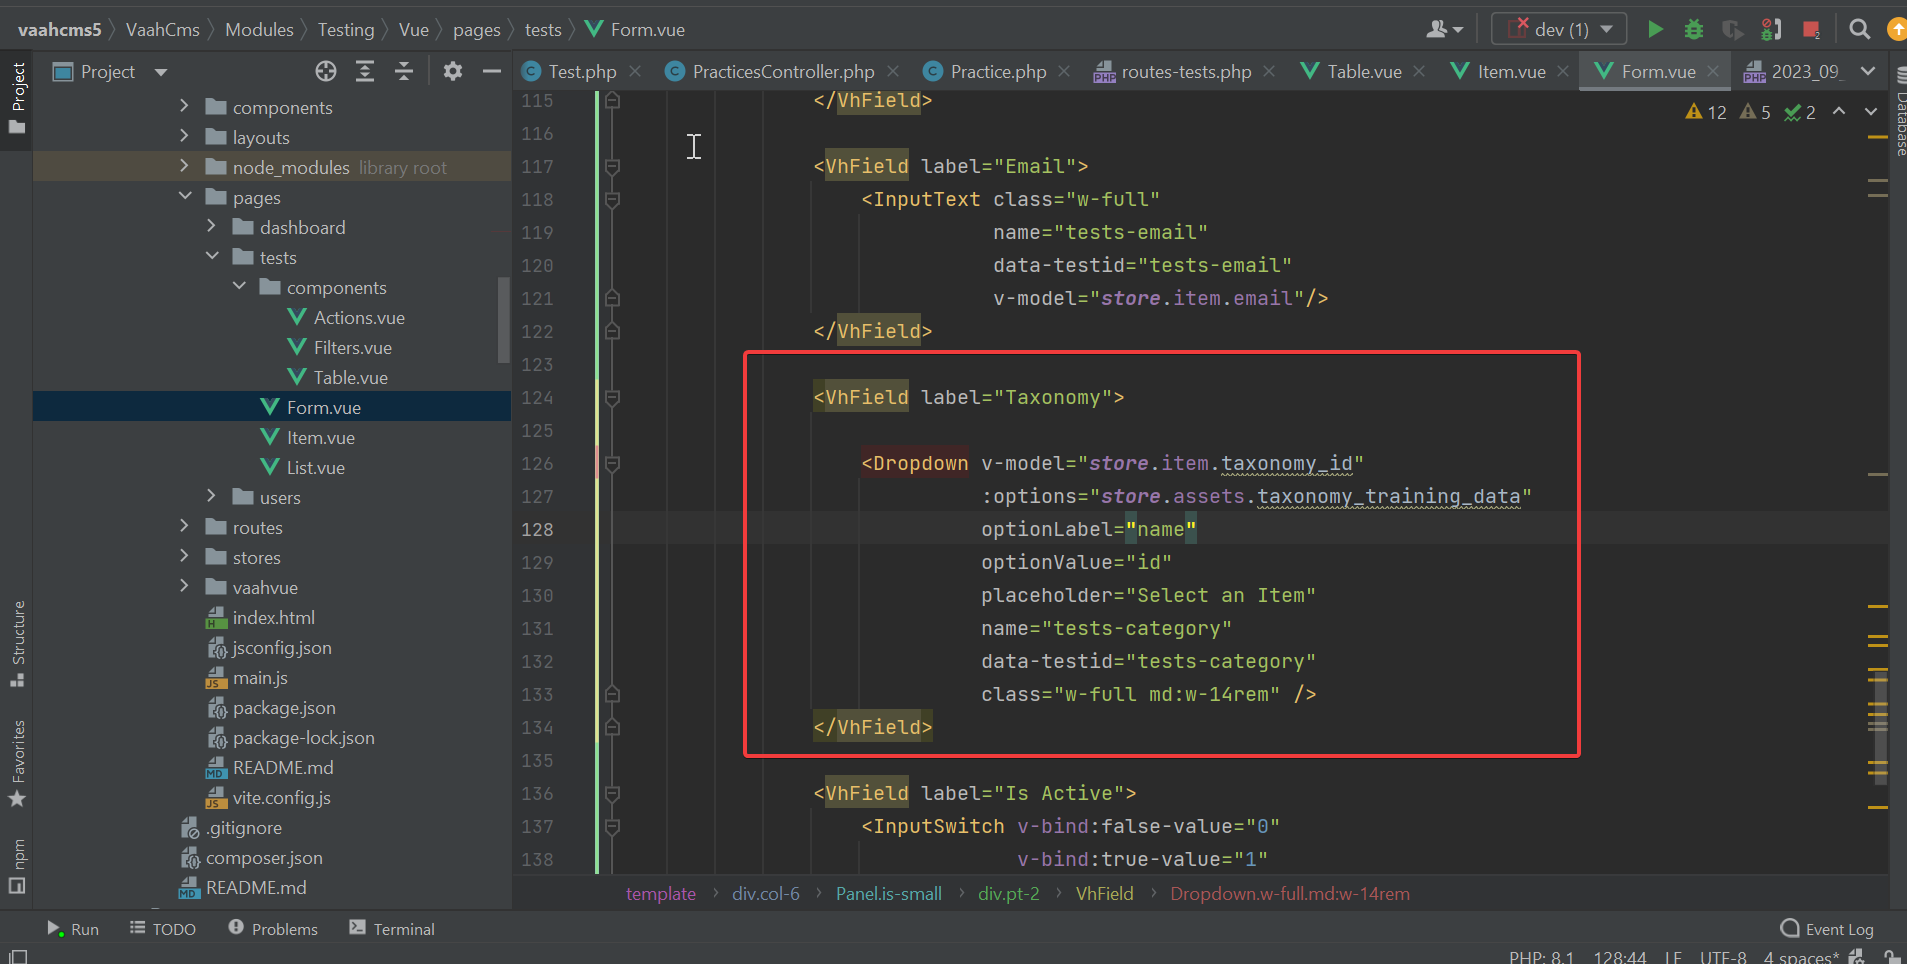
Now, you should insert the code for a dropdown menu into your form.vue file, following the format and structure depicted in the provided image.
This dropdown code will enable you to create a dropdown menu within your form, offering a selection of options for users to choose from when entering data.
NOTE
In this process, we are storing the ID of the selected taxonomy data. As mentioned earlier, just like adding the Email field, you also need to include a column in your migration file to accommodate the storage of these taxonomy data IDs.
This ensures that the system has a designated place to store the selected taxonomy information associated with each data entry.
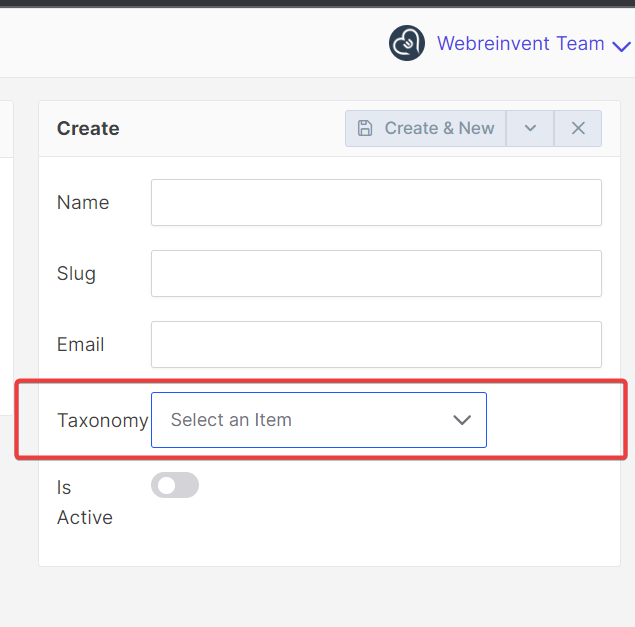
After successfully adding the dropdown column to your form.vue file as per the previous instructions,
your form's appearance and functionality will be transformed to resemble the image provided below.
This image serves as a visual representation of how the form now appears,
complete with the newly integrated dropdown menu, enhancing the user experience and data entry process
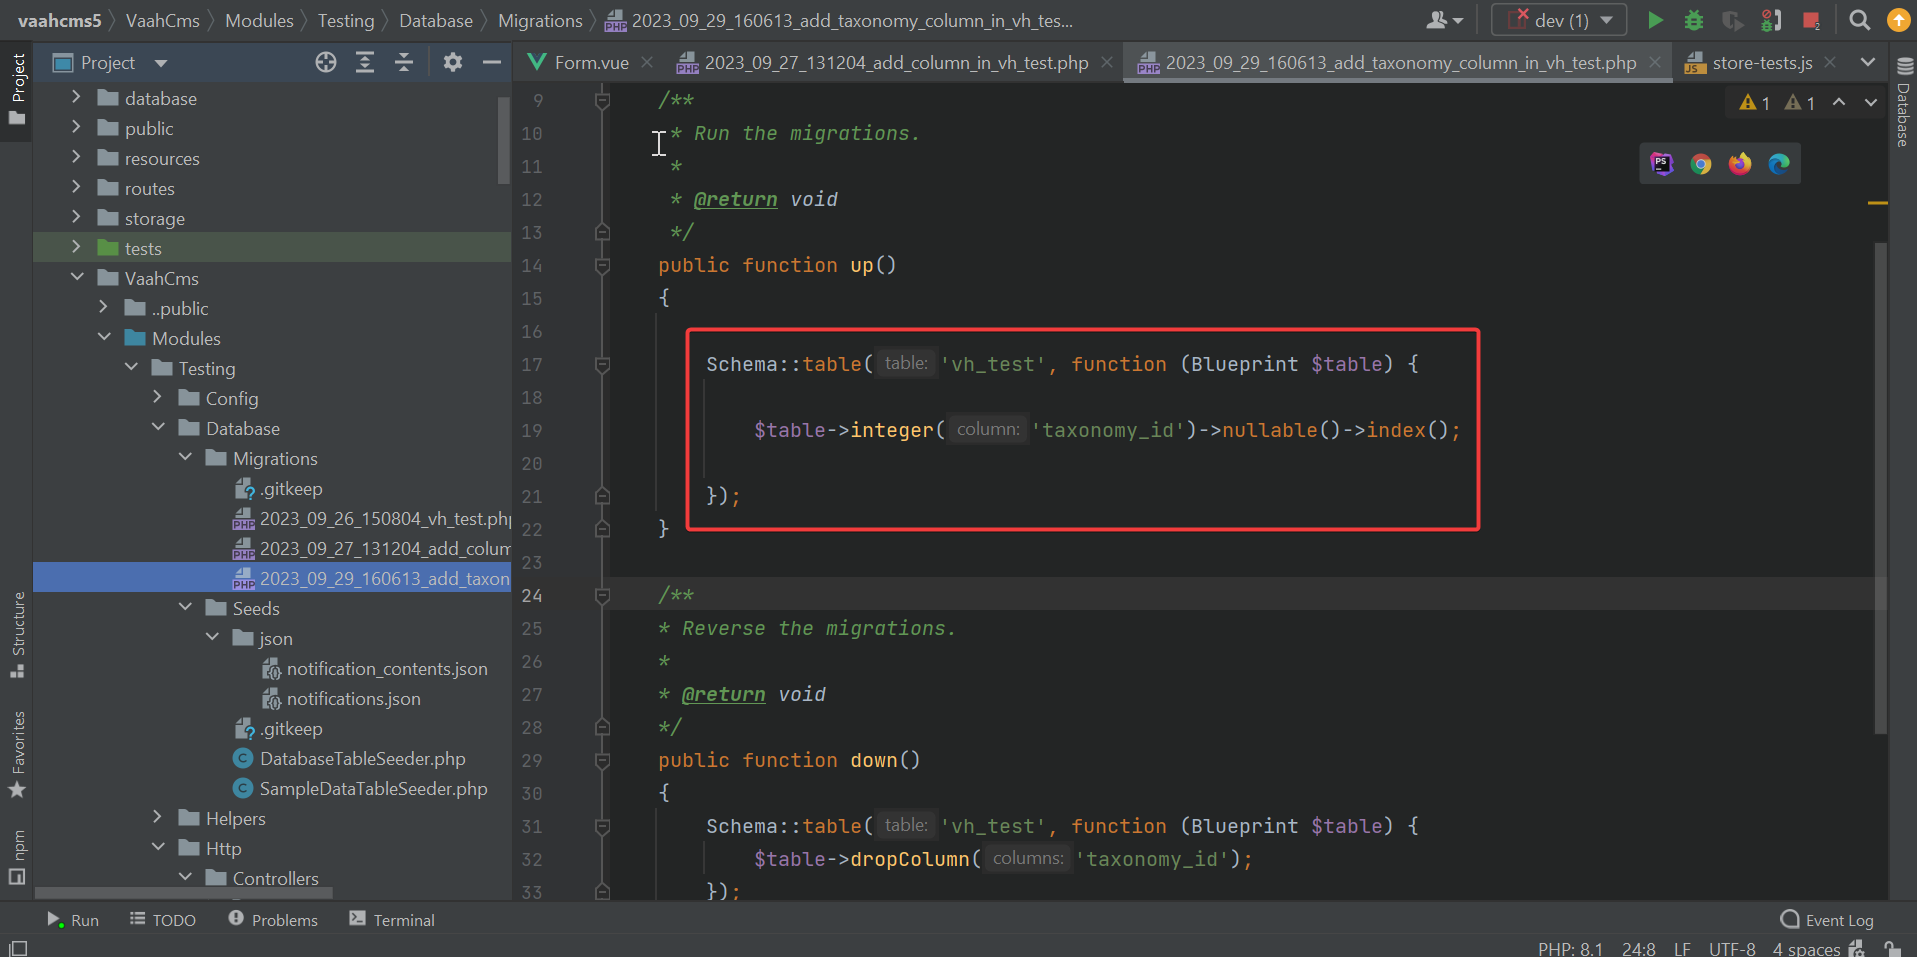
Add Taxonomy Column In Crud Migration
Similar to how we discussed adding the Email column in the migration earlier, you'll need to follow a similar process to create a new column for storing taxonomy data.
In this case, you should create a column with the name taxonomy_id in your database table.
This column will serve as the designated storage location for taxonomy data identifiers associated with each data entry.
After successfully adding the taxonomy_id column in the migration file, the next step is to declare this column as fillable within your model.
This ensures that the column can accept and store data. Additionally, don't forget to deactivate and then activate your module.
This action is essential to refresh the module's database schema and apply the recent changes,
including the addition of the taxonomy_id column, ensuring that the database is in sync with your module's configuration.

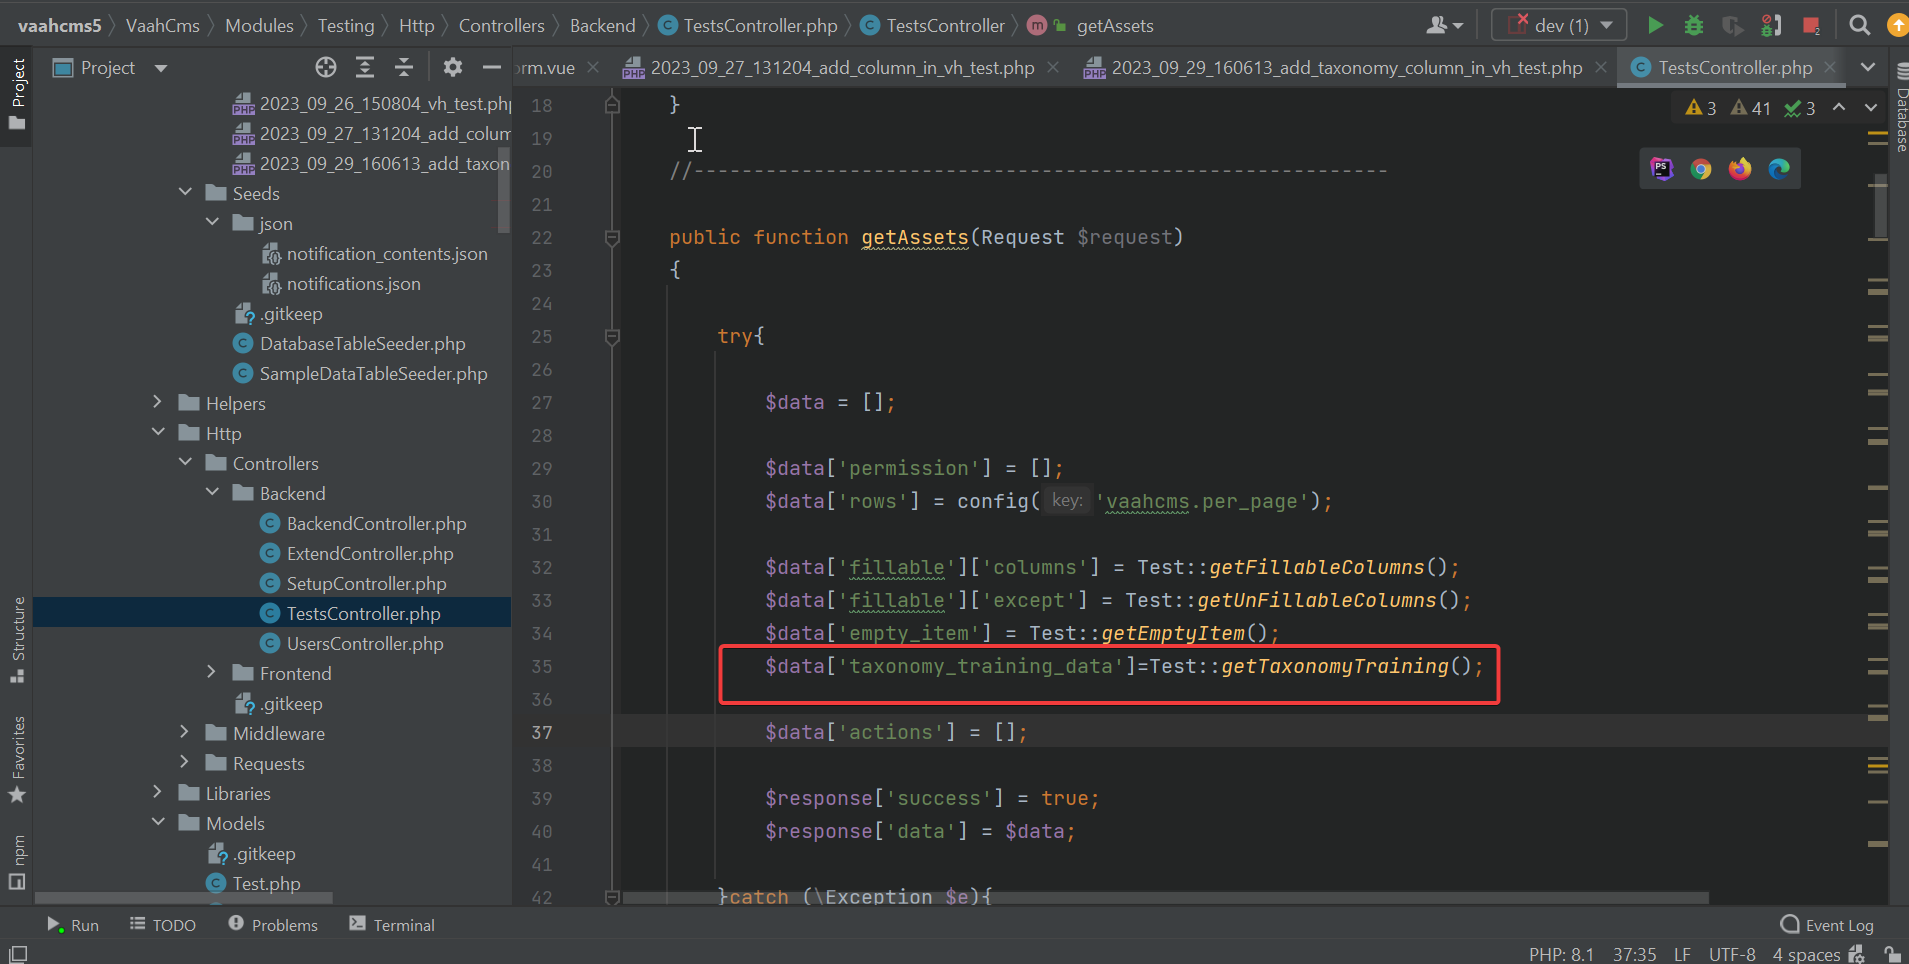
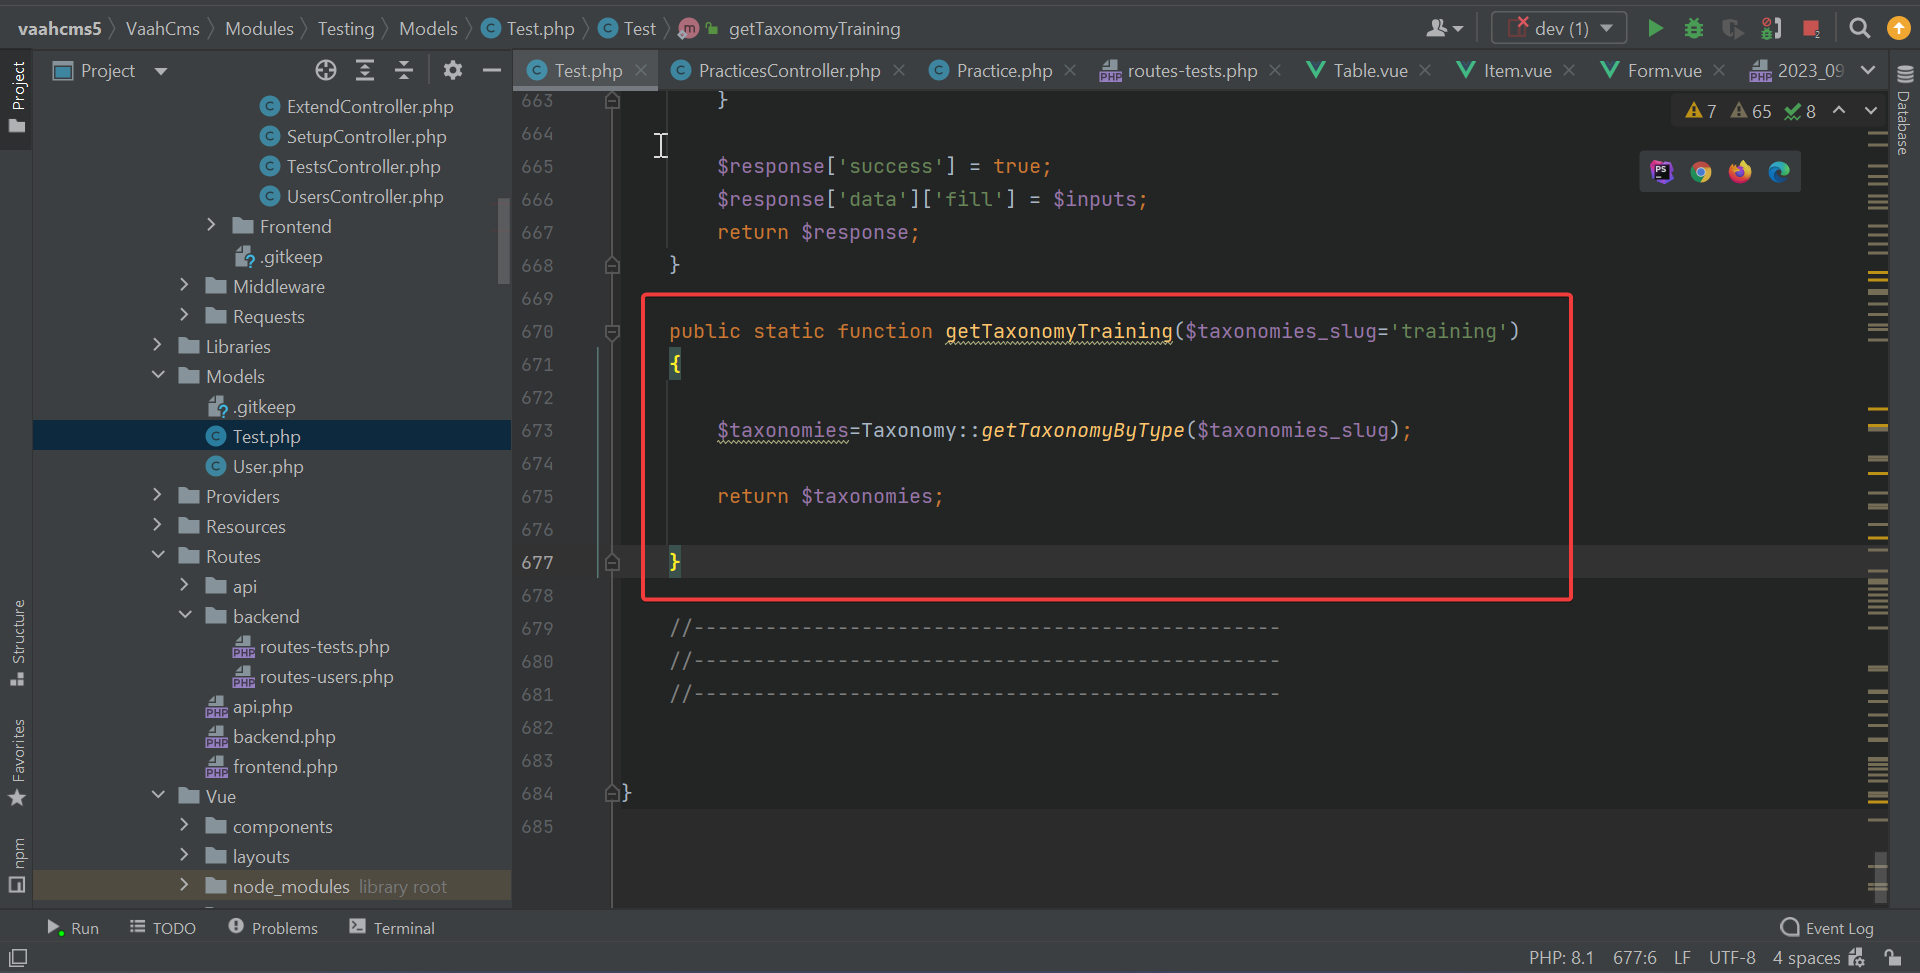
Get Taxonomy Data In Crud
In the provided code snippet, the retrieval of taxonomy data is managed by the getAssets function.
This function serves as a controller or handler for data requests related to a vaahcms crud component or functionality.
Within this function, various data components are prepared for a response, and one of these components is taxonomy data. This taxonomy data is retrieved using the Practice::getTaxonomyTraining() method.
In the associated model code, which is Practice, there is a static method getTaxonomyTraining defined.
This method is designed to accept a parameter, $taxonomies_slug, which can be used to specify a particular taxonomy by its slug.
The provided slug is used as a basis to query the database or data source for taxonomy data related to the specified slug.
This dynamic nature allows the function to fetch different taxonomy datasets depending on the slug provided when calling the method.
NOTE
Ensure that you create the taxonomies properly; otherwise, the data associated with those taxonomies will not appear in your designated column.
In other words, if you don't define and set up the taxonomies correctly, the data you expect to see in a specific column won't be displayed as intended.
when the getAssets function calls Practice::getTaxonomyTraining(), it can send a specific slug as an argument.
The model code then uses this slug to identify and retrieve the relevant taxonomy data.
This flexibility allows for the retrieval of taxonomy data tailored to the specific needs of the vaahcms crud component or any other part of the application.
This describes the visual representation of taxonomy data within your CRUD form dropdown.
It outlines how the taxonomy data will be presented or displayed in the dropdown menu of your form.
In the same way that we displayed the email field in the table above, we are aiming to showcase the taxonomies data within the table.
We intend to utilize a similar approach to how the email field was presented, but this time, we'll apply it to display the taxonomies data.
We will use the email field as a reference point or template to determine how the taxonomies data should be structured and displayed within the table. you can take the reference click here
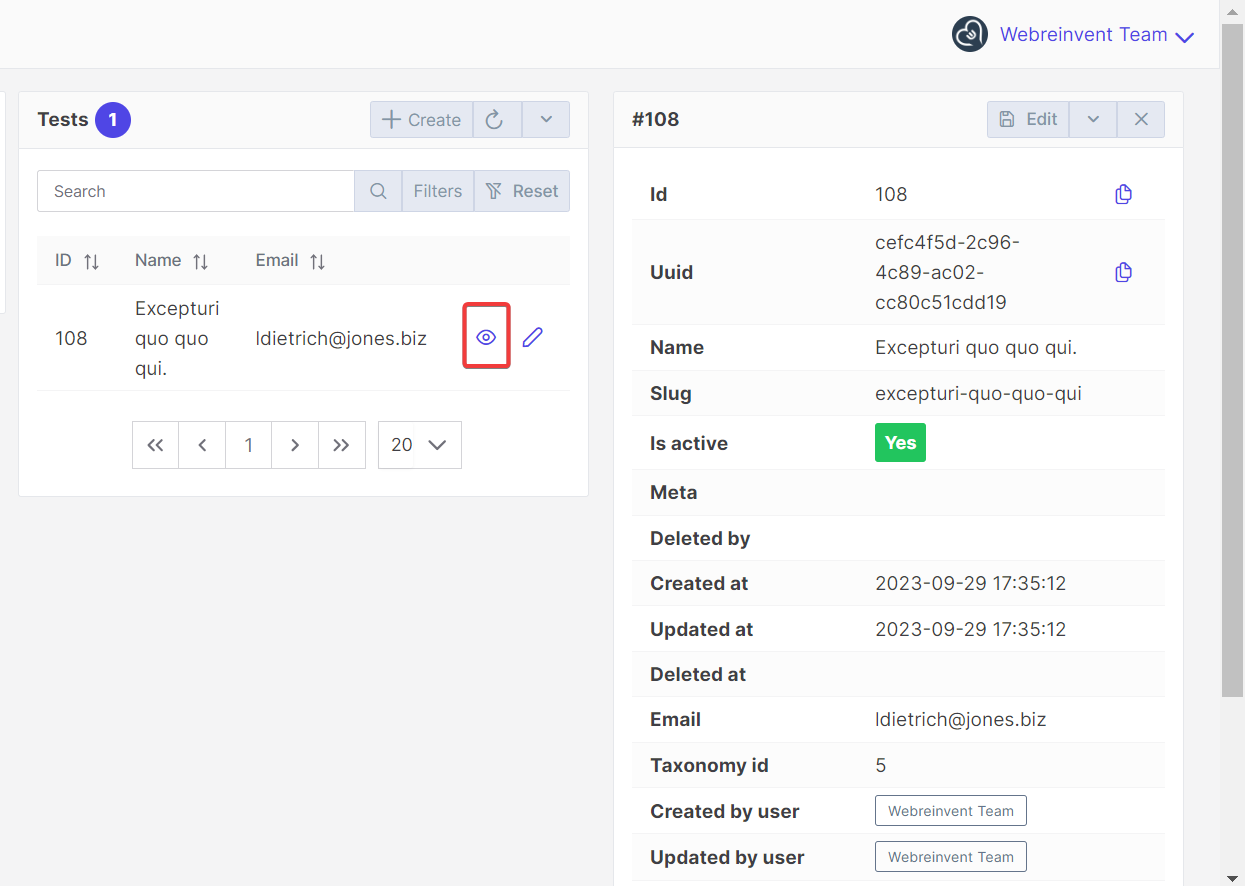
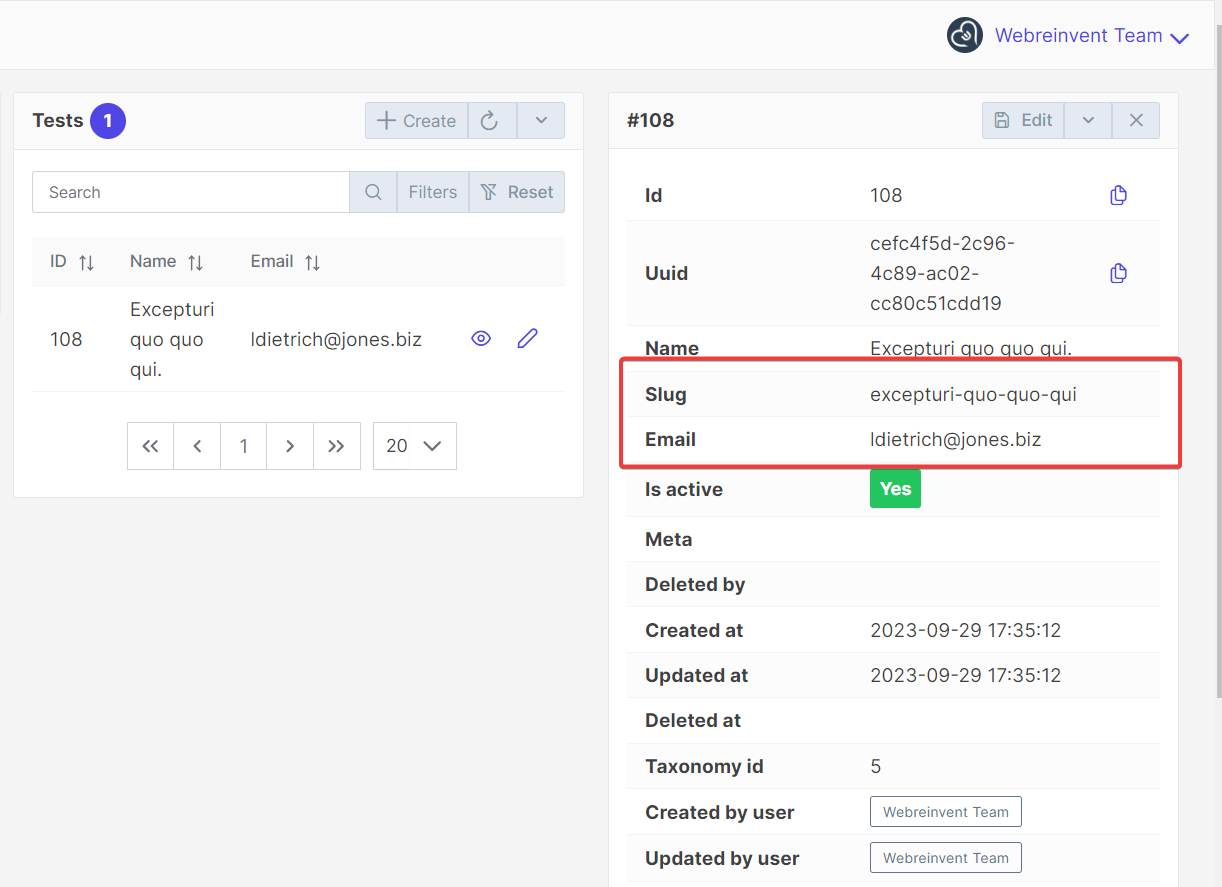
Change The Order of the View
When you click on the view button for a specific data entry, the default behavior is to display the columns of that data in a certain order.
However, it's important to note that you have the flexibility to customize and change the order of these columns.
For example, you can rearrange the display so that the email column appears after the slug column in the detailed view of the data.
This means you can adjust the sequence in which the data fields are presented to best suit your preferences or requirements.
The default arrangement of columns that you see when you click on the view button is as depicted in the image below.
This means that the columns are initially ordered and displayed in a specific way as shown in the image.
Changes In Item.vue File
The image you're viewing represents the item.vue file, which is responsible for rendering the data columns.
To change the order in which the columns are displayed, you need to make modifications to the code within this item.vue file.
By altering this code, you can adjust the rendering logic to reorder the columns as desired.
Specifically, you want to rearrange the code so that the email column is displayed after the slug column,
allowing you to control the sequence in which these data fields appear.

you have the ability to specify the order in which you want to display columns by adding or arranging them within this code block. This code is primarily responsible for determining which fields are visible in the item view.
If you don't want to display the Email field by default, and instead, you want to change the order in which Email is shown, you can make adjustments here
<template v-if="column === 'created_by' || column === 'updated_by' || column ==='email'">
                        </template>
As a result of the modifications and adjustments made previously, the email field is no longer visible when viewing the card or item.
Instead, we have reconfigured the rendering of the email field to align with our desired order.
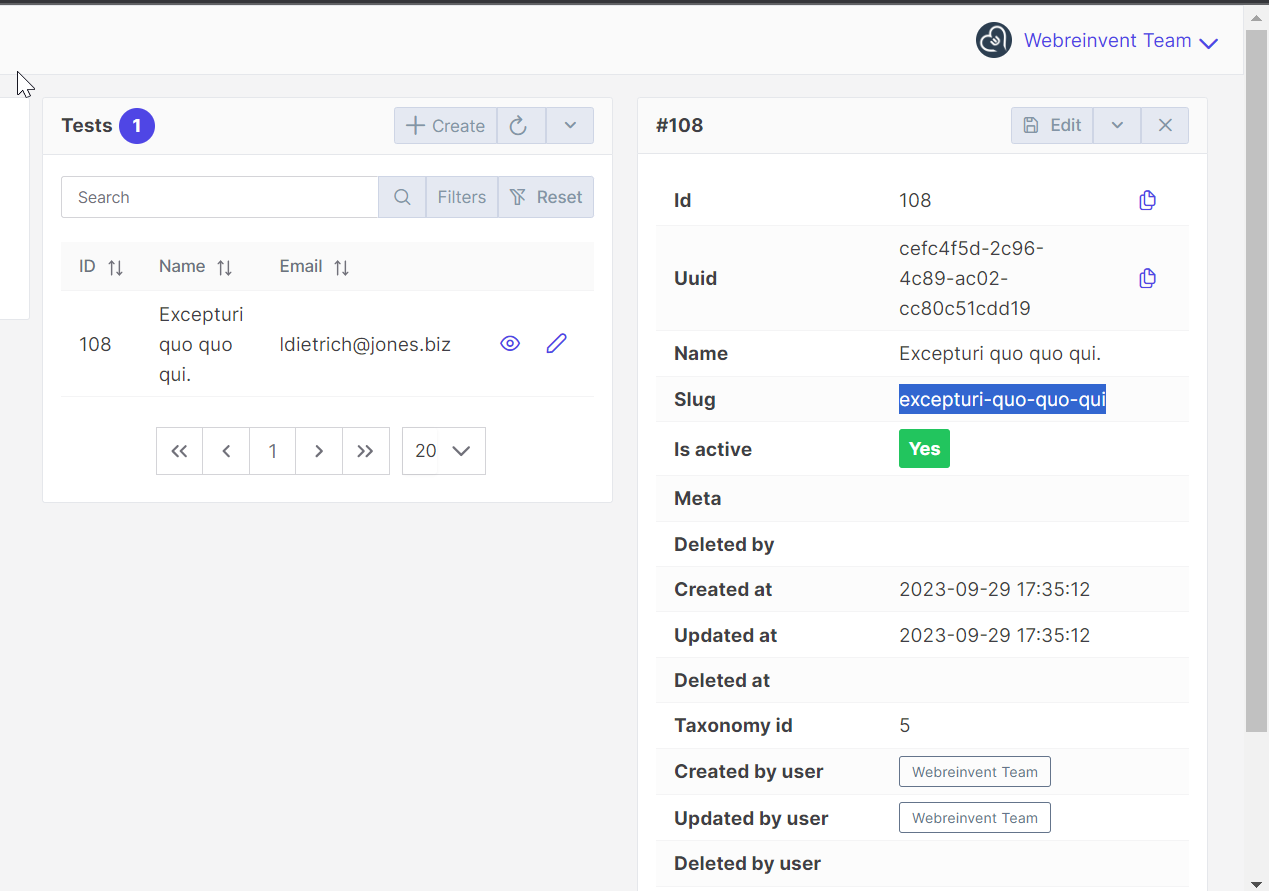
In essence, this step is the last action required to achieve the desired order of data display within the item view.
Once you incorporate this code into your item.vue file, the email field will be presented in the specified order,
ensuring that it appears after the slug field when viewing the item or card.
<template v-else-if="column === 'slug'">
                            <VhViewRow :label="column"
                                       :value="value"
                                       type="slug"
                            />
                            <VhViewRow label="Email"
                                       :value=store.item.email
                                       type="email"
                            />
                        </template>
These changes were implemented to customize the order in which data fields are rendered,
and the result aligns with the desired sequence of displaying the Email field after the slug field in the item view.
Comprehensive Guide
Understanding Code Flow for Adding New Features in a CRUD Application
When adding a new feature to a CRUD (Create, Read, Update, Delete) application like VaahCMS, it's essential to understand the code flow to effectively integrate the new functionality. Here's a step-by-step approach to help you study and comprehend the code flow of CRUD operations:
1. Identify the Feature Scope:
- Clearly define the scope and requirements of the new feature you want to add. Understand what data it will manipulate and how it will be presented in the application.
2. Examine the Database Schema:
- Review the database schema to understand how the data related to your feature is stored. Identify the tables and relationships involved.
3. Controller and Routes:
- Check the routes and controllers associated with CRUD operations. Typically, there will be routes defined in the
routes/backend/routes-file-name.phporroutes/bakcend.phpfile that correspond to CRUD actions. - Examine the controller responsible for handling these actions. Look for methods like
index,create,store,edit,update, anddestroy.
4. Model:
- Investigate the model associated with the data. The model file defines the structure of the data and often contains methods for data retrieval, validation, and manipulation.
- Examine any relationships defined in the model, such as one-to-many or many-to-many relationships with other models.
5. Views:
- Study the views used for displaying data, forms for data creation and editing, and any templates related to your feature.
- Understand how data is rendered in Vue components or other view engines.
6. CRUD Operations:
- Pay particular attention to how CRUD operations are implemented. For example, how data is fetched from the database (
read), how new data is created (store), how existing data is updated (update), and how data is deleted (destroy). - Examine validation logic to ensure that data meets specific criteria before being stored or updated.
7. Middleware and Authorization:
- Check if there are middleware or authorization rules in place for the CRUD operations. Understand who has permission to perform each action.
8. Form Validation:
- Explore how form validation is handled, including validation rules and error handling.
9. Network Requests:
- Use your browser's developer tools or an API testing tool like Postman to inspect network requests made when performing CRUD actions. This will help you understand how data is transmitted between the client and server.
10. Database Queries:
- Analyze the database queries generated by your CRUD operations. This can help you understand how data is retrieved and stored in the database.
11. Testing:
- If possible, run tests related to the CRUD feature. This will give you insights into how the feature is expected to behave under various scenarios.
12. Logging and Debugging:
- Utilize logging and debugging tools to trace the flow of code and understand how data is processed at each step.
13. Documentation:
- Refer to any documentation or comments within the codebase to gain additional insights into the implementation details.
By following these steps, you'll gain a comprehensive understanding of the code flow for CRUD operations in VaahCMS, which will enable you to add new features more effectively while maintaining consistency with the existing codebase.