Basics of Product in VaahStore
What is Product?
In the context of VaahStore, a Product refers to an item that is available for sale. It can be any physical or digital item that customers can purchase.
Purpose
The purpose of creating a Product in VaahStore is to cater to the diverse preferences, needs, and requirements of consumers. By offering a wide range of Products, businesses can enhance customer satisfaction and expand their market reach.
Creating Products in VaahStore allows businesses to provide a diverse range of options to their customers. Whether it's physical or digital items, customers can easily browse and purchase the Products they need.
Having a variety of Products also ensures that there is something for everyone. Different customers have different preferences, and by offering a wide selection of Products, businesses can attract a larger customer base and increase sales.
Create
How to create a Product?
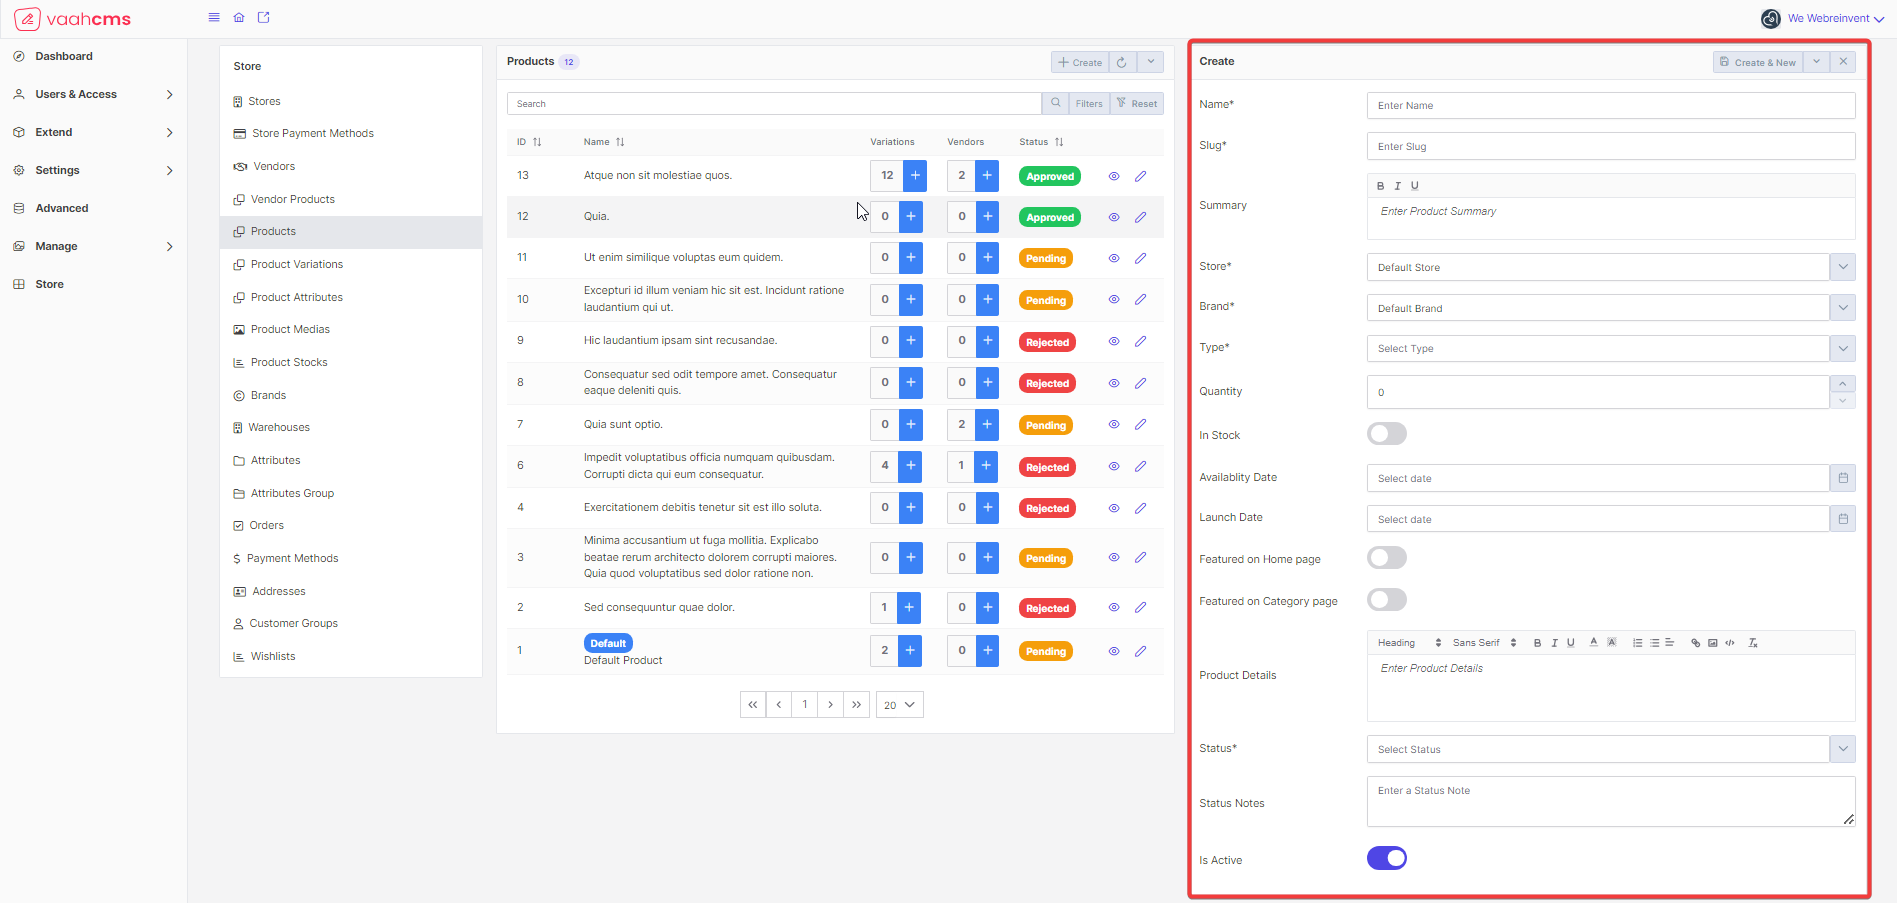
After activating VaahStore, to create a product go into VaahCMS > Store > Products then click on create button. A form to create product will open.
Follow the below image for reference :
Requirements to create a Product
| Fields | Descriptions | |
|---|---|---|
| Name | This will contain name of the product. | |
| Slug | This will contain slug of the product,it will be autogenerated when you enter the product name. | |
| Summary | This will contain summary of the product, although it is optional field. | |
| Store | Here choose Store for your product. | |
| Brand | Here choose the brand of your product | |
| Type | Select the type of your product | |
| Quantity | Here provide the quantity of the product that you are going to create, by default it will be set to 0 | |
| In Stock | Indicate that the product is in stock or not, this will automatically be enabled if product quantity is available. | |
| Availablity Date | Select the date from which, your product will be available for purchase | |
| Launch Date | Select the launch date of your product | |
| Featured on Home Page | Here enable this field, if product is going to be featured on home page | |
| Featured on Category Page | Here enable this field if product is going to be featured on category page | |
| Product Details | Here describe about your product in detail. | |
| Status | Here choose the status of your product. | |
| Seo Title | Here provide the seo title for your product,although this is optional field | |
| Seo Description | Here provide the description about seo for your product, although this is optional field. | |
| Seo Keywords | Here provide the keywords for your seo, although this field is optional field. | |
| Status Notes | Notes are to describe your decision for any status. | |
| Is Active | This is to Activate or Deactivate your product, by default it will be set to active. |
Fill the fields with valid values and click on Create & New button present at the top right corner of your screen,
You will get the message Product created successfully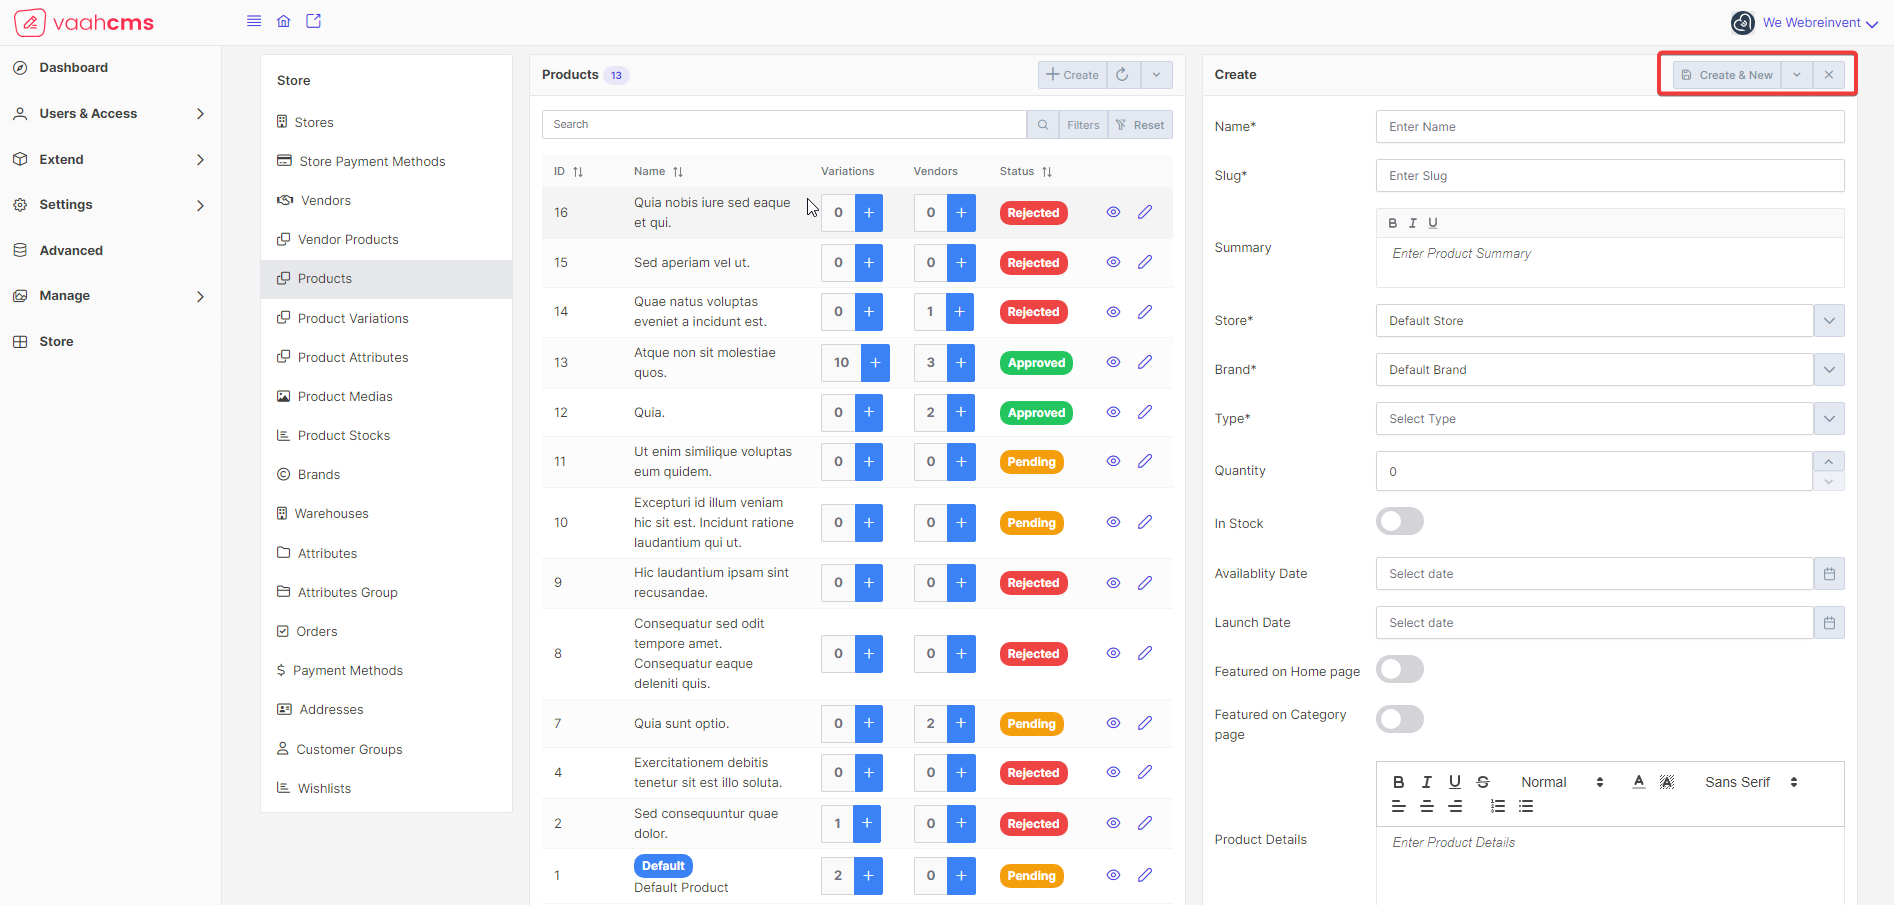
Various buttons and their usage in Create Product form
Create & Close: It will create the product and redirect you to the list page ofProductscrudCreate & Clone: It will create the product and clone all the details of the particular product into a new formReset: It will reset all the values prefilled by the user in every fields of the formFill: It will fill every fields of the form with valid values
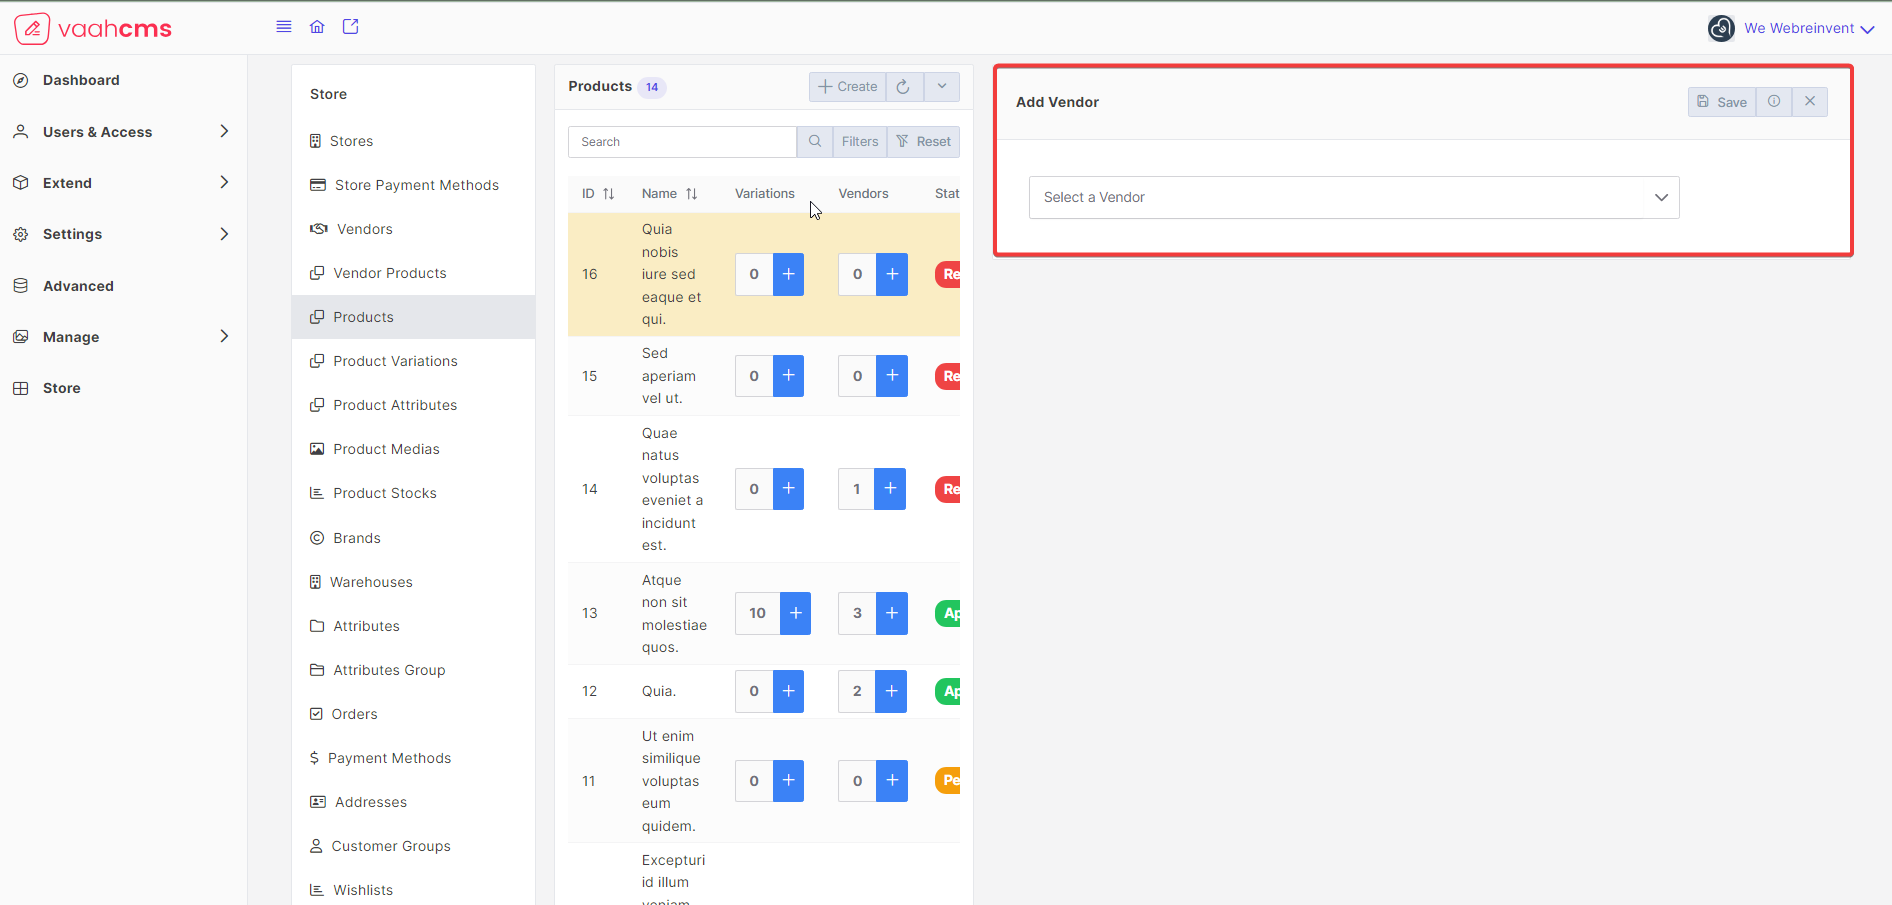
Add Vendors to product
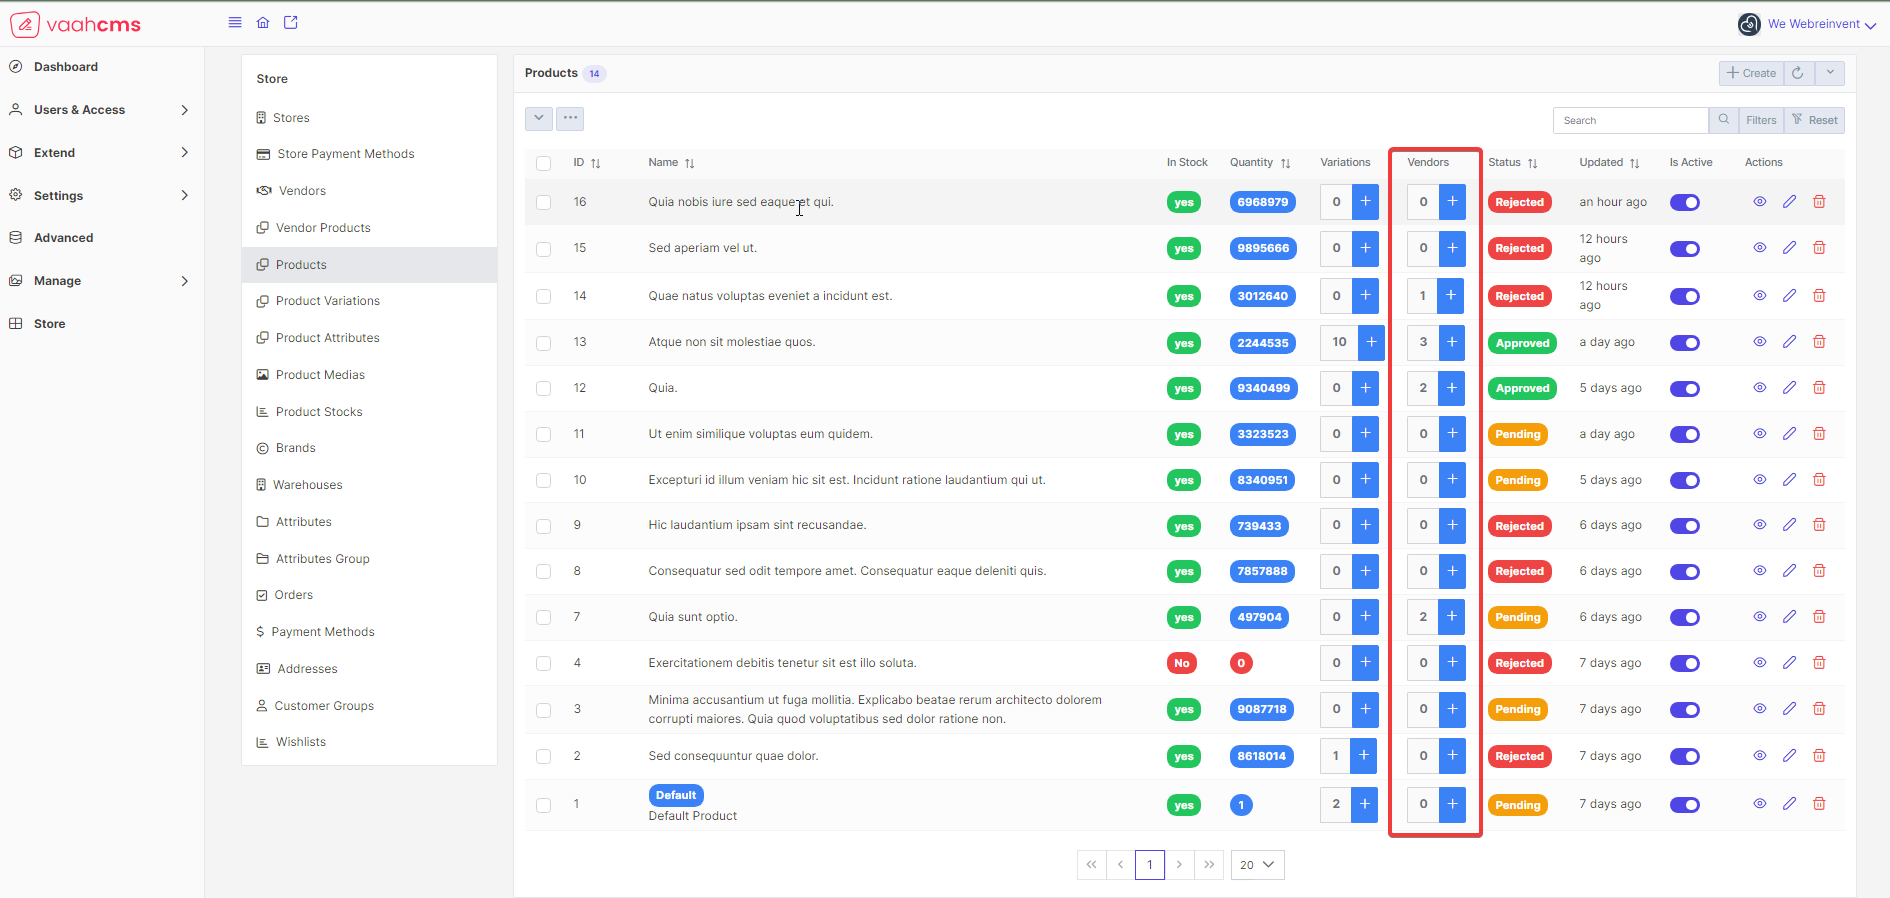
After creating a product, to add vendors directly to product look into the table where all the listing of product is coming.
Over there under the Vendors column you will find the total count of vendors to that particular product along with an option + to add new vendor, just click on that.
Follow the below image for reference:
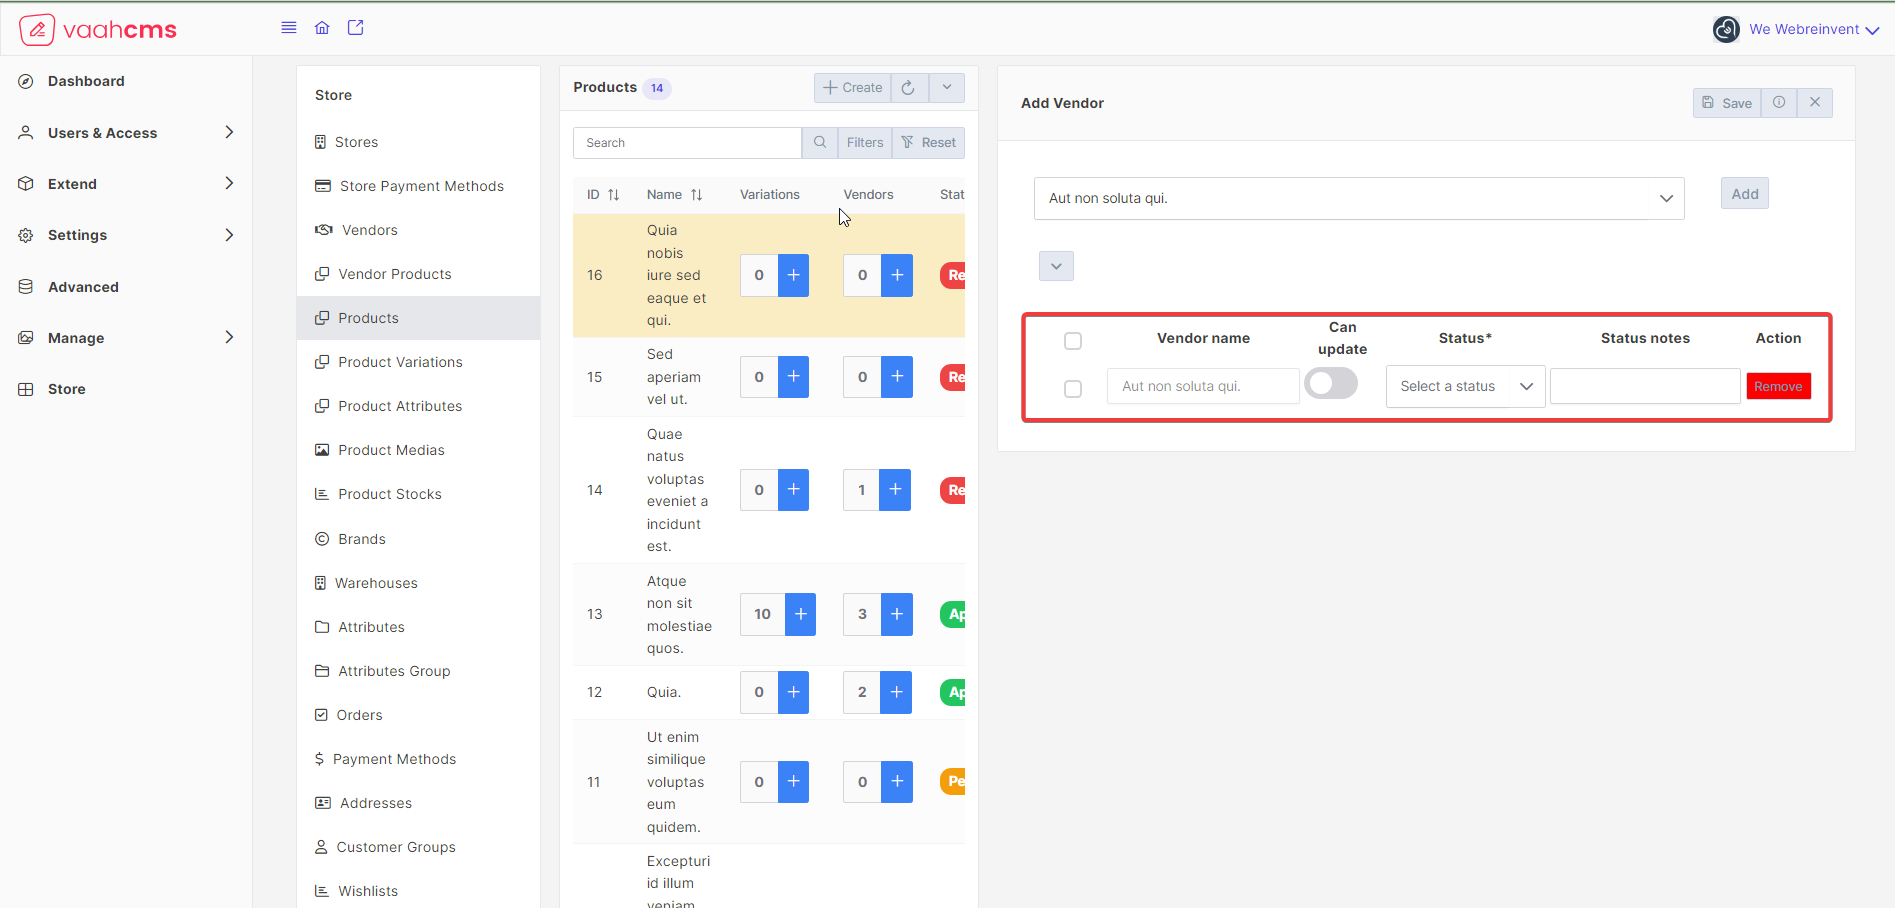
After that a Add Vendor page will open, inside the Add Vendor page there is a dropdown to select and add vendor.
Follow the below image for reference:
When you click on Add button, that particular vendor will come in the table format along with the columns as
Vendors Name,Can update, Status, Status notes, Action
Follow the below image for reference:
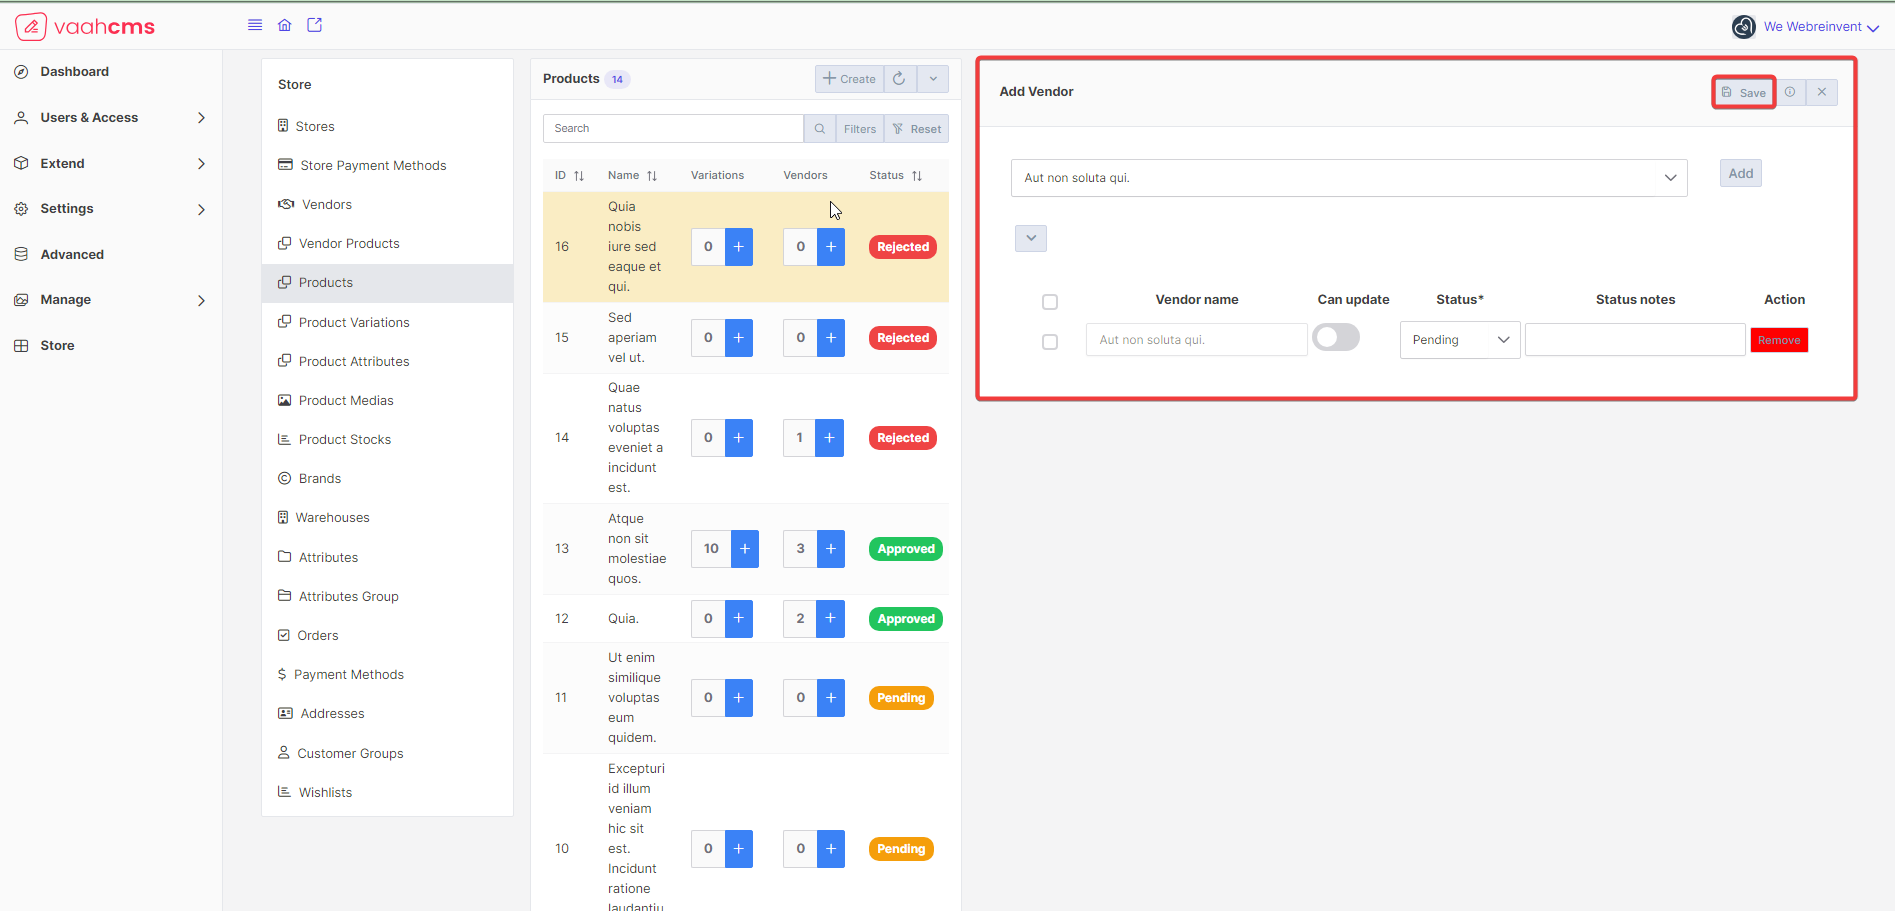
Here Status field is mandatory, choose the option from the dropdown and click on the Save button present at the
top right corner of the Product page. Just click on that you will get the message vendor added successfully
and you will be redirected to the list page of Product page.
Follow the below image for reference:
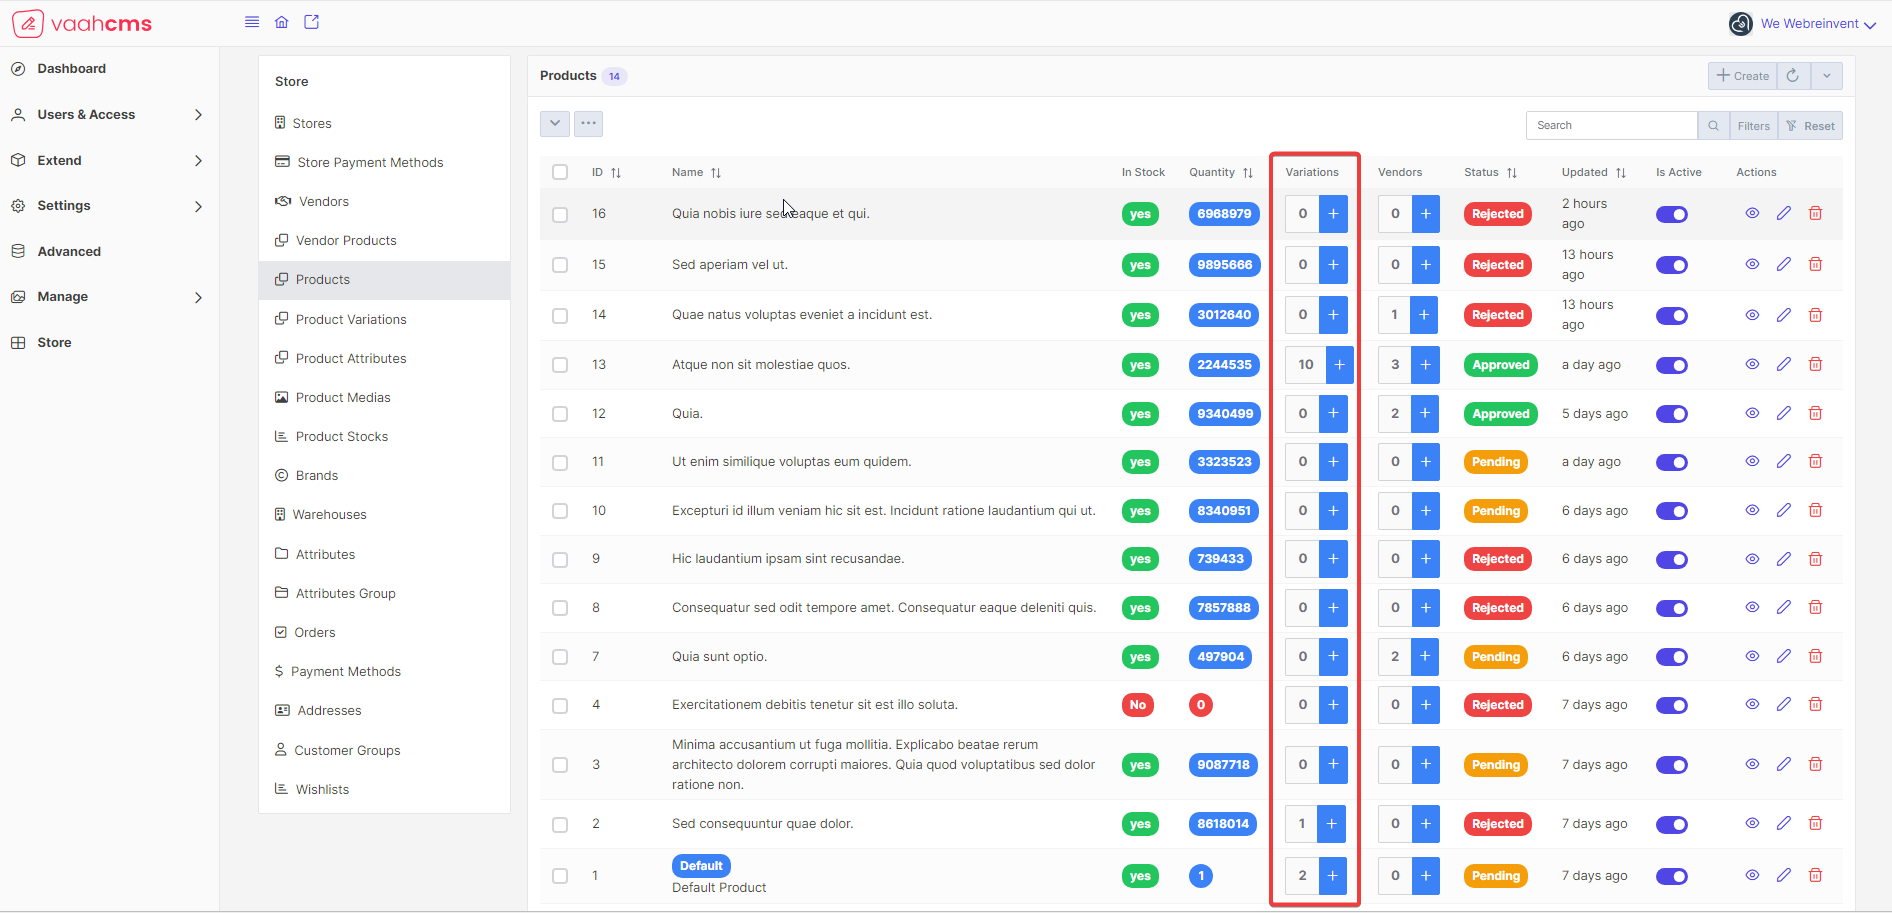
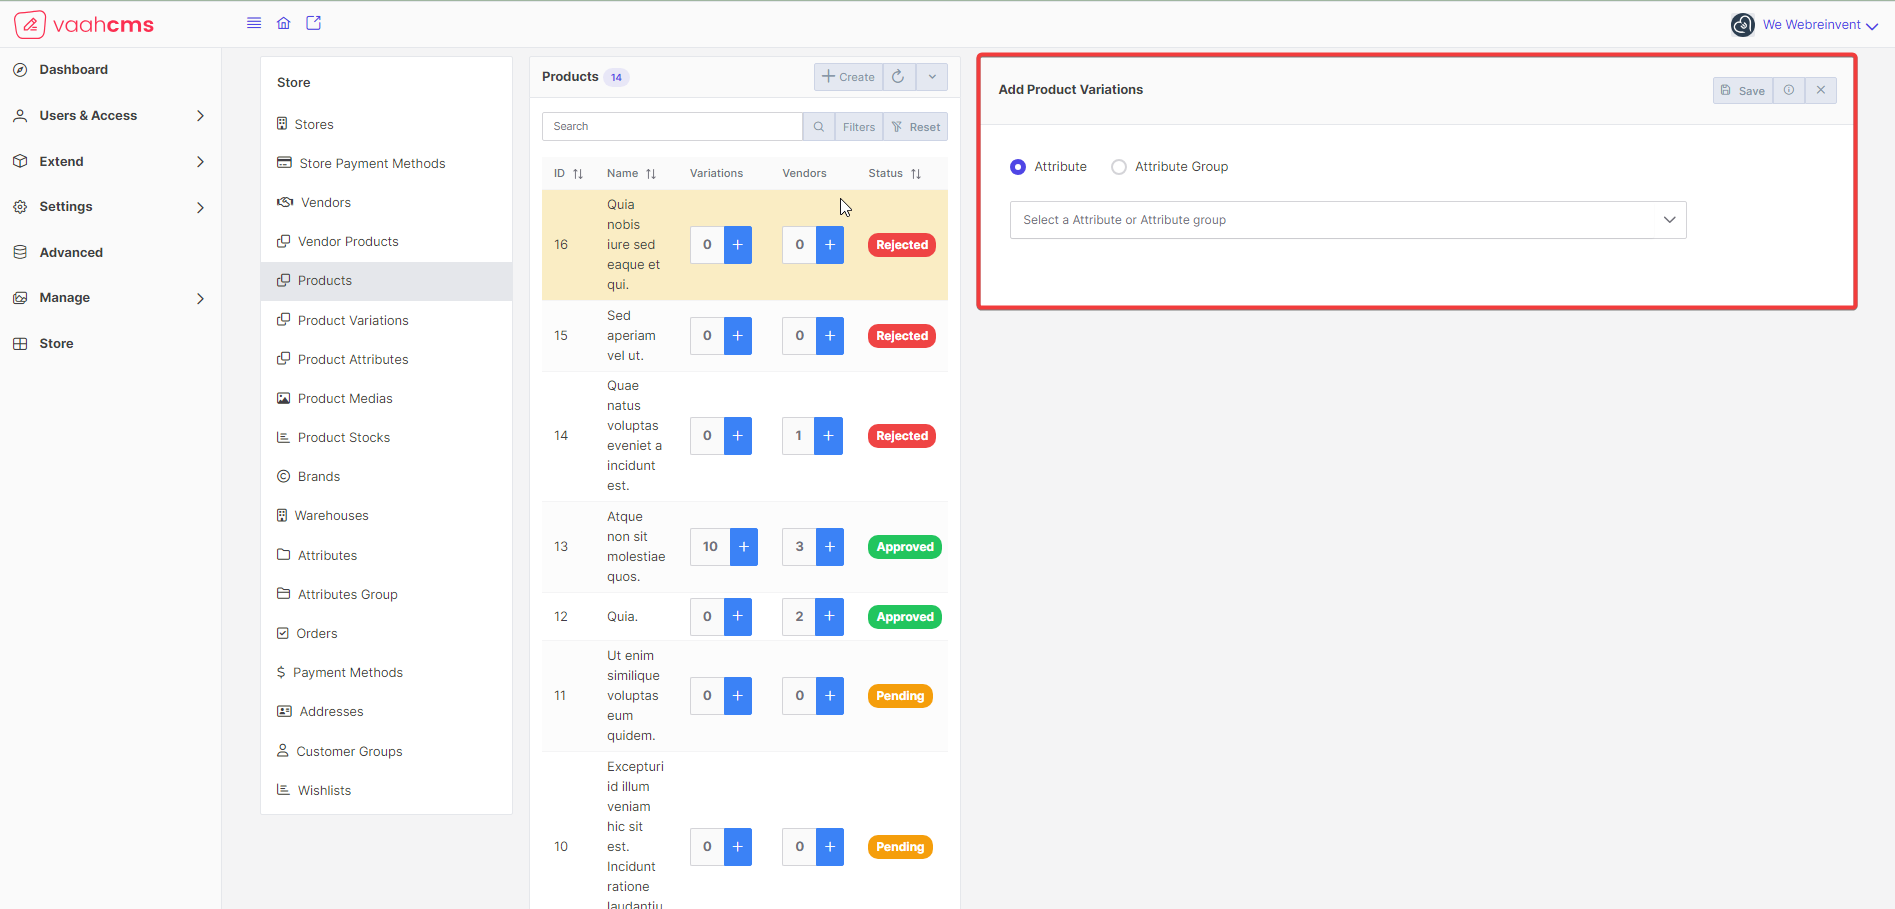
Add Variations to product
After creating a product, to add variations directly to a product look into the table where all the listing of product
is coming. Over there under the Variations column you will find the total count of Variations to that particular
product along with an option + to add new variation, just click on that.
Follow the below image for reference:
After that a Add Product Variations page will open, inside the Add Product Variations page there are two radio buttons 1. Attribute 2. Attribute Group . The values in the dropdown will be dependent on the radiobutton selected
Follow the below image for reference:
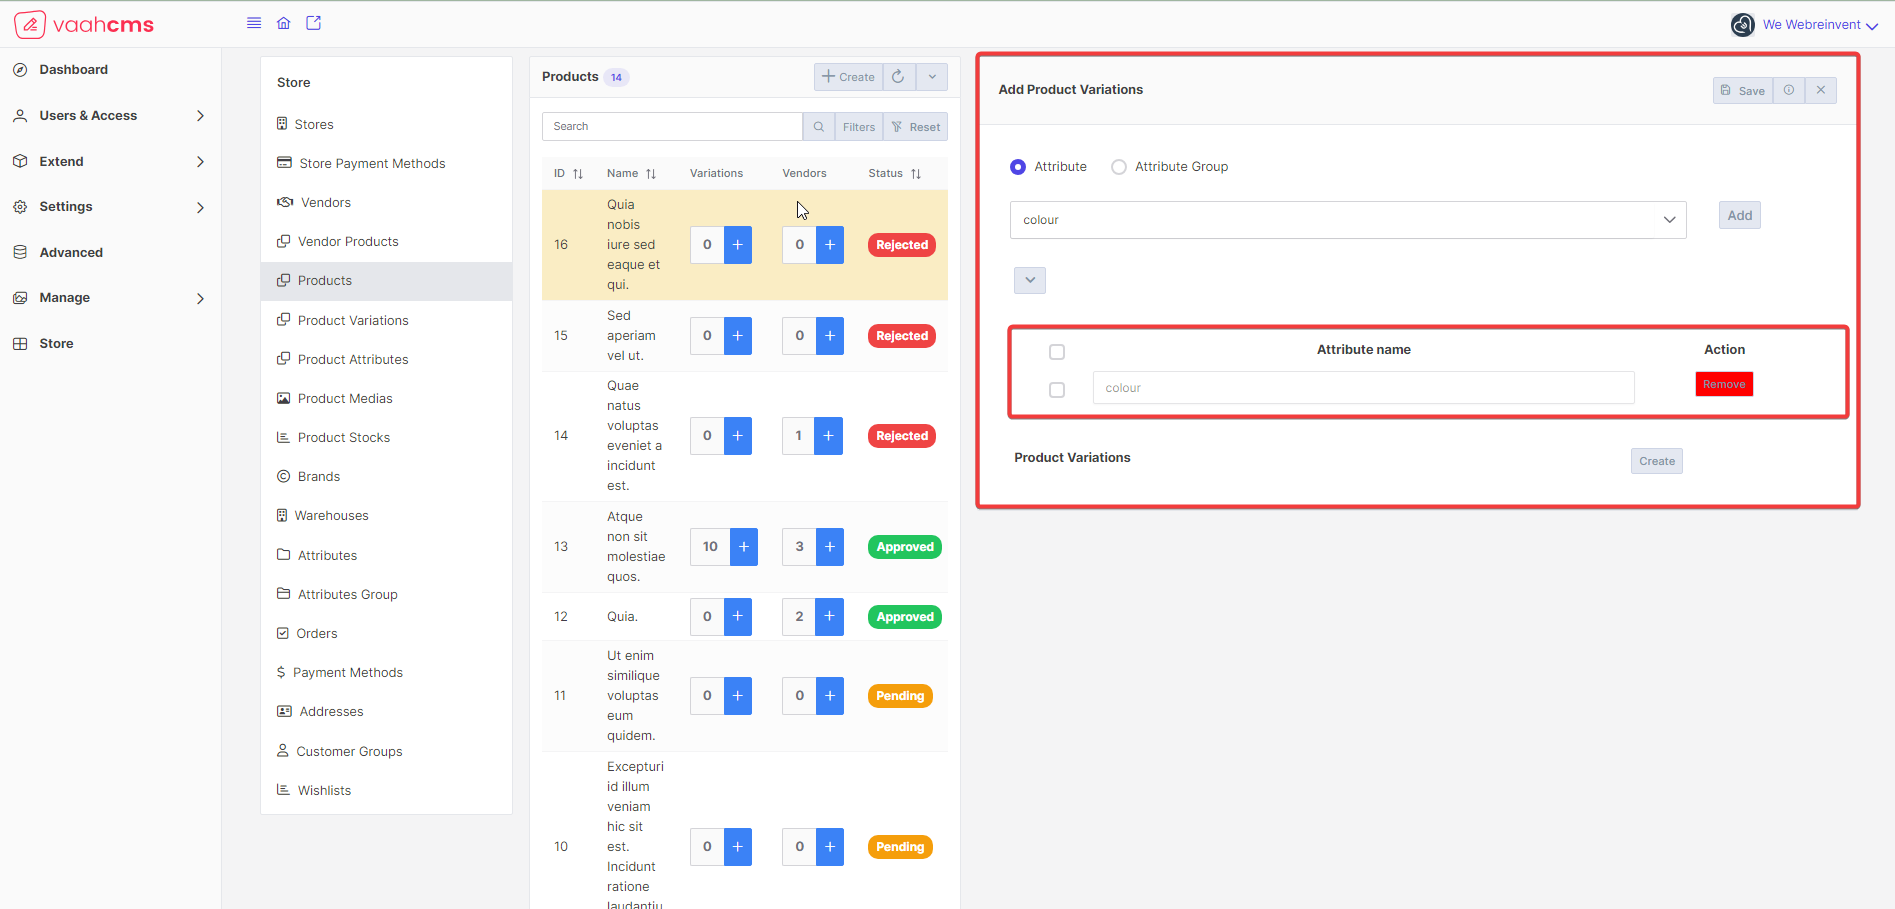
When you select a value in the dropdown, add button will be present to the next of dropdown just click on that button. Added attribute will be shown in the form of tables with the columns as Attribute name, and with a remove button.
You can remove a attribute from the list using that.
Follow the below image for reference:
 A
A create button will be present to the bottom of list of attributes, when you click on create button all variations of that particular product will be present in front of you in the tabular format.
Follow the below image for the reference:
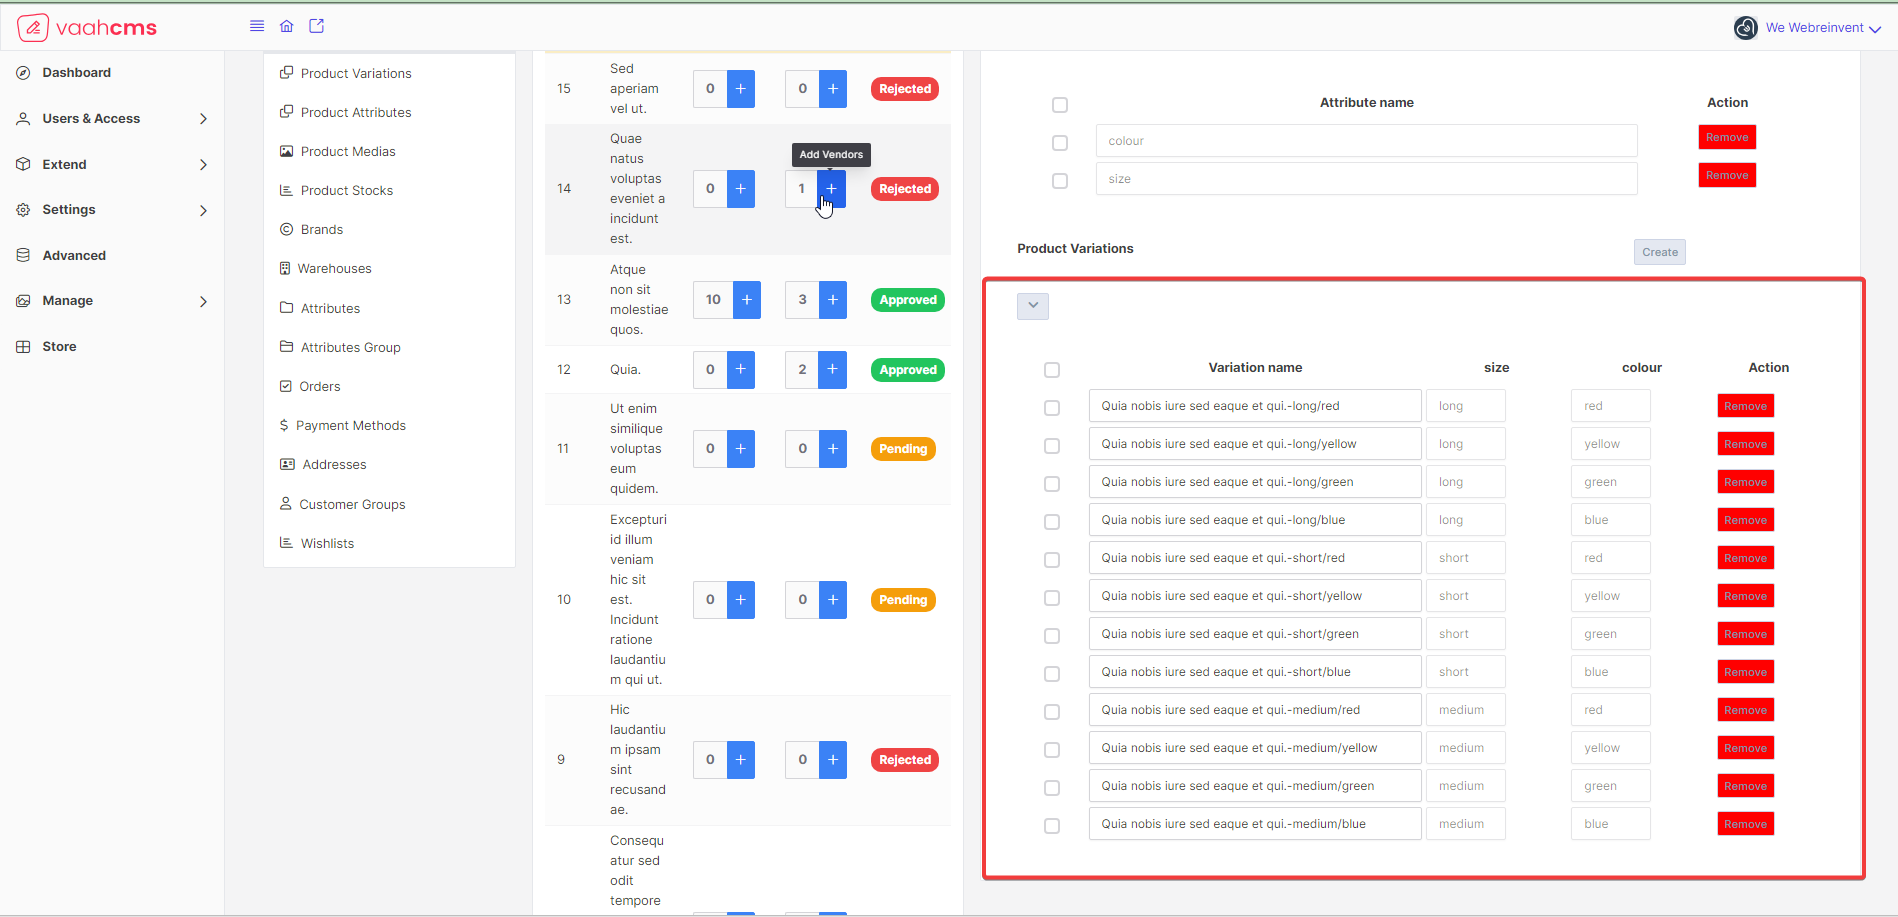
From the list of Product Variations, you will have the option to remove the variation from the list by clicking on remove button present under the Action column or bulk menu present there.
Follow the below image for the reference:
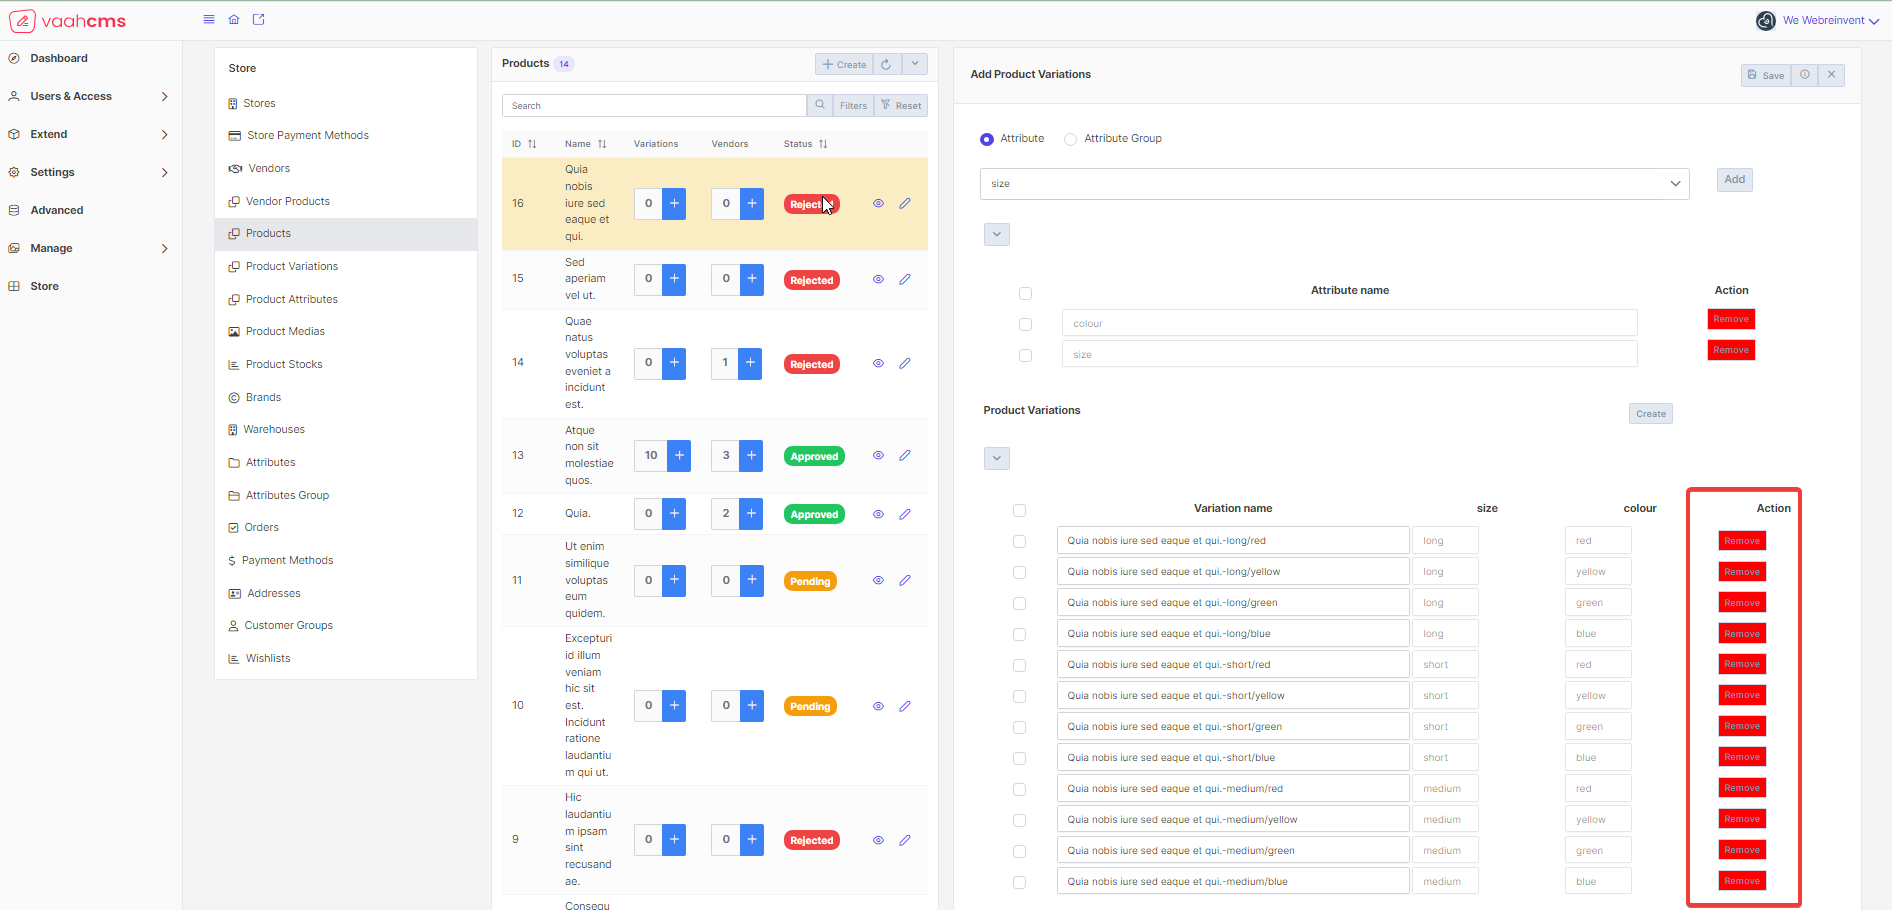
In the end, you just need to click on Save button present at the top, you will get the message Variation added successfully and will be redirected to the list page of Product
Follow the below image for reference:
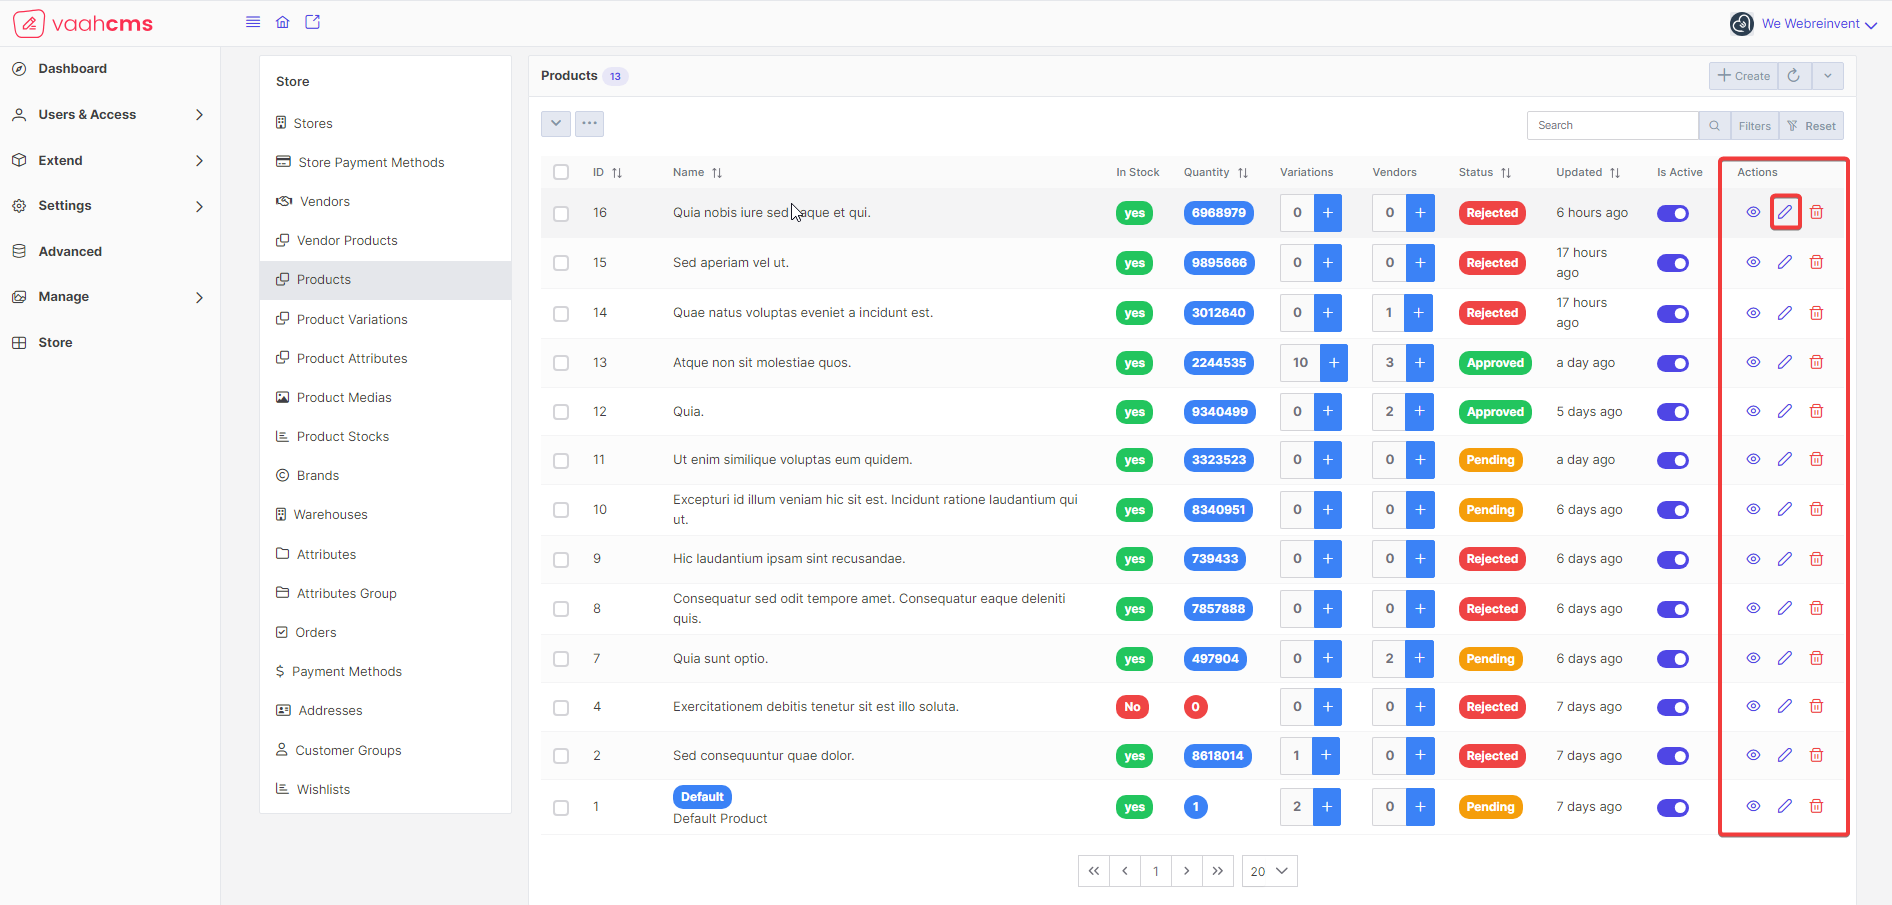
Update a Product
To update a existing product, you need to click on pencil icon present under the Actions column on the list page of Product
Follow the below image for reference:
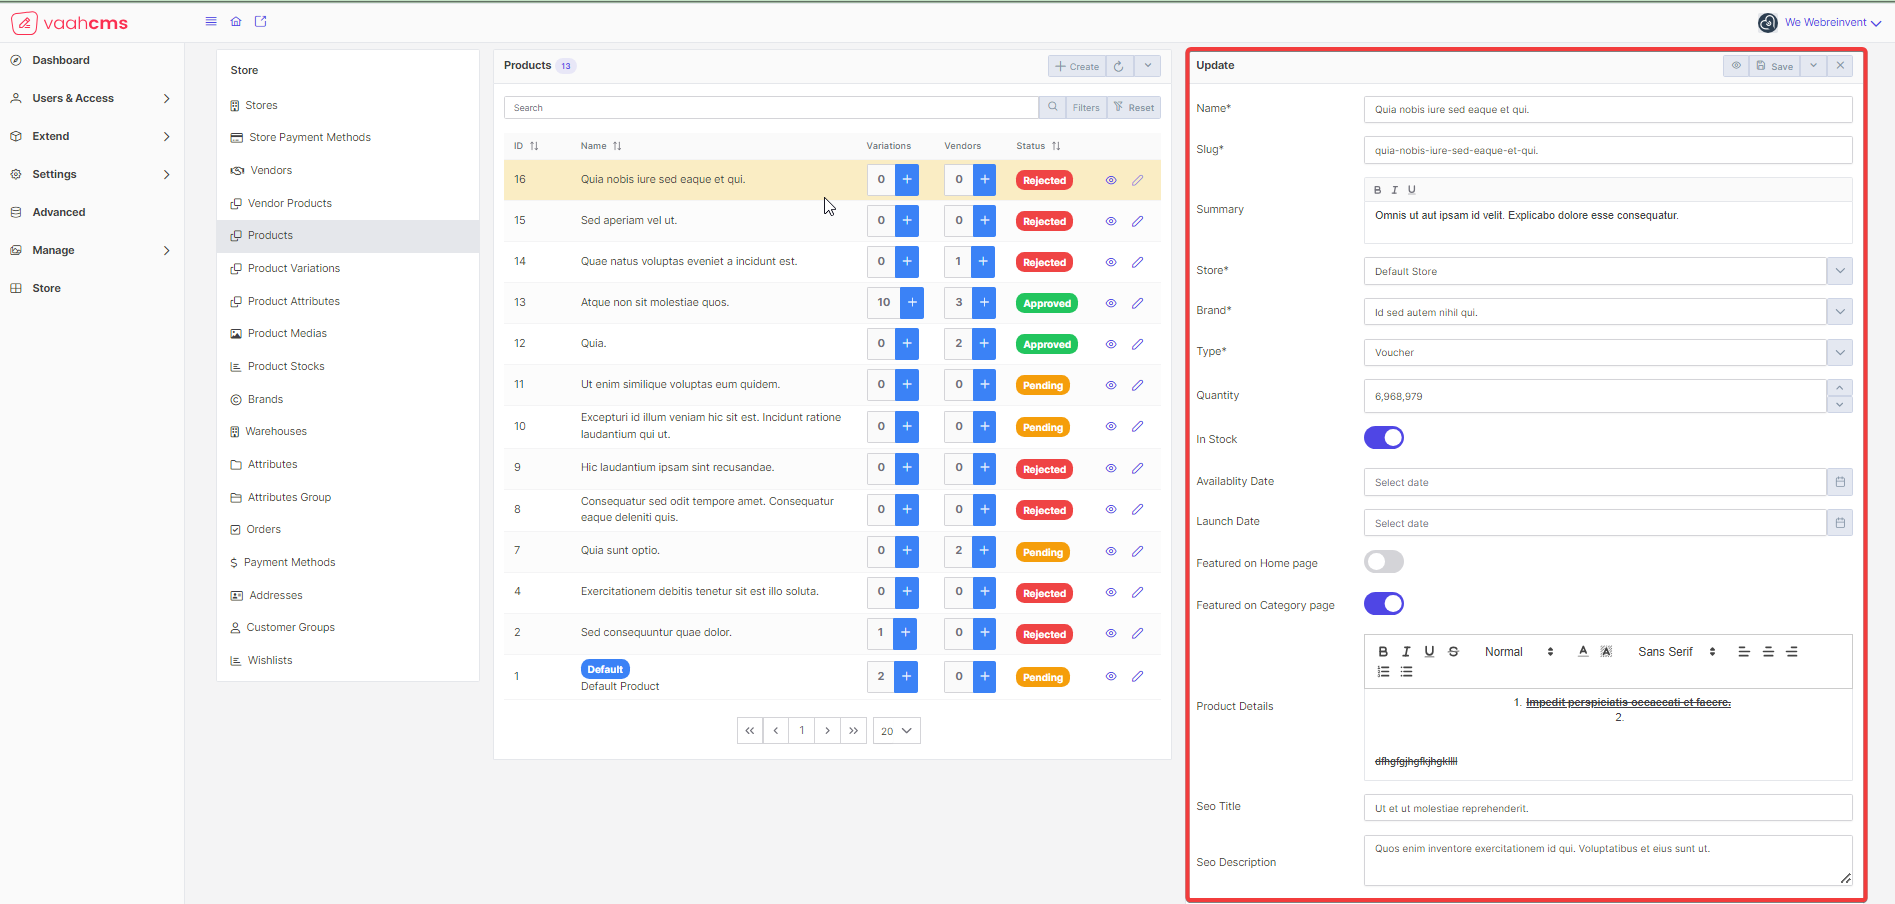
 A form will open to the right side of your screen with the prefilled values, you just need to update the values of
the field that you want to update.
A form will open to the right side of your screen with the prefilled values, you just need to update the values of
the field that you want to update.
Follow the below image for reference:
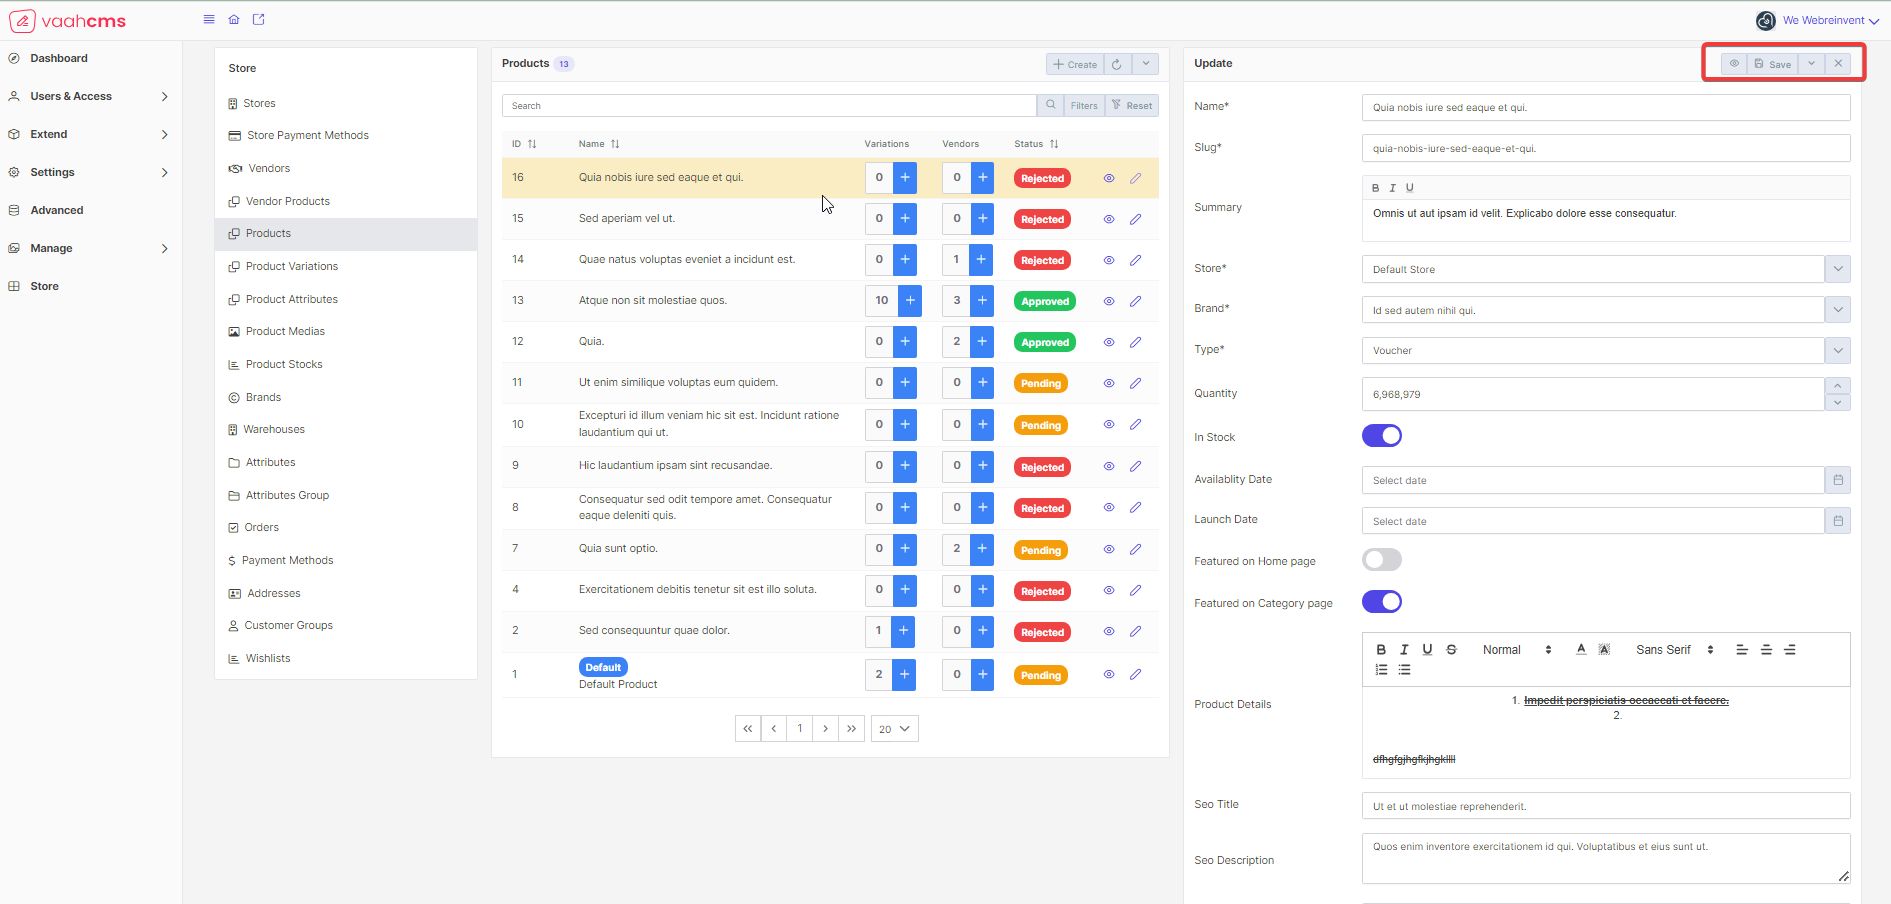
 Just click on
 Save button present at the top
Other options available in the Update window
Follow the below image for reference:
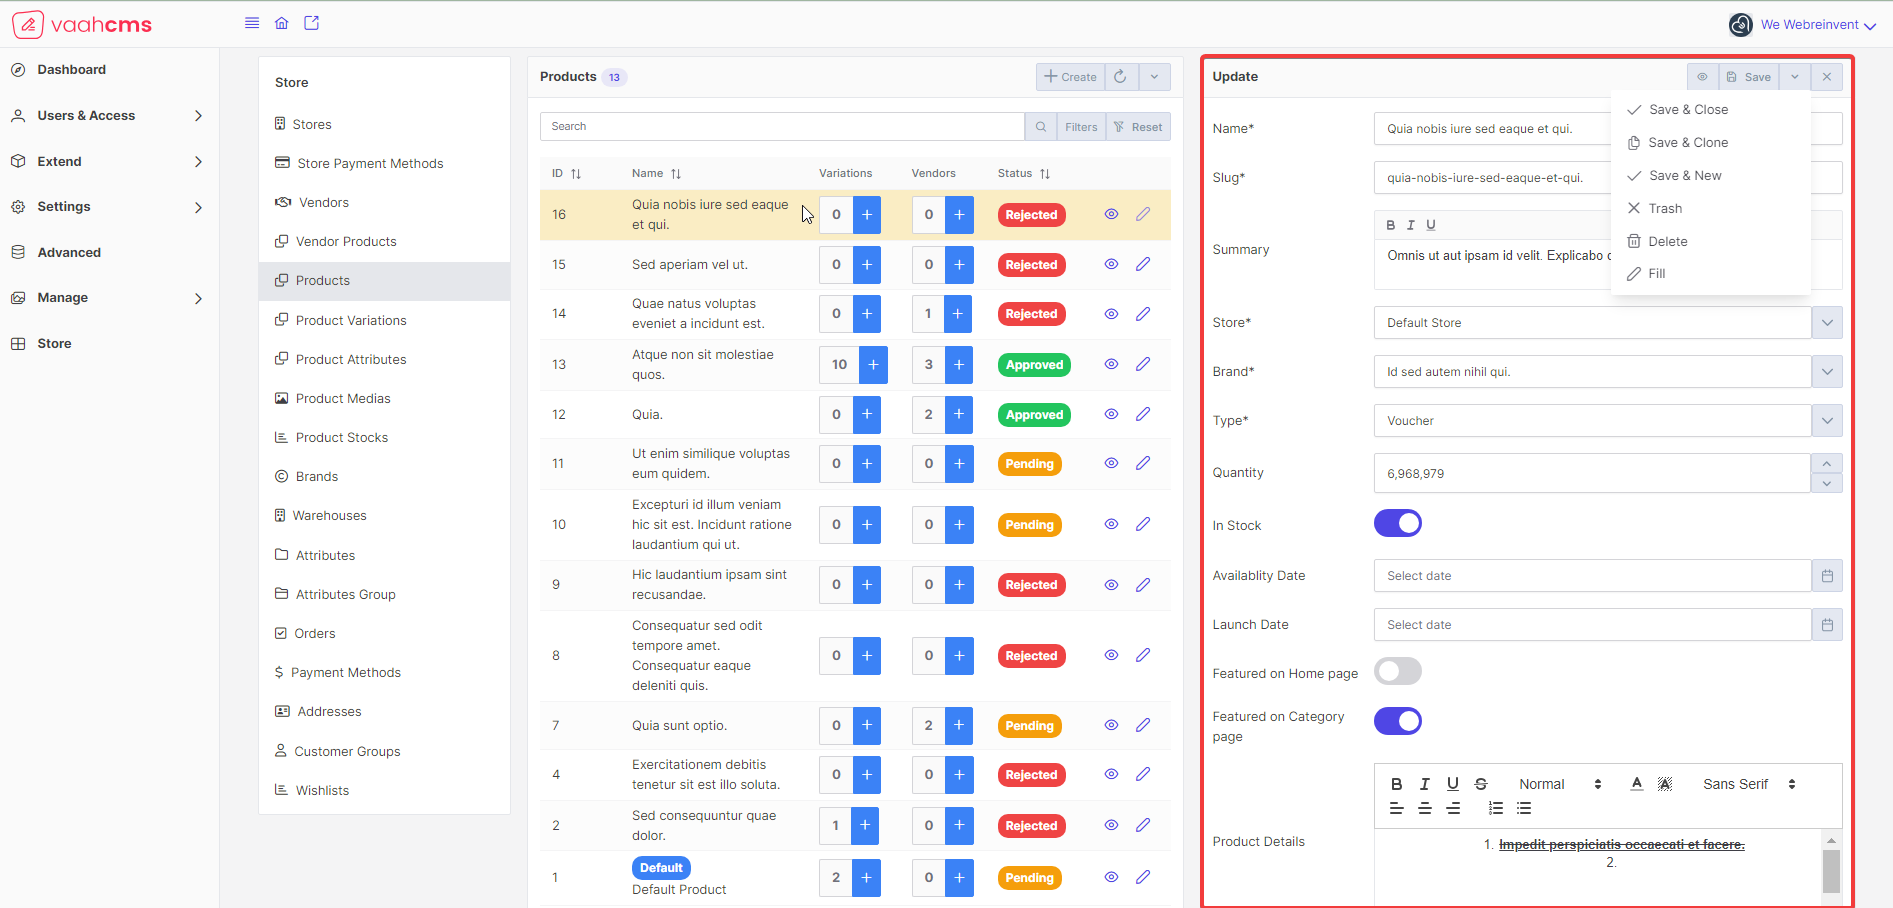
Save & Close: It will save the record and redirect you to the list page ofProductscrudSave & Clone: It will save the record and clone all the details of that particular product and prefill all the values in a new formSave & New: It will save the record and open a new form for youTrash: It will trash that particular product but give you the option to restore that product with arestorebuttonDelete: It will ask for your confirmation before deleting that particular productFill: It will fill all the fields with a valid value
Trash
Meaning : When a product is moved to the Trash, it is not immediately deleted from the system. Instead, it is temporarily
stored in the Trash, allowing users to recover or restore the product if needed. This provides a safety net in case the
product was deleted accidentally or if the user wants to retrieve it at a later time.
Visit the list page of product, here you will have the various options to trash a product.
- Trash the
Productfrom selected menu list, just click on thedropdownmenu present on the list page. You will have various options to choose from.
Follow the below image for reference: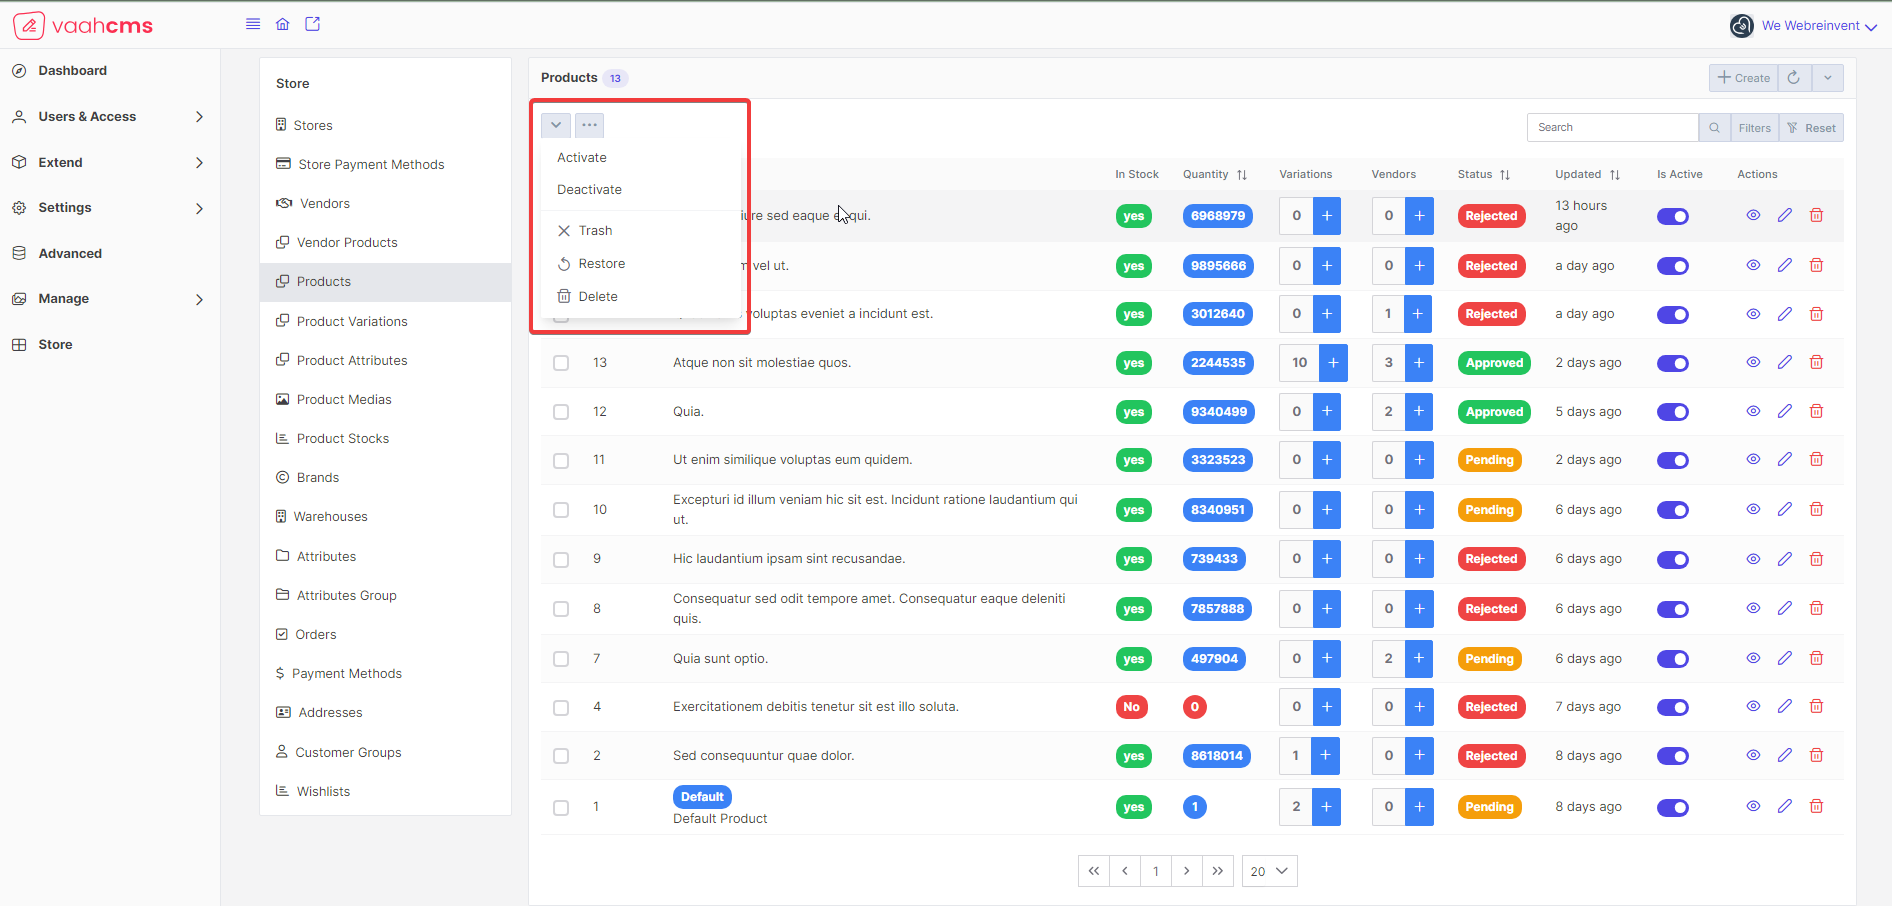
To trash the Product from here you just need to select that particular product and select the checkbox in front of the product that you want to trash
and choose the Trash option from the options available in the menu, you will get the message action was successful
Follow the below image for reference:

- Trash the
Productfrom bulk menu list: ToTrashaProductfrom here, just click on three dots available on the list page ofProductscrud.
Follow the below image for reference: To trash the
 Productsfrom here you just need to select theTrash Alloption from the options available in the menu, you will get the popup which will askDo you want to Trash all the record(s)?choose the yes option from there you will get the messageaction was successful
Follow the below image for reference: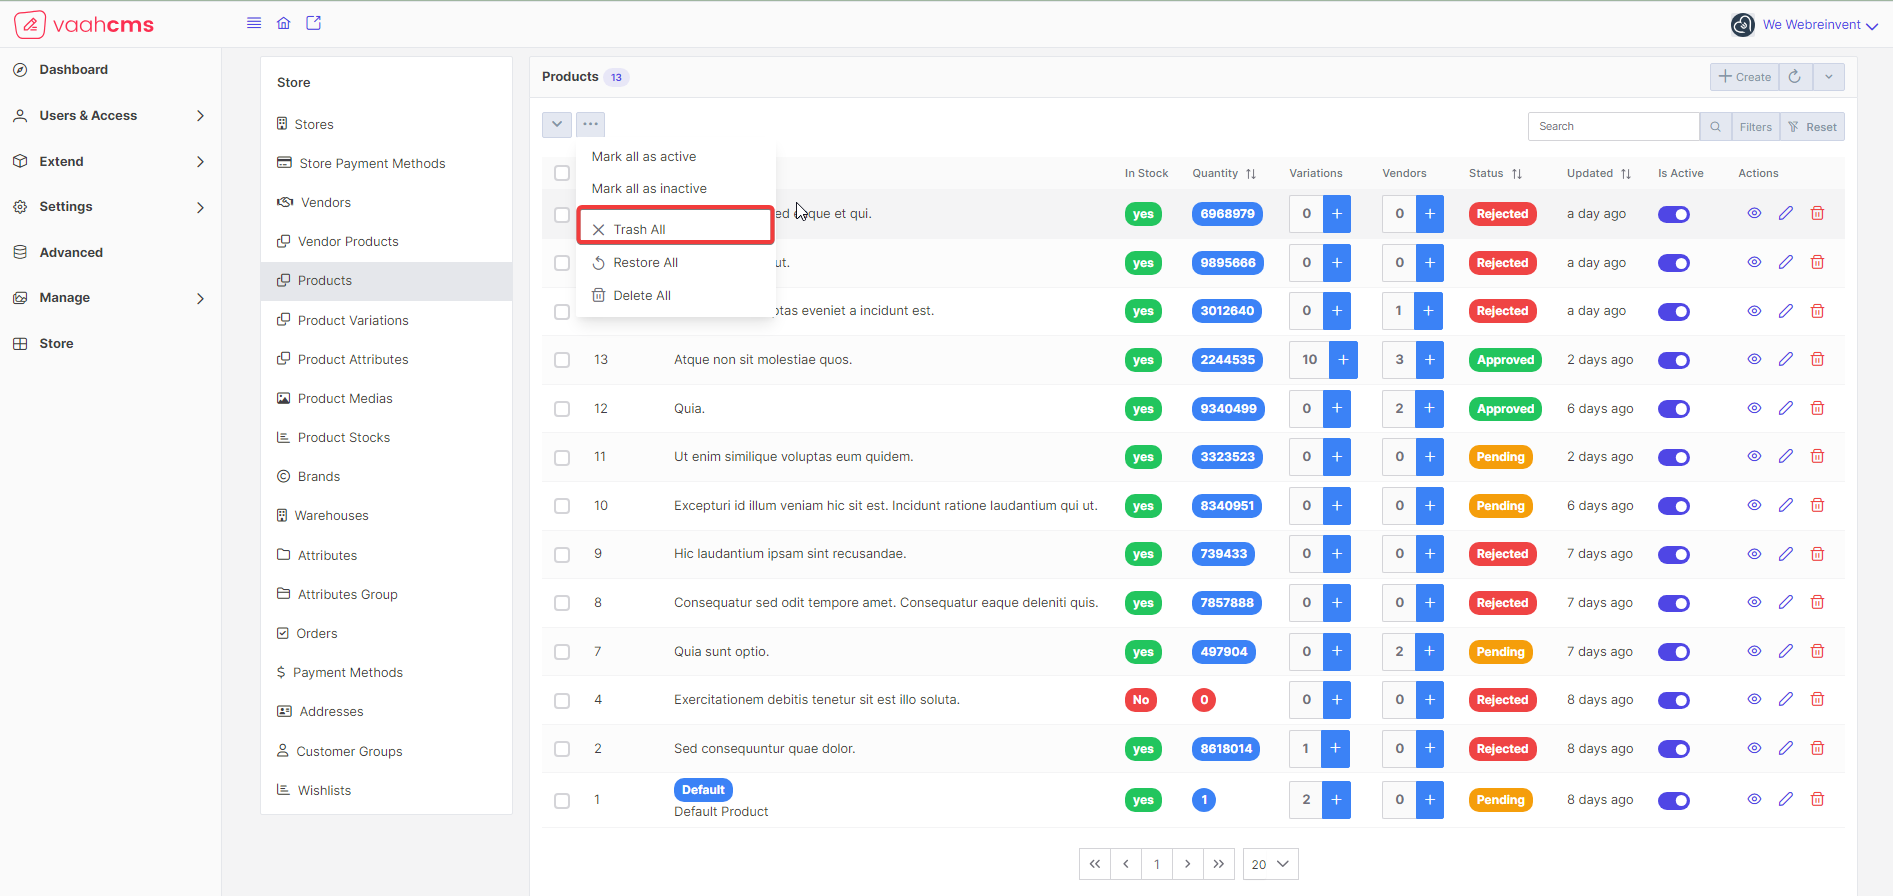
- Trash the
Productfrom Action Column present on the list page :
Follow the below image for reference: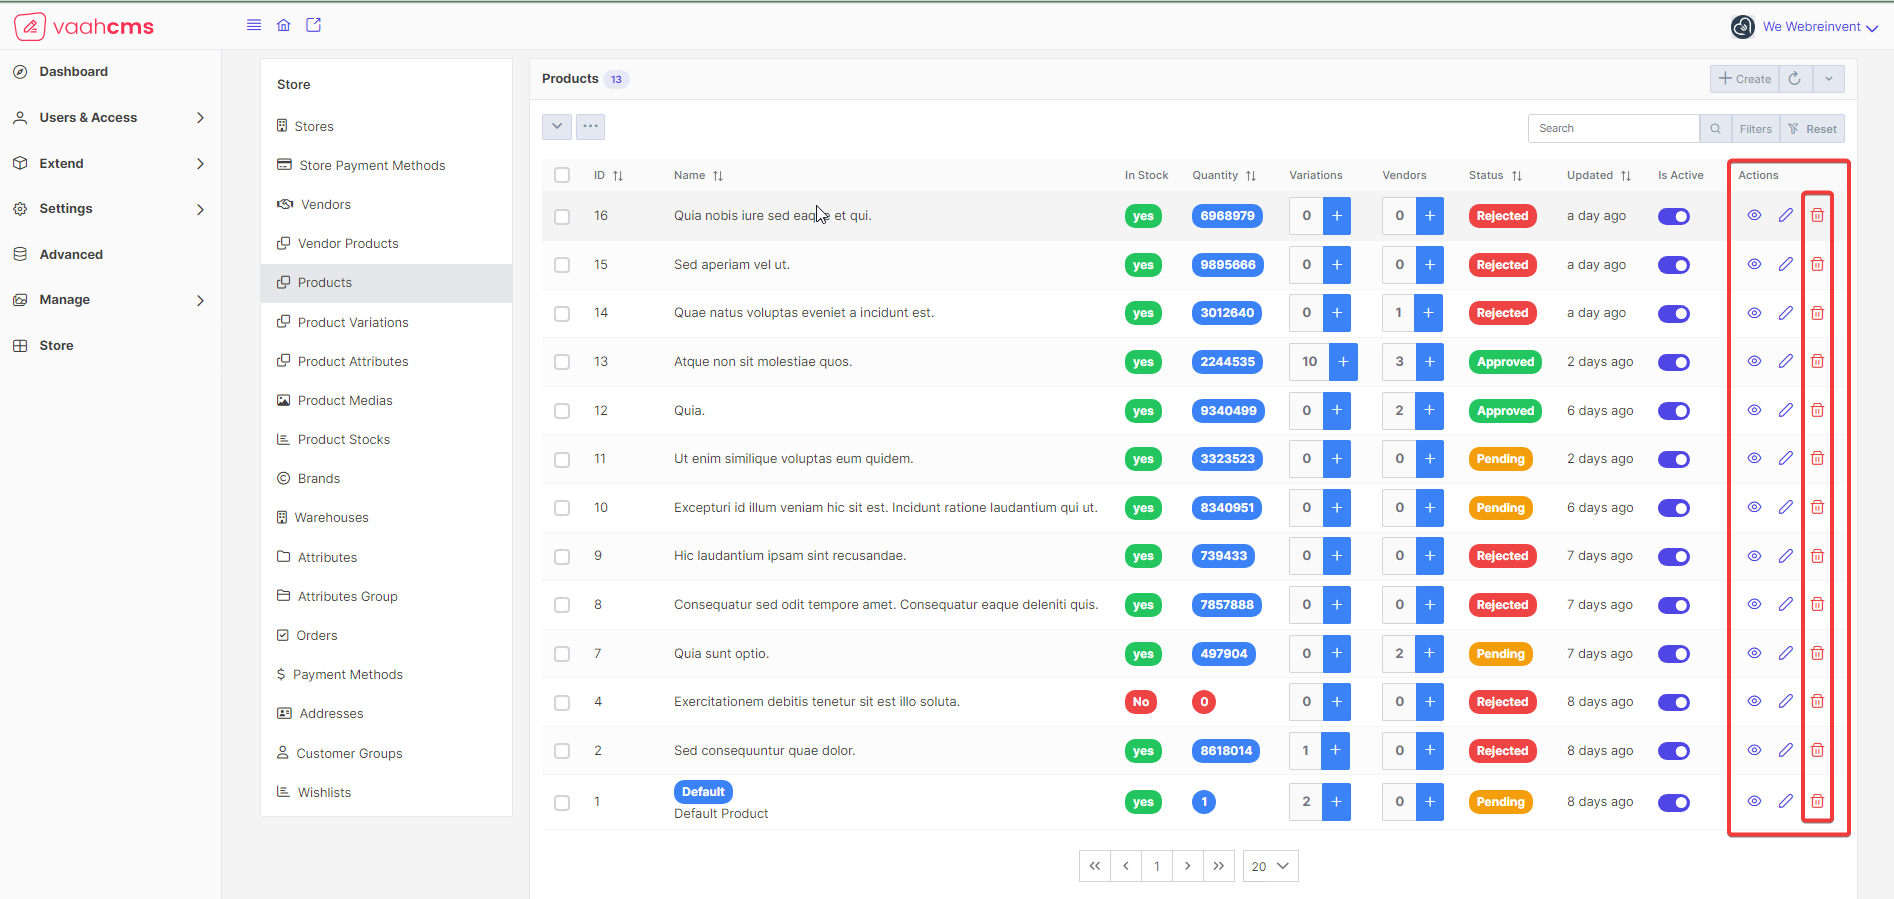 To
To TrashtheProductfrom here you just need to click on trash icon present under theActionscolumn on the list page ofProductyou will get the messageaction was successfuland that particularProductwill be trashed successfully
Delete
Meaning : Delete refers to the action of removing a product from the system or marking it as inactive.
Deleting a product is useful when you no longer want to offer or display the product to customers.
It helps to keep your product catalog organized and up to date.
There are various options to Delete a Product
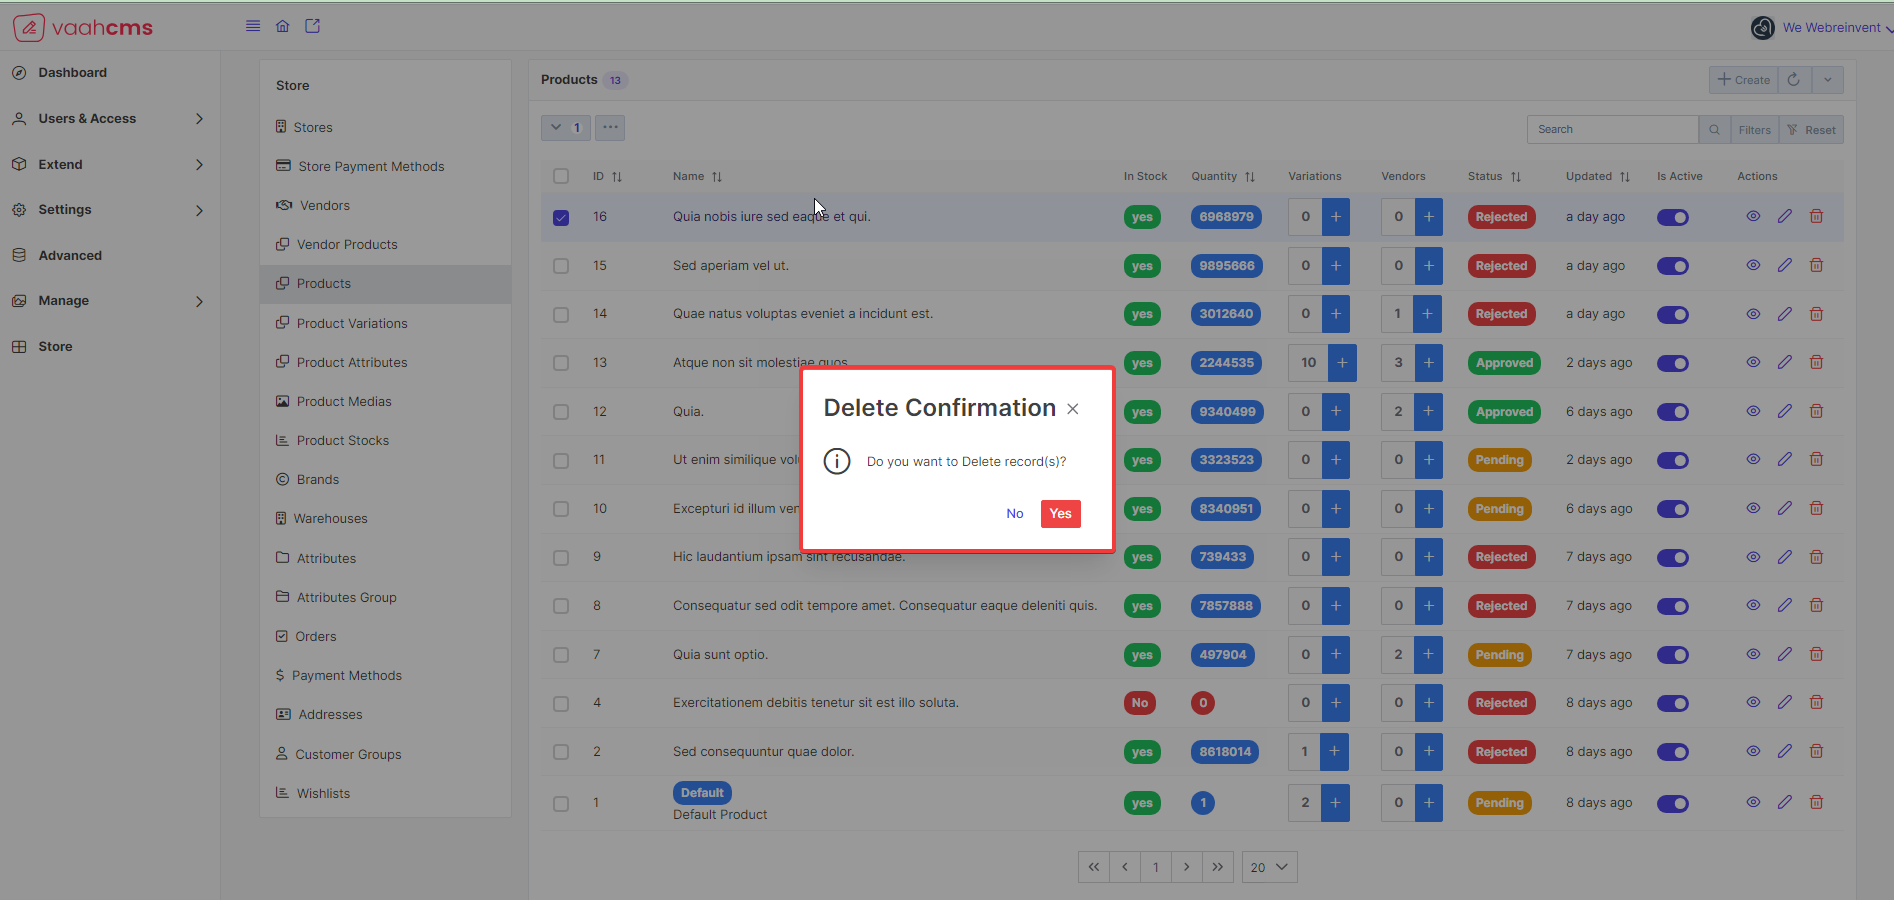
- Delete the
Productfrom selected menu list : click on thedropdownicon present on the list page, you will have various options to choose from
Follow the below image for reference:
To DeletetheProductfrom here you just need to select that particular product by selecting the checkbox in front of theProductthat you want to delete and choose theDeleteoption from the options available in the menu, it will ask forDo you want to Delete records,click on yes and you will get the messageaction was successfuland that particularProductwill be deleted successfully.
Follow the below images for reference: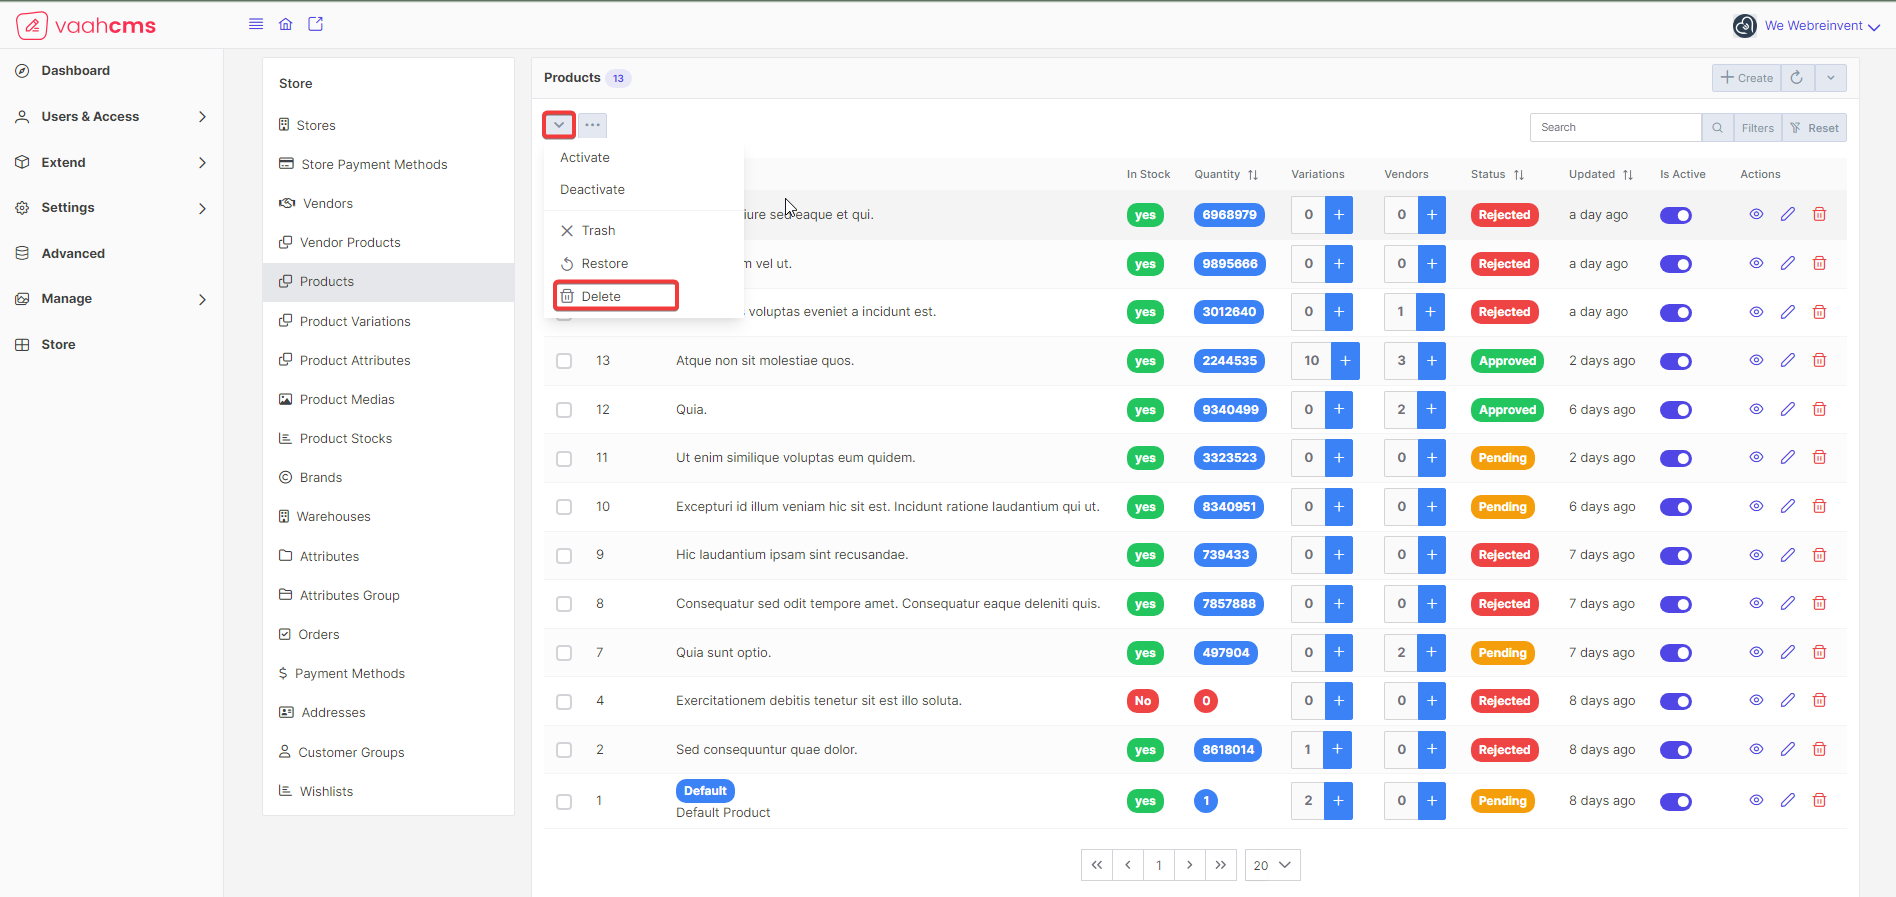
- Delete the
Productfrom bulk menu list Follow the below image for reference:
To DeletetheProductsfrom here you just need to select theDelete Alloption from the options available in the menu, you will get the popup which will askDo you want to Delete all the record(s)? choose the yes option from there you will get the messageaction was successful`.
Follow the below image for reference:
Restore
Meaning : The Restore option allows you to bring back a previously deleted or trashed Product and make it active
again. This can be useful if you accidentally deleted a Product or if you need to retrieve a Product that was
temporarily removed from your store but still has relevant information or data associated with it.
Visit the list page of product, here you will have the various options to restore a product.
RestoretheProductfrom selected menu list, just click on thedropdownmenu present on the list page. You will have various options to choose from.
Follow the below image for reference:
To RestoretheProductfrom here you just need to select that particular product and select the checkbox in front of the product that you want toRestoreand choose theRestoreoption from the options available in the menu, you will get the messageaction was successful.
Follow the below image for reference: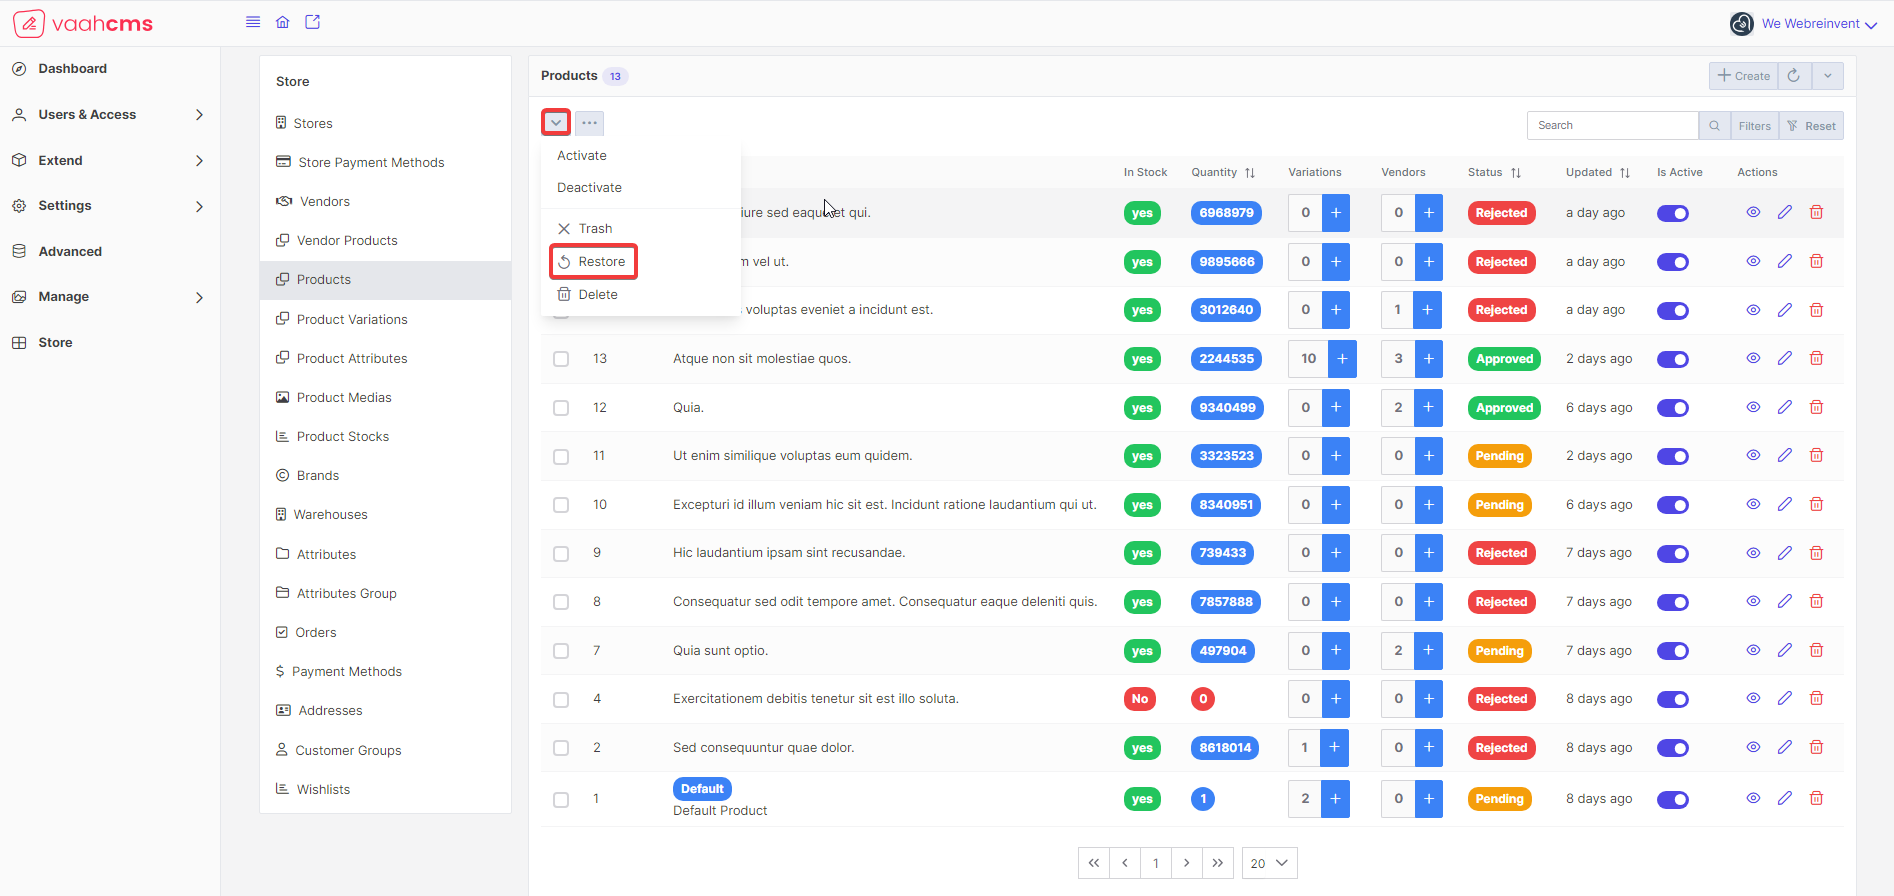
- Restore the
Productfrom bulk menu list: To RestoreProductsfrom here, just click on three dots available on the list page ofProductscrud.
Follow the below image for reference:
To RestoretheProductsfrom here you just need to select theRestore Alloption from the options available in the menu, you will get the popup which will askDo you want to Restore all the record(s)?choose the yes option from there you will get the messageaction was successful
Follow the below image for reference: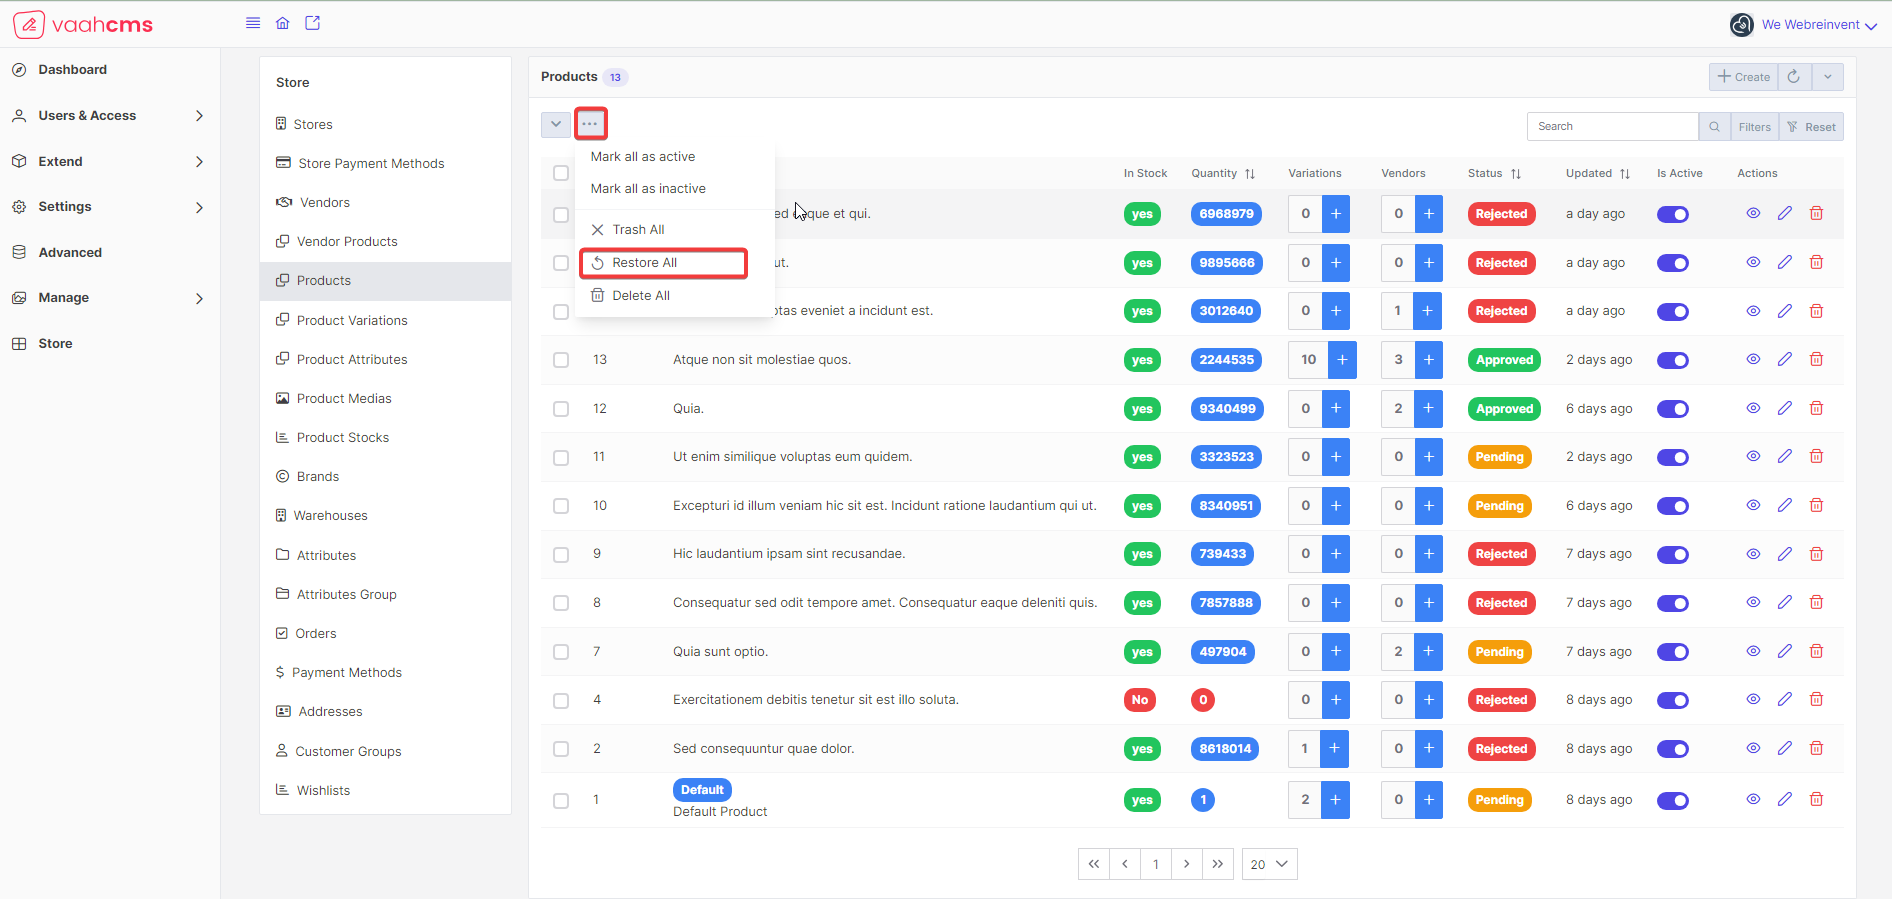
- Restore the
Productfrom Action Column present on the list page :
Follow the below image for reference: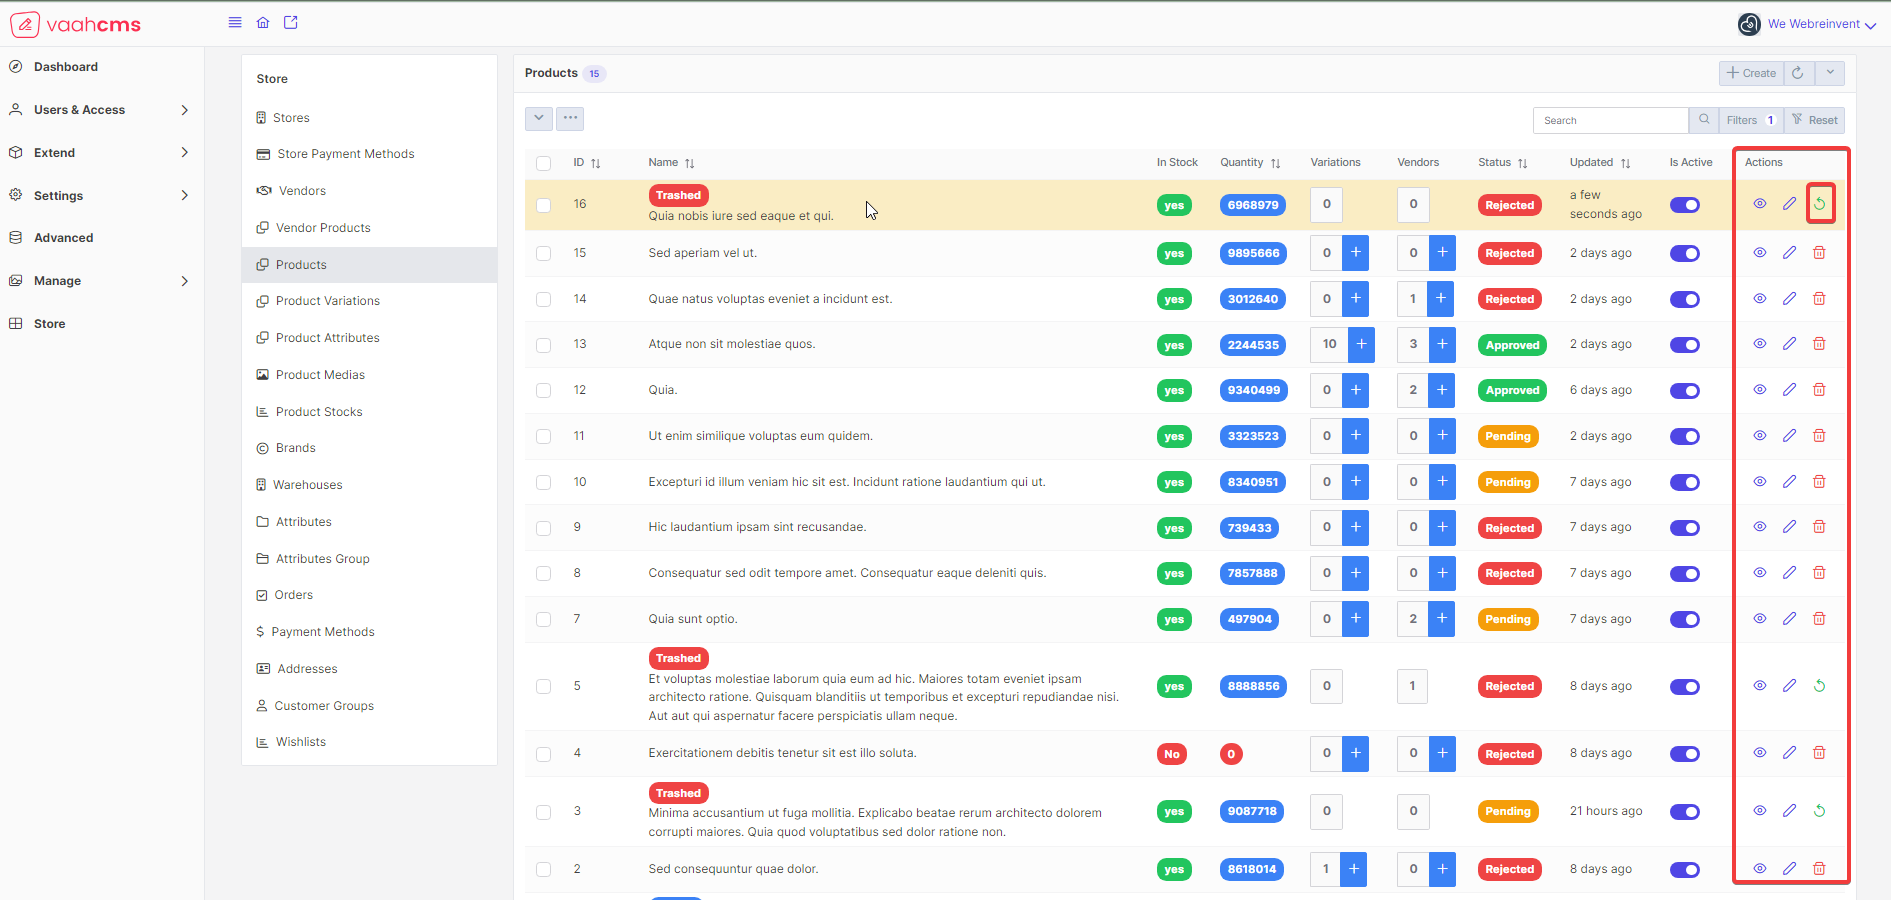 To
To RestoretheProductfrom here you just need to click onrestoreicon present under theActionscolumn on the list page ofProductyou will get the messageaction was successfuland that particularProductwill berestoredsuccessfully
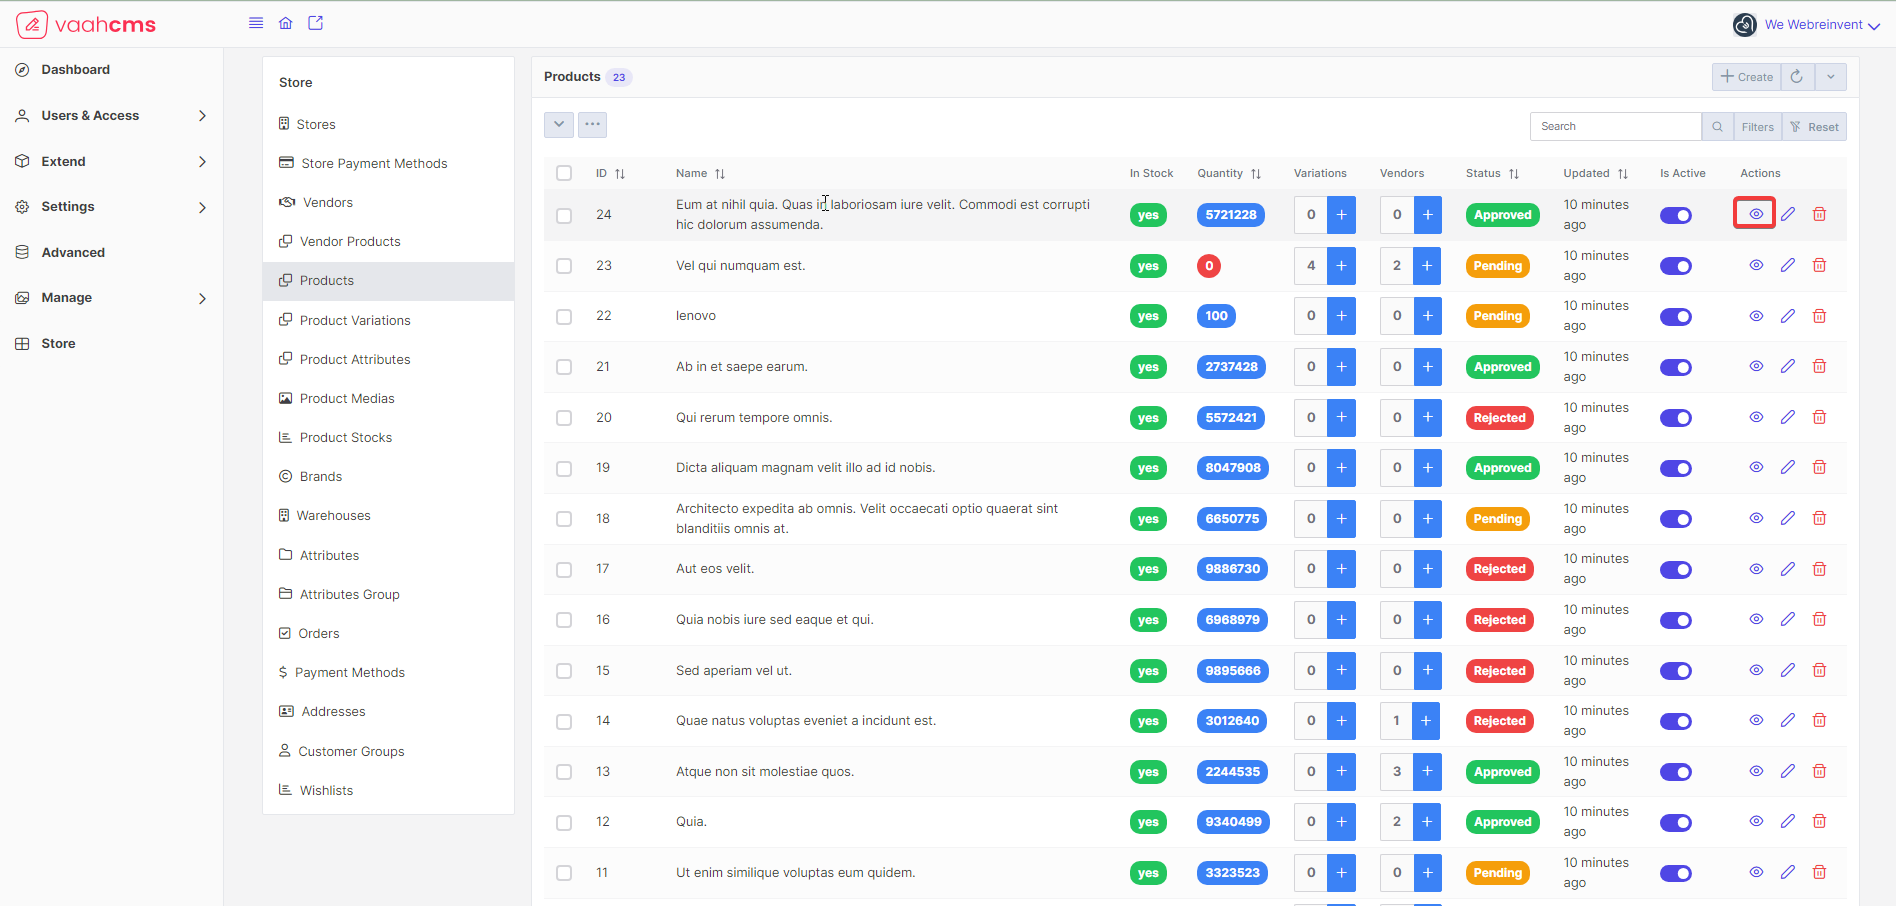
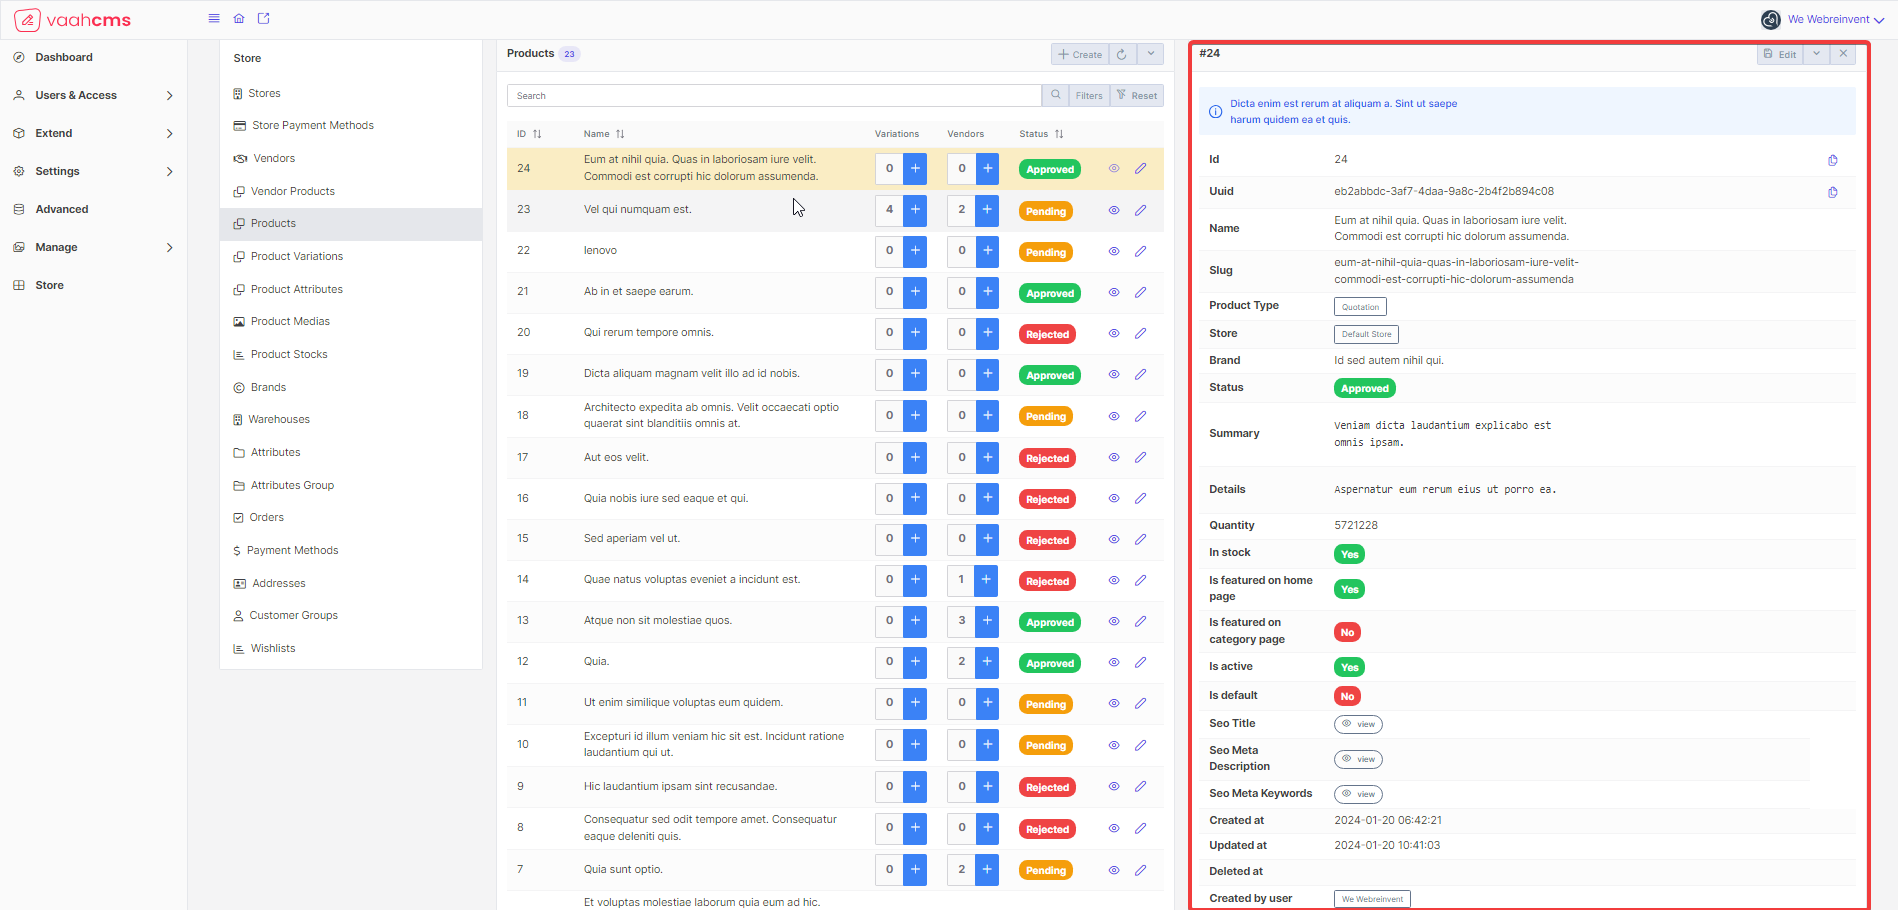
View
Visit the list page of Products CRUD, here you will have the option to view the details of a particular product
In the list page of product CRUD, under the Actions Column, click on the eye icon, a new page will open to the
right side of your screen.
Follow the below images for reference:
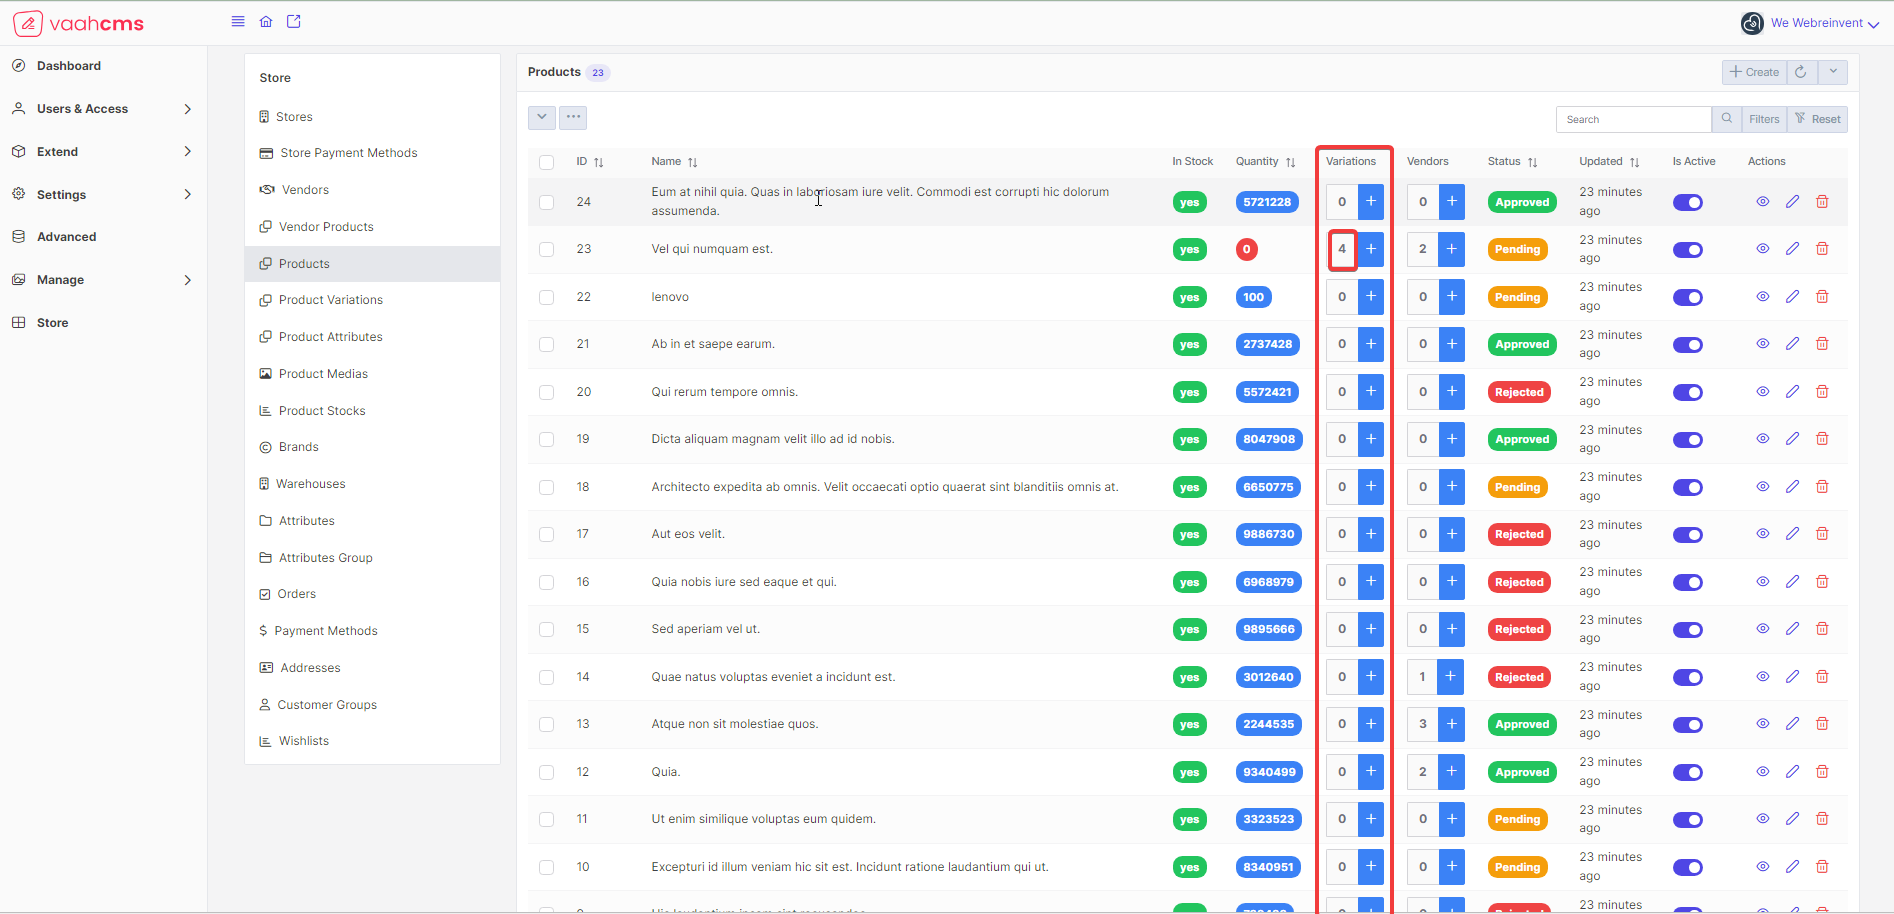
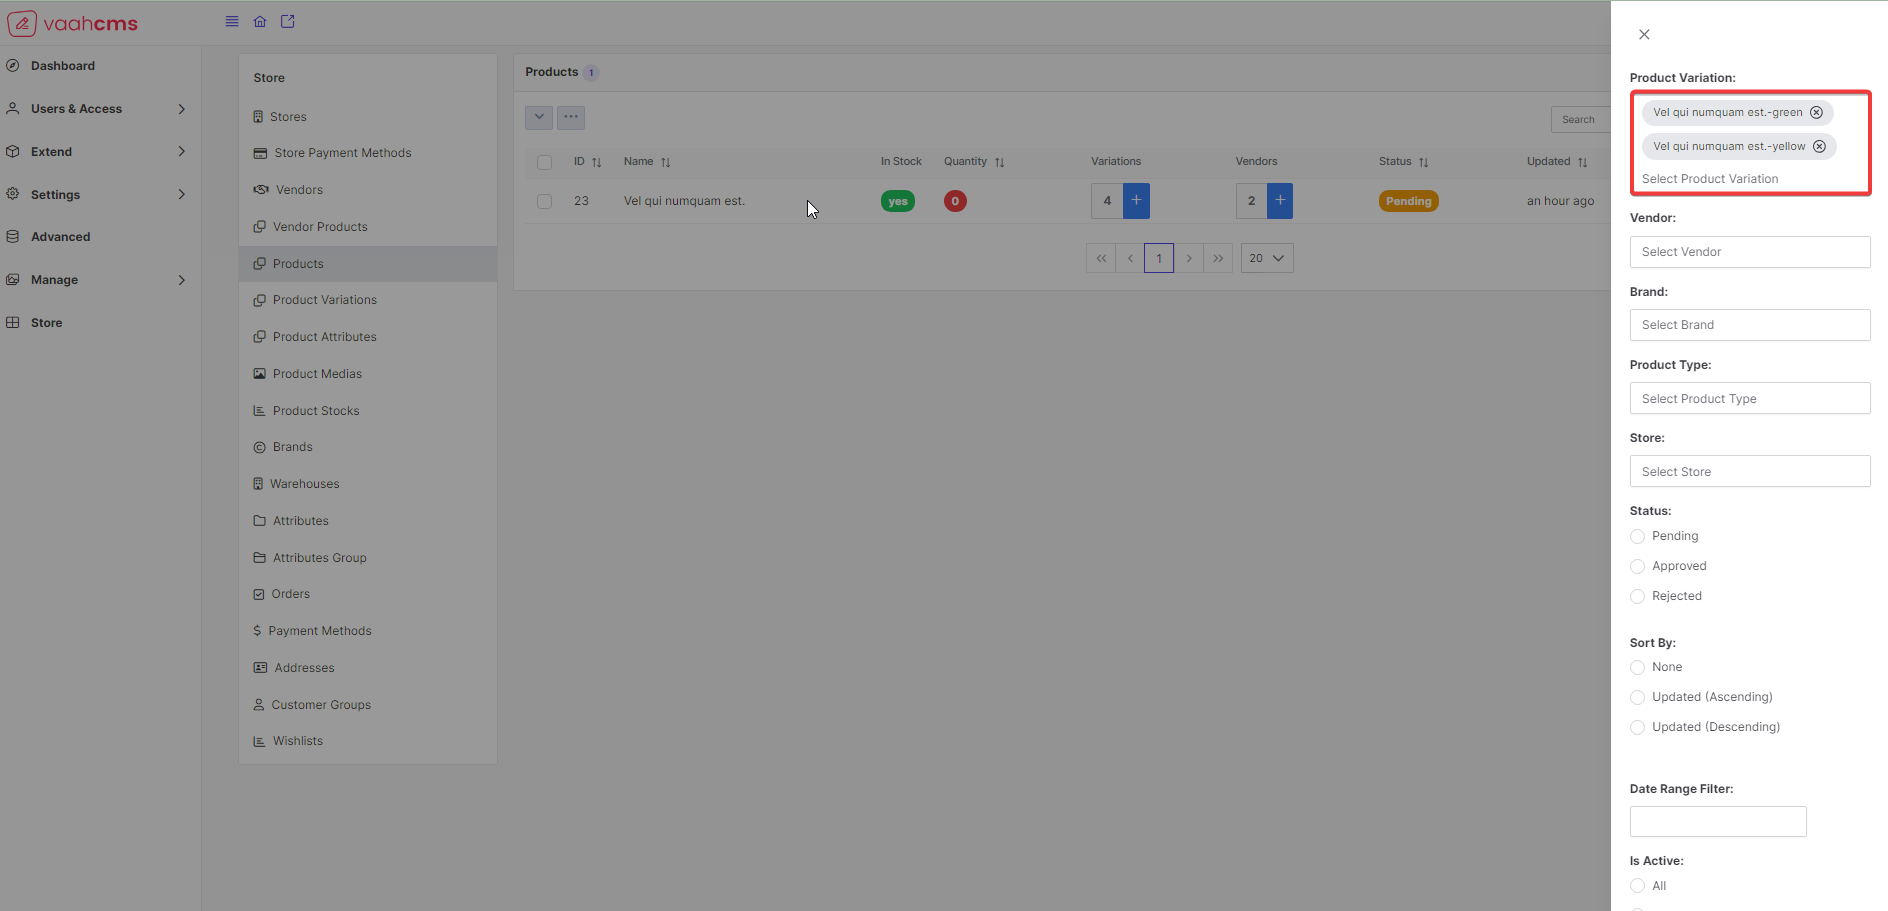
View Variations
To view all the variations of a particular product, you just need to visit the list page of Product crud,
in the Variations column, click on quantity of variations, it will redirect you to the Variations list page
and it will show you only the Variations related to that product. You can verify it from the url as the slug of
the product will come as selected in.
Follow the below images for reference:

Filter Section
There are many filters which are available in the Product crud
Product variation Filter: Here you just need to select the name of theProduct Variations, by default it will give you only 10 records but you can also search theProduct Variationsand can select multipleProduct Variationsit will update the list on the basis ofProduct Variationsname provided.
Follow the below image for the reference:
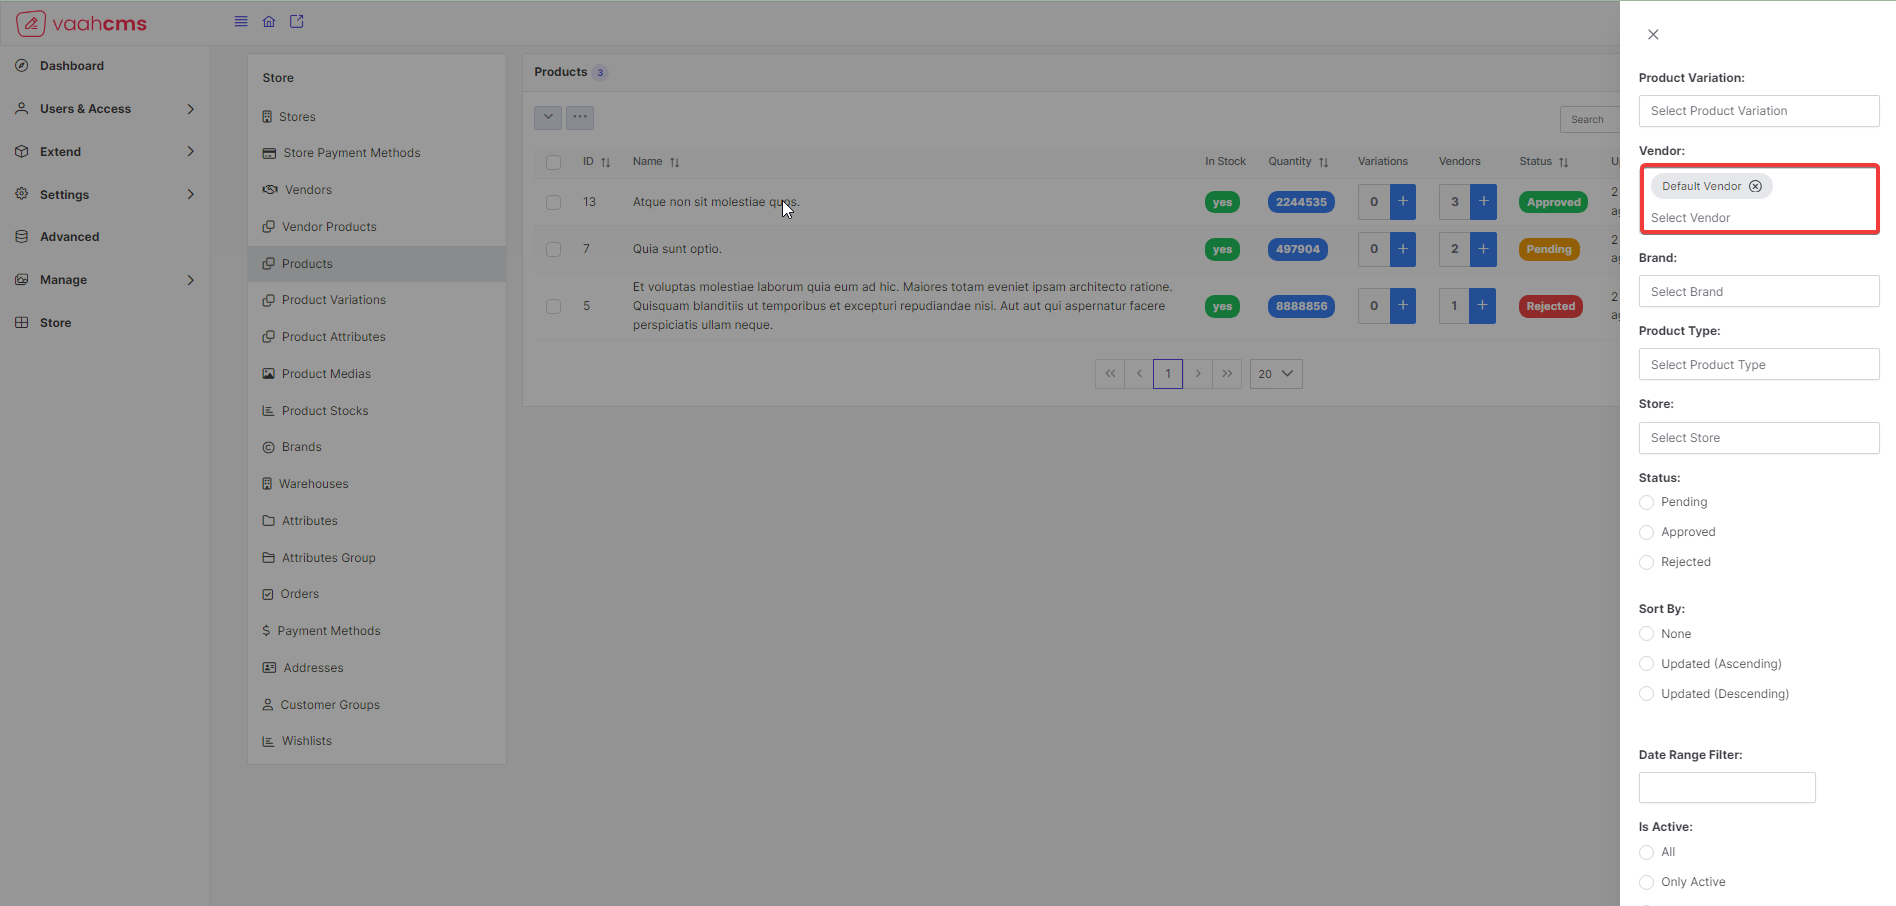
Vendor Filter: Here you just need to select the name of thevendors, by default it will give you only 10 records but you can also search theVendorsand can select multipleVendors, it will update the list on the basis ofVendorsname provided.
Follow the below image for the reference:
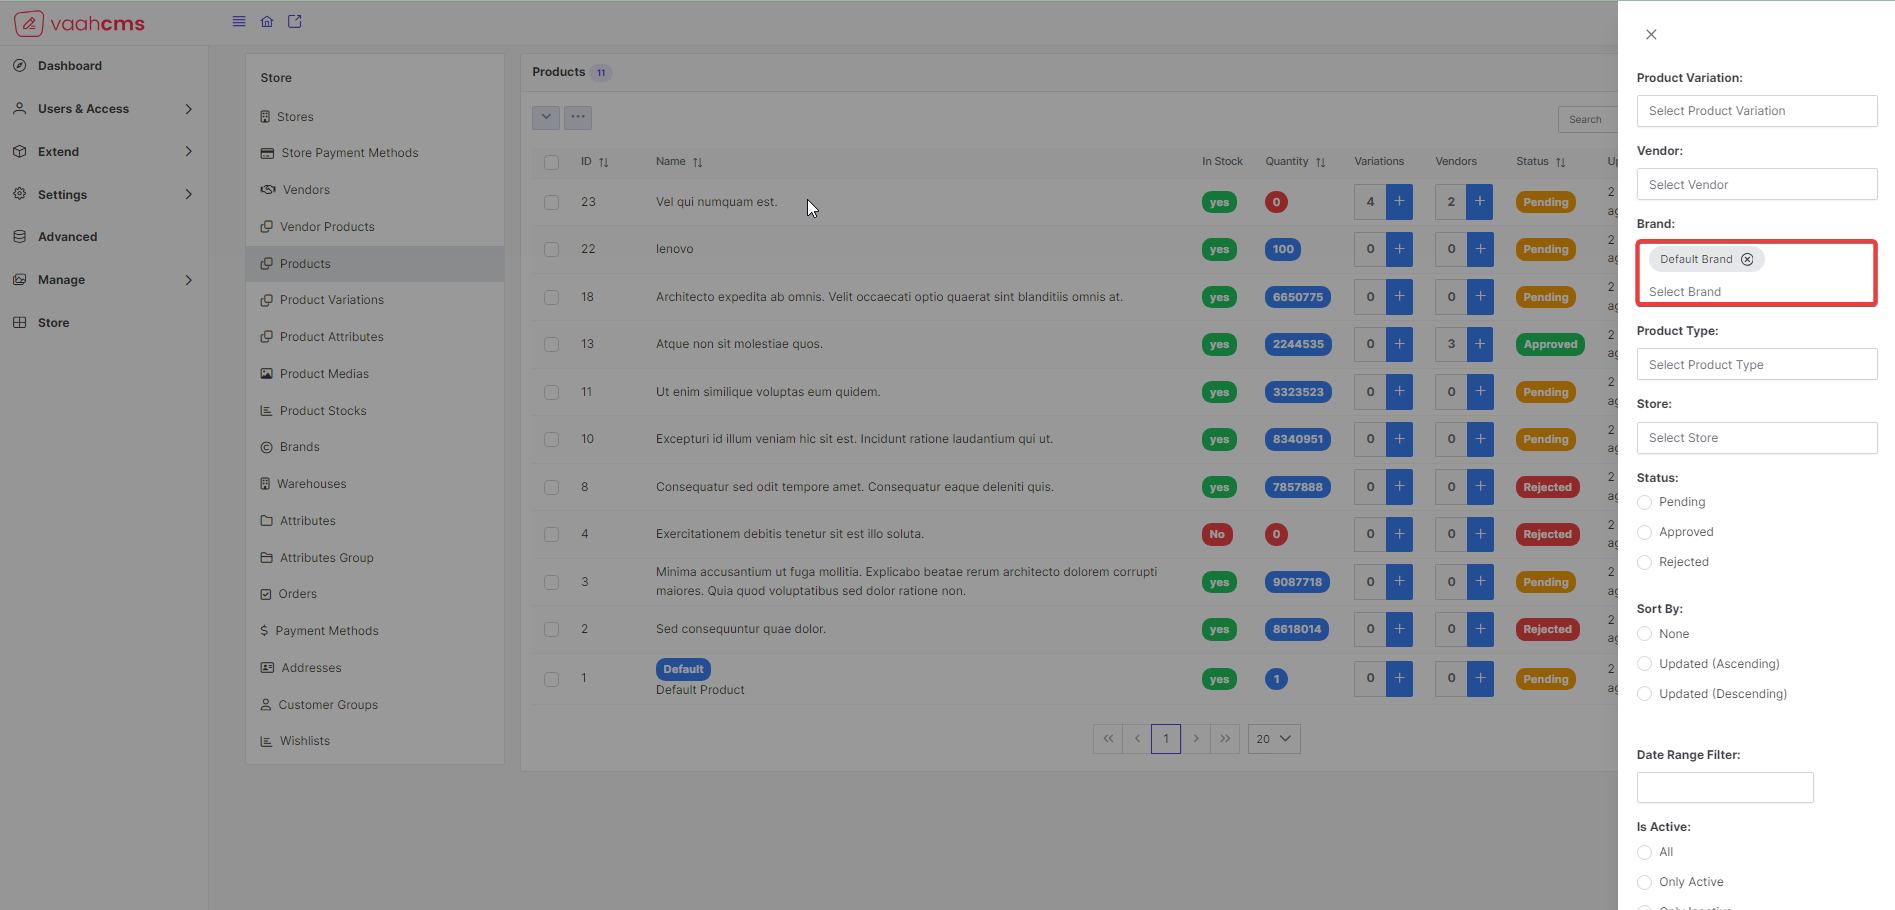
Brand Filter: Here you just need to select the name of theBrand, by default it will give you only 10 records but you can also search theBrandand can select multipleBrandsit will update the list on the basis ofBrandsname provided.
Follow the below image for the reference:
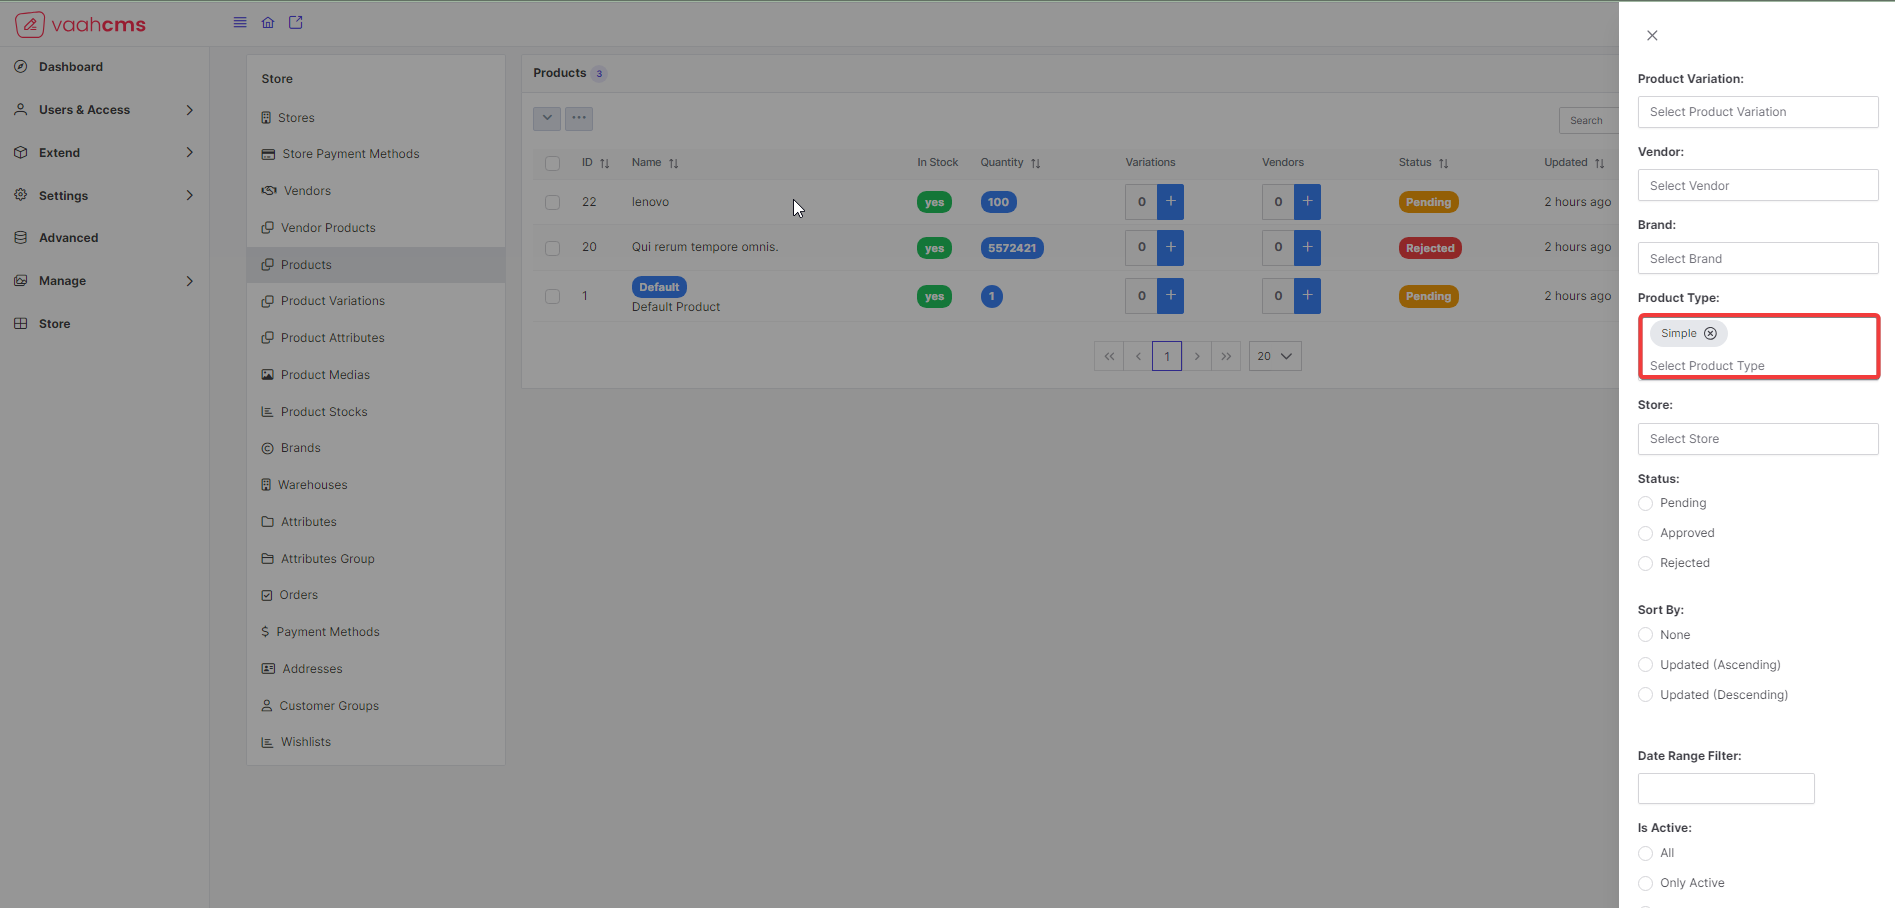
Product Type Filter: Here you just need to select the name of theProduct Type, by default it will give you only 10Product Typesbut you can also search theProduct Typesand can select multipleProduct Typesit will update the list on the basis ofProduct Type'sname provided.
Follow the below image for the reference:
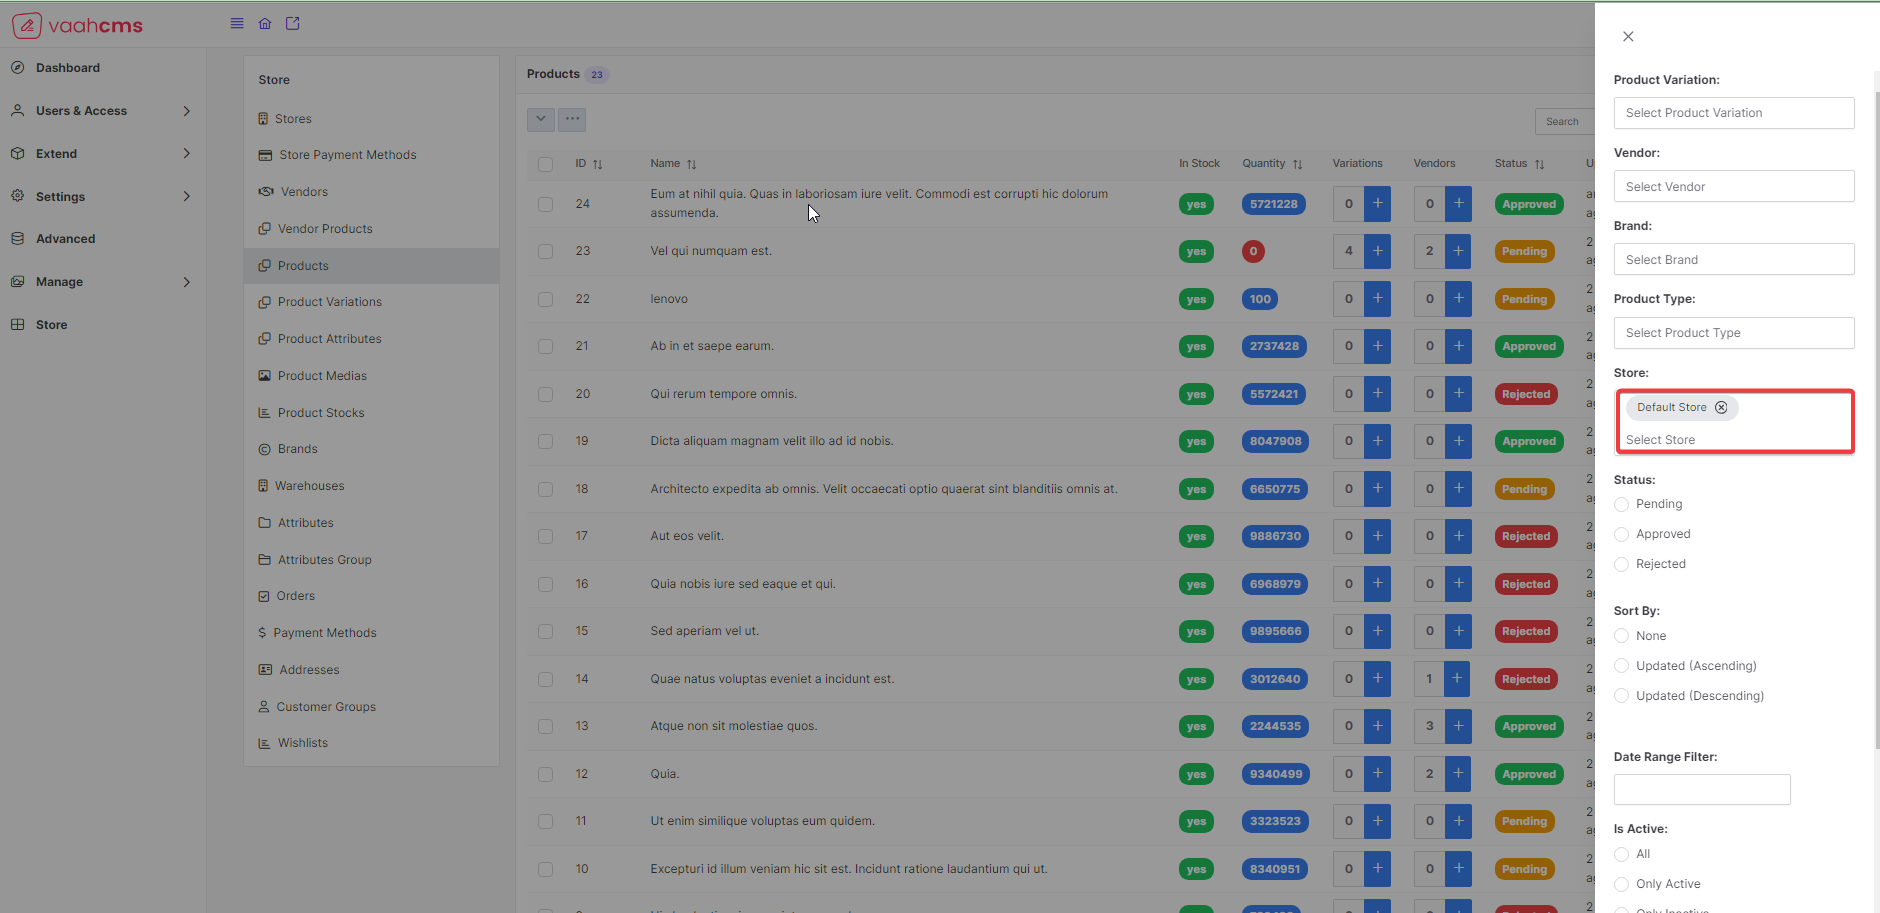
Store Filter: Here you just need to select the name of theStore, by default it will give you only 10 records but you can also search theStoreand can select multipleStoresit will update the list on the basis ofStore'sname provided.
Follow the below image for the reference:
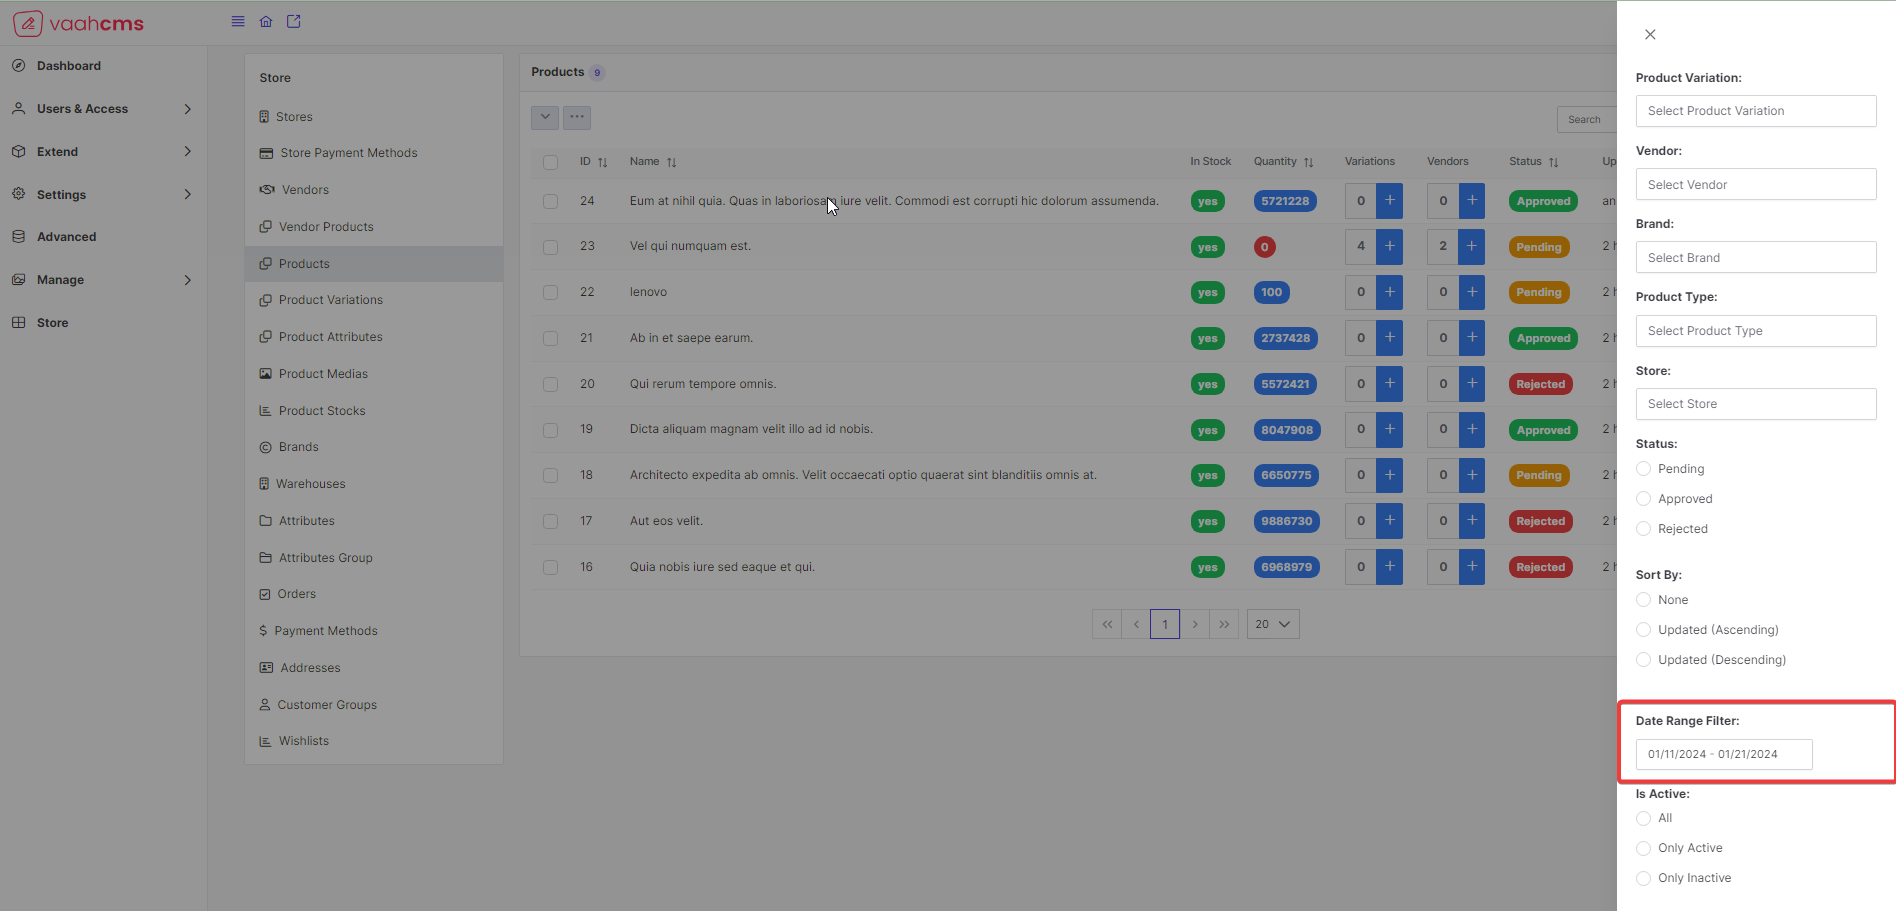
Date RangeFilter : Here you just need to provide thecreated_atdate range, it will give you the filtered results on the basis ofcreated_atdate of theProduct.
Follow the below image for the reference: