Basics of Address in VaahStore
What is Address?
In the context of VaahStore, a Address refers to the location where a customer wants their purchased products to be
delivered. It includes details such as the street address, city, state, postal code etc.
Purpose
The purpose of collecting and managing Customer's addresses in VaahStore is to ensure accurate and timely delivery
of products to customers. By storing Customer's addresses, businesses can streamline their order fulfillment process
and provide a seamless shopping experience.
Create
How to create a Address for a `Customer?
To create a Customer's address in VaahStore, follow these steps:
- Login to the
VaahStoreadmin panel. - In the left sidebar section, click on Extend > Modules
- You will be able to see all the modules
- Activate
Storemodule, by clicking on theactivatebutton present in the right side of your screen - Click on
Storefrom the left sidebar, You will be able to see the dashboard of theVaah Storewith links to all theCruds - Click on the
Addresseslink in the dashboard section - List page of
Addressescrud will be opened
Follow the below image for reference :

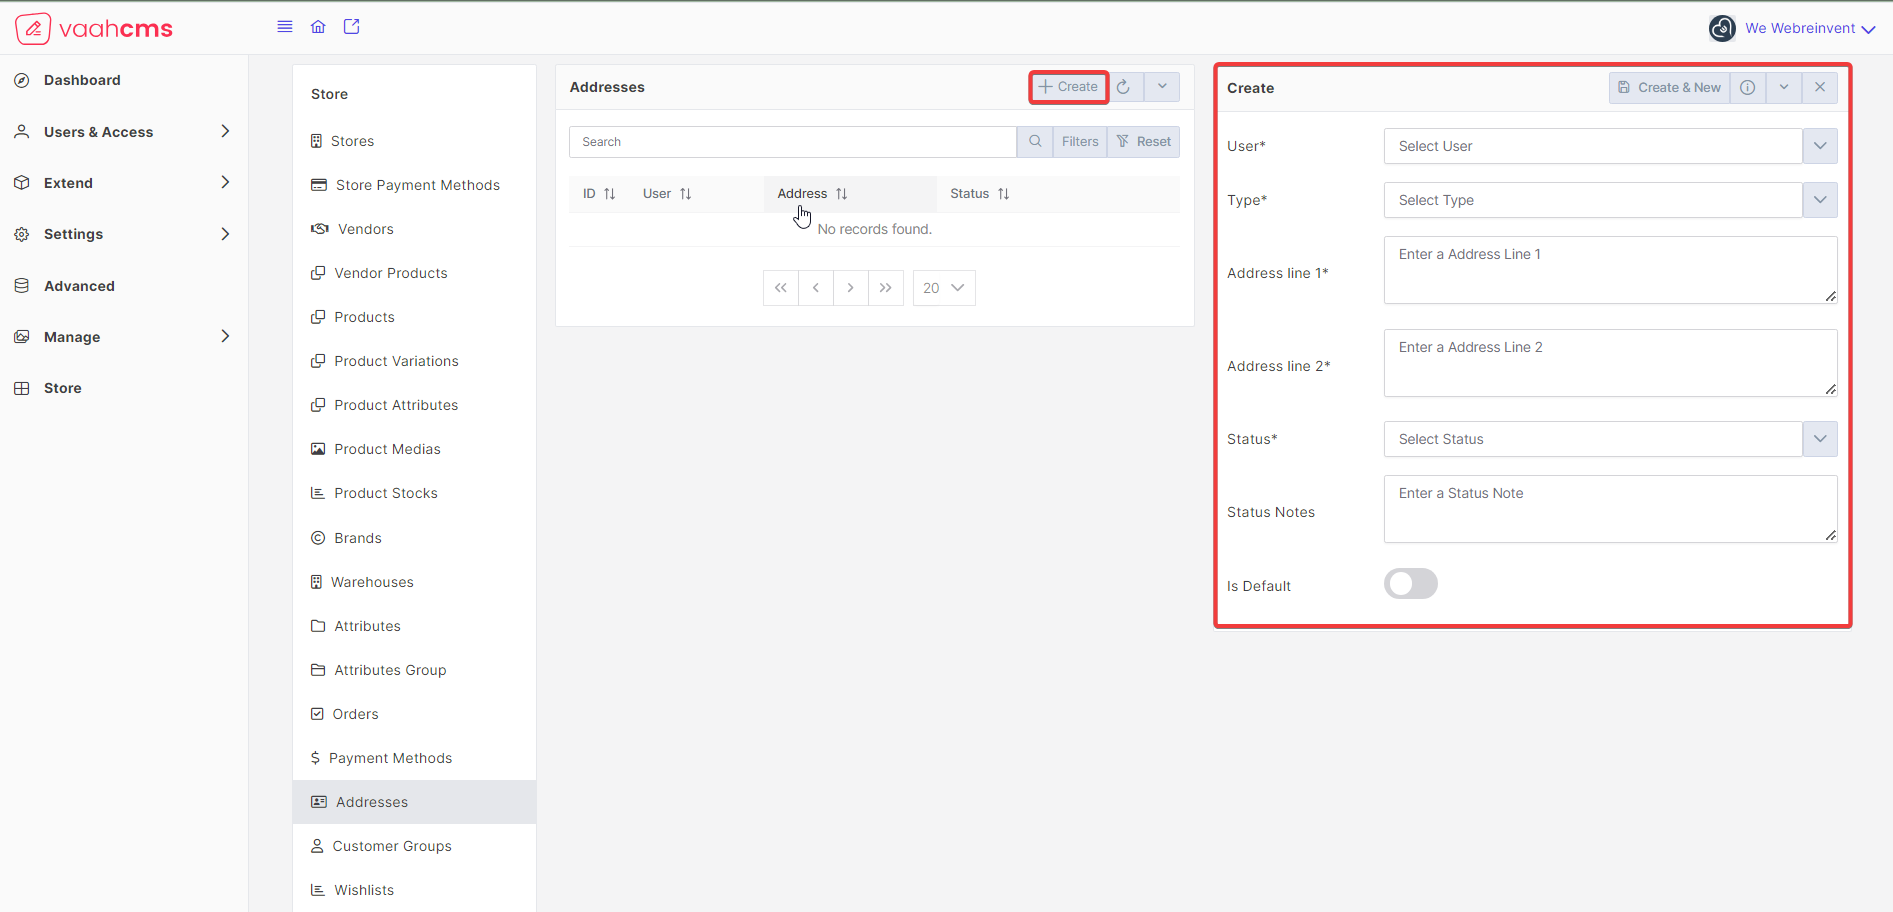
Requirements to create a Address
| Fields | Descriptions | |
|---|---|---|
| User | Here you need to select the user out of list of users in the dropdown. | |
| Type | Here you need to choose the Address type out of available options. | |
| Address line 1 | Here you need to provide primary information such as house number, building name. | |
| Address line 2 | Here you need to provide complete information about your address such as district,state,country . | |
| Status | Here you need to choose the status of the Address from the list of options available in the dropdown | |
| Status Notes | Here you need to provide notes about the status, this field is mandatory only when status is selected as rejected | |
| Is Default | With the help of this toggle button, you can make a address default address. |
Fill the fields with valid values and click on Create & New button present at the top right corner of your screen,
You will get the message Address created successfully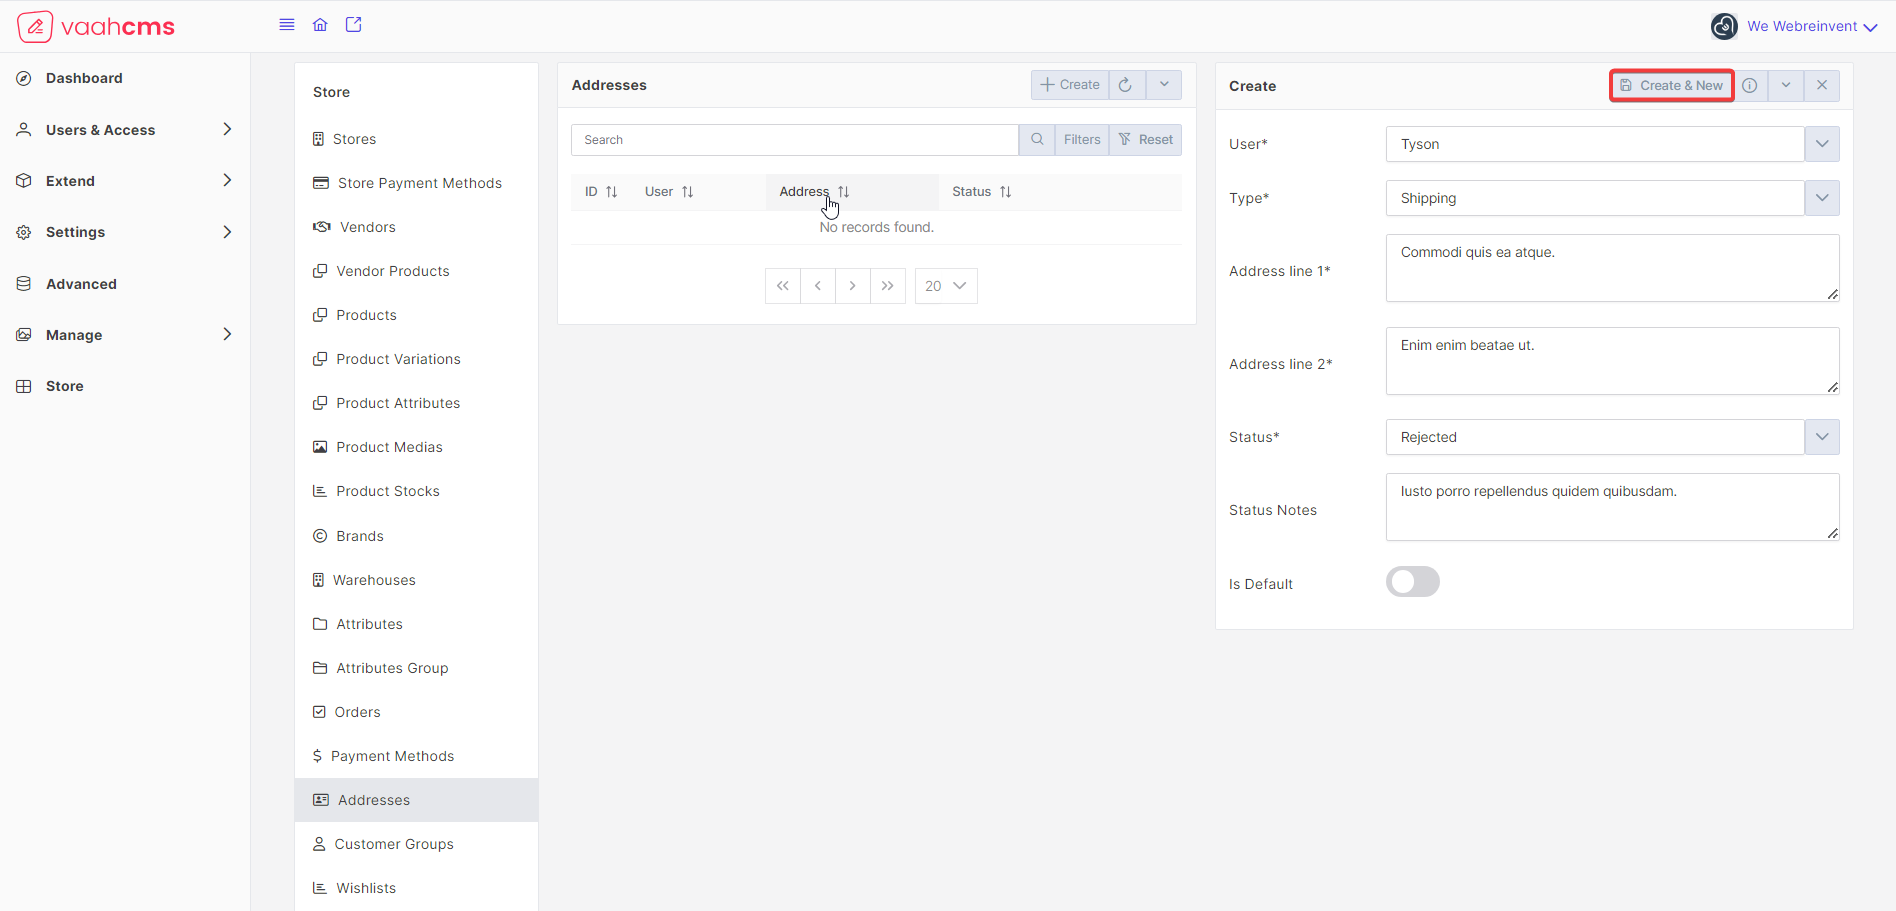
Various buttons and their usage in Create Address form
Create & Close: It will create the Address and redirect you to the list page ofAddressescrudCreate & Clone: It will create the Address and clone all the details of the particular Address into a new formReset: It will reset all the values prefilled by the user in every fields of the formFill: It will fill every fields of the form with valid values
NOTE
When you add address for a first time for a particular user that address will be considered as the user's default address.
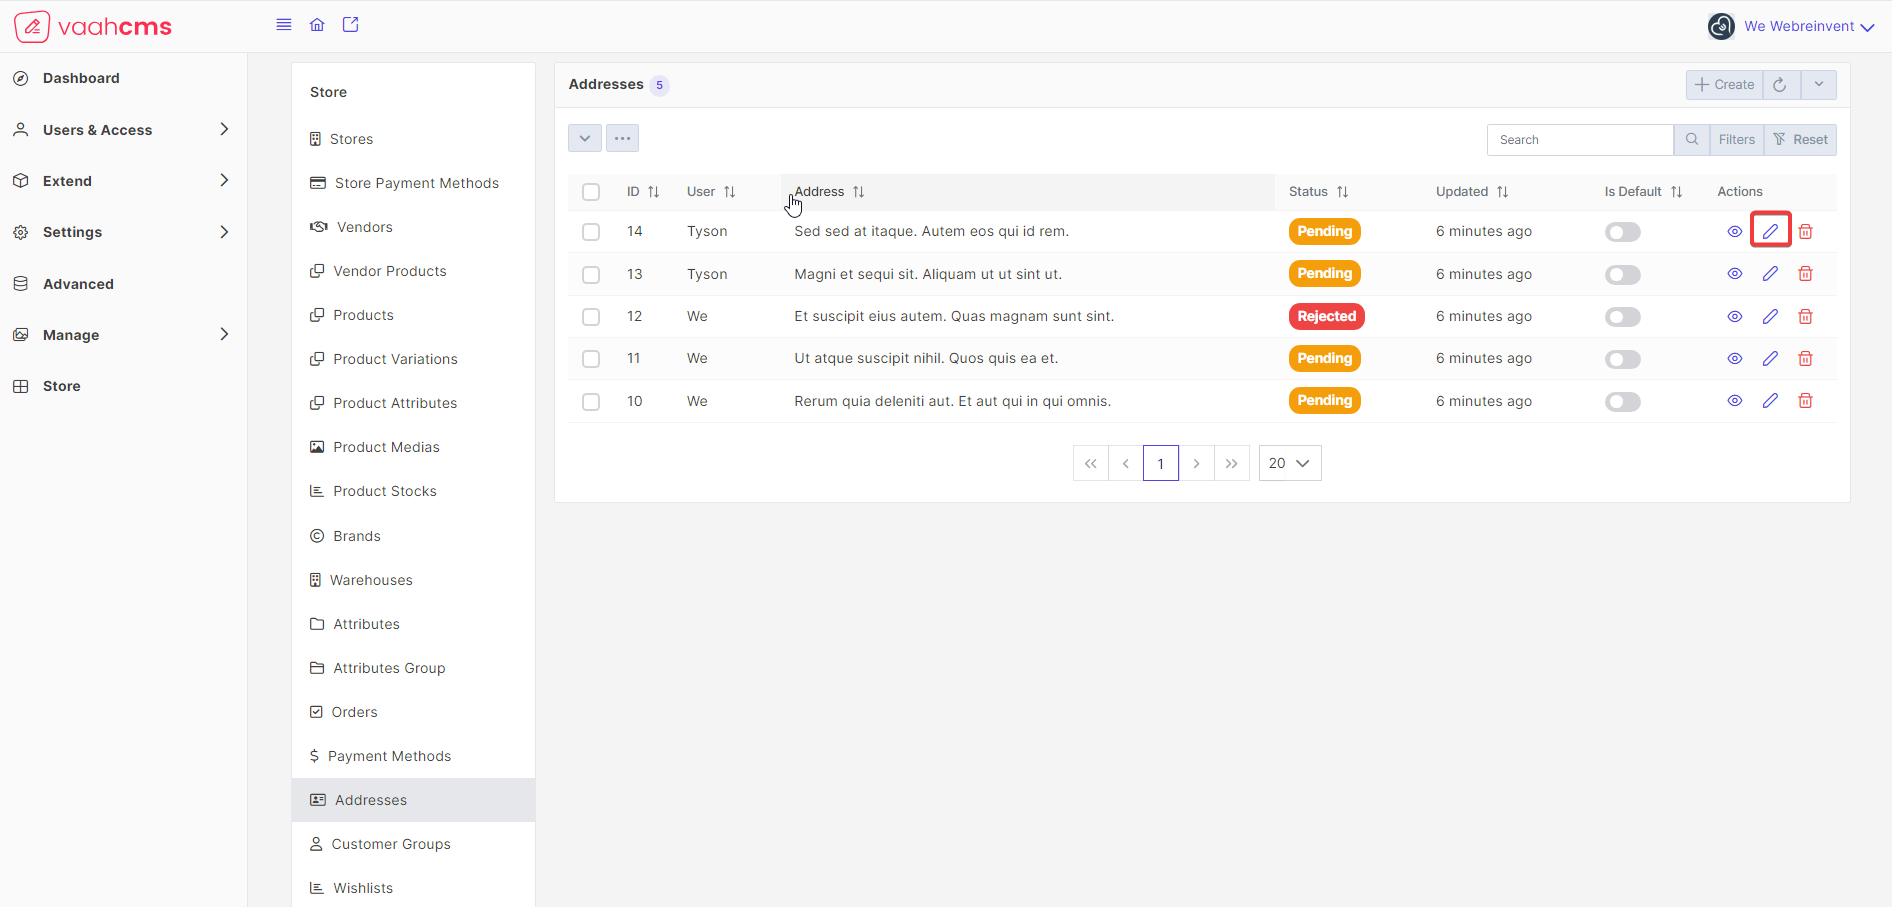
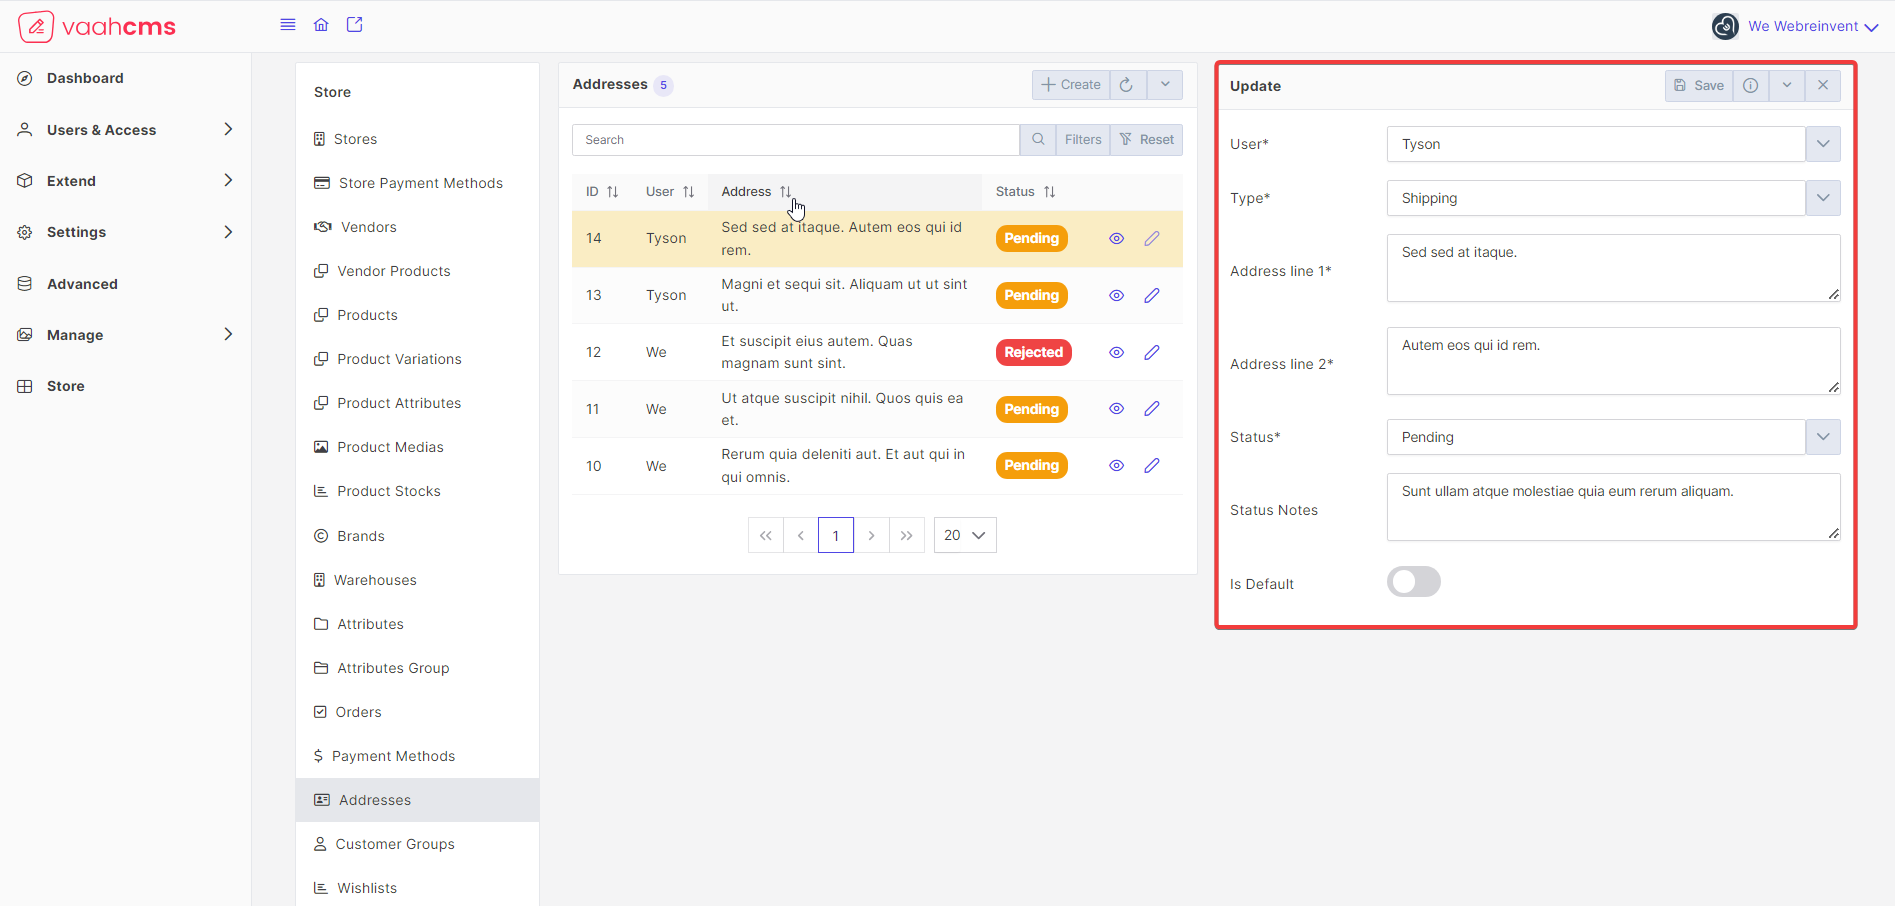
Update
To update a existing address, you need to click on pencil icon present under the Actions column on the list page
of Addresses crud.
Follow the below image for reference:
 A form will open to the right side of your screen with the prefilled values, you just need to update the values of the
field that you want to update.
A form will open to the right side of your screen with the prefilled values, you just need to update the values of the
field that you want to update.
Follow the below image for reference:
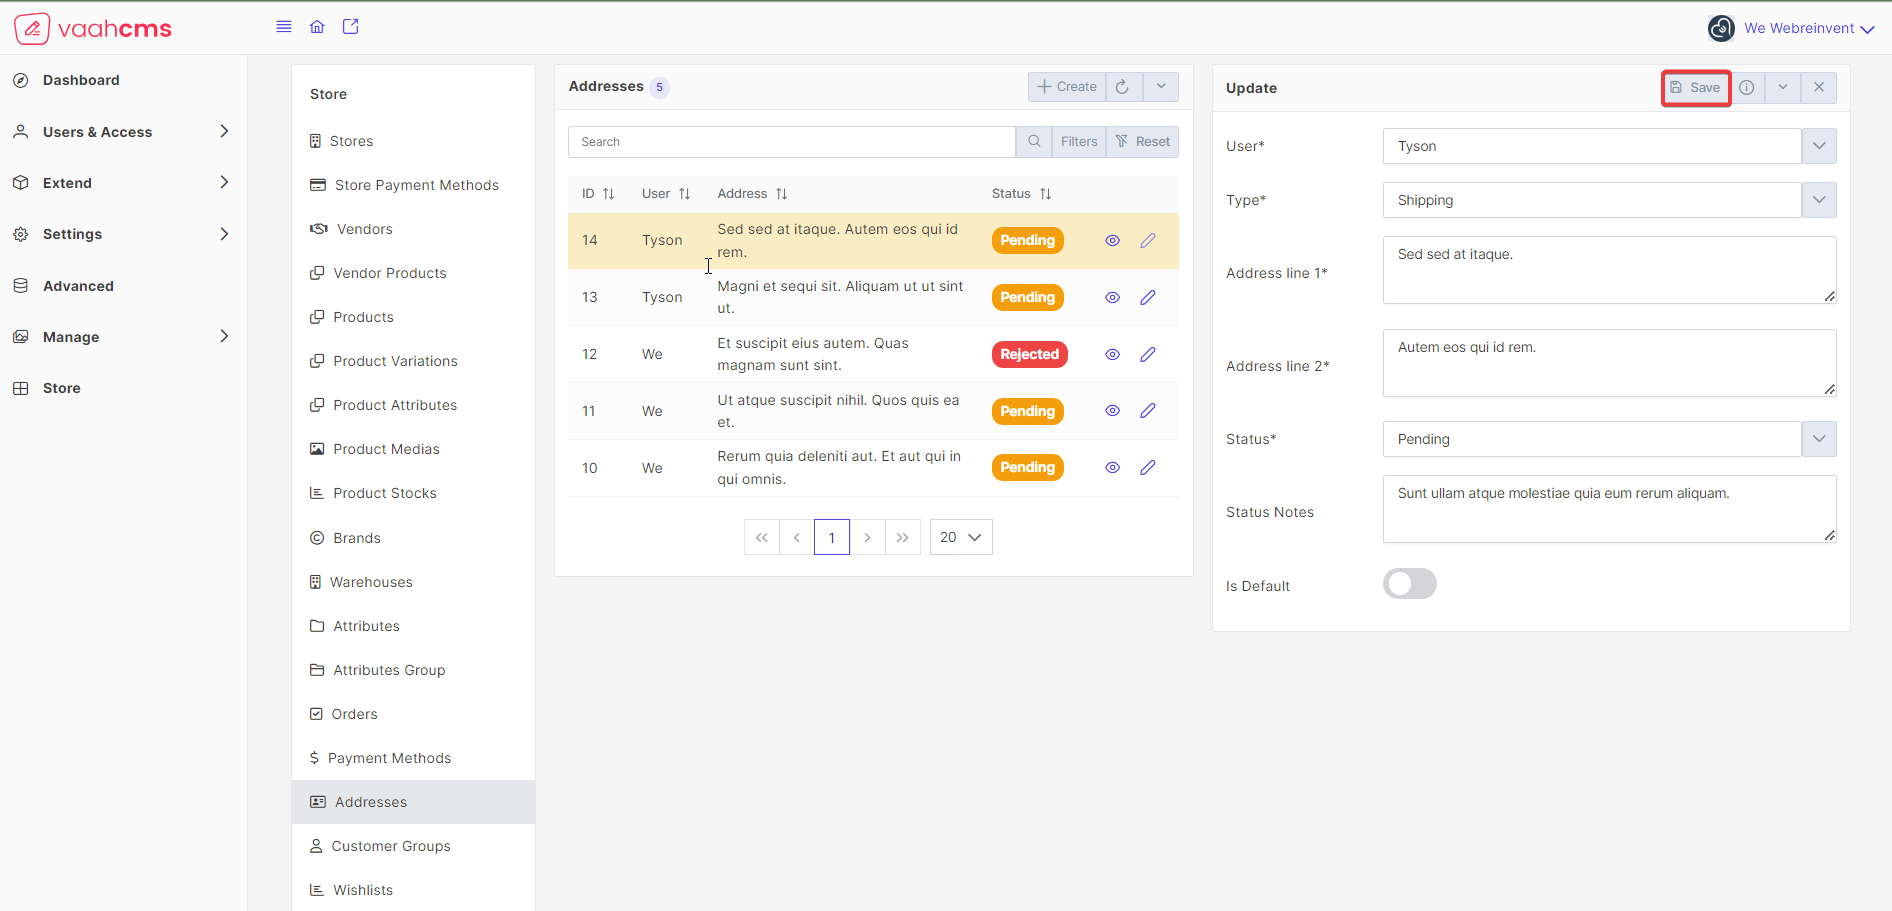
 Just click on
 Save button present at the top
Other options available in the Update window
Follow the below image for reference:
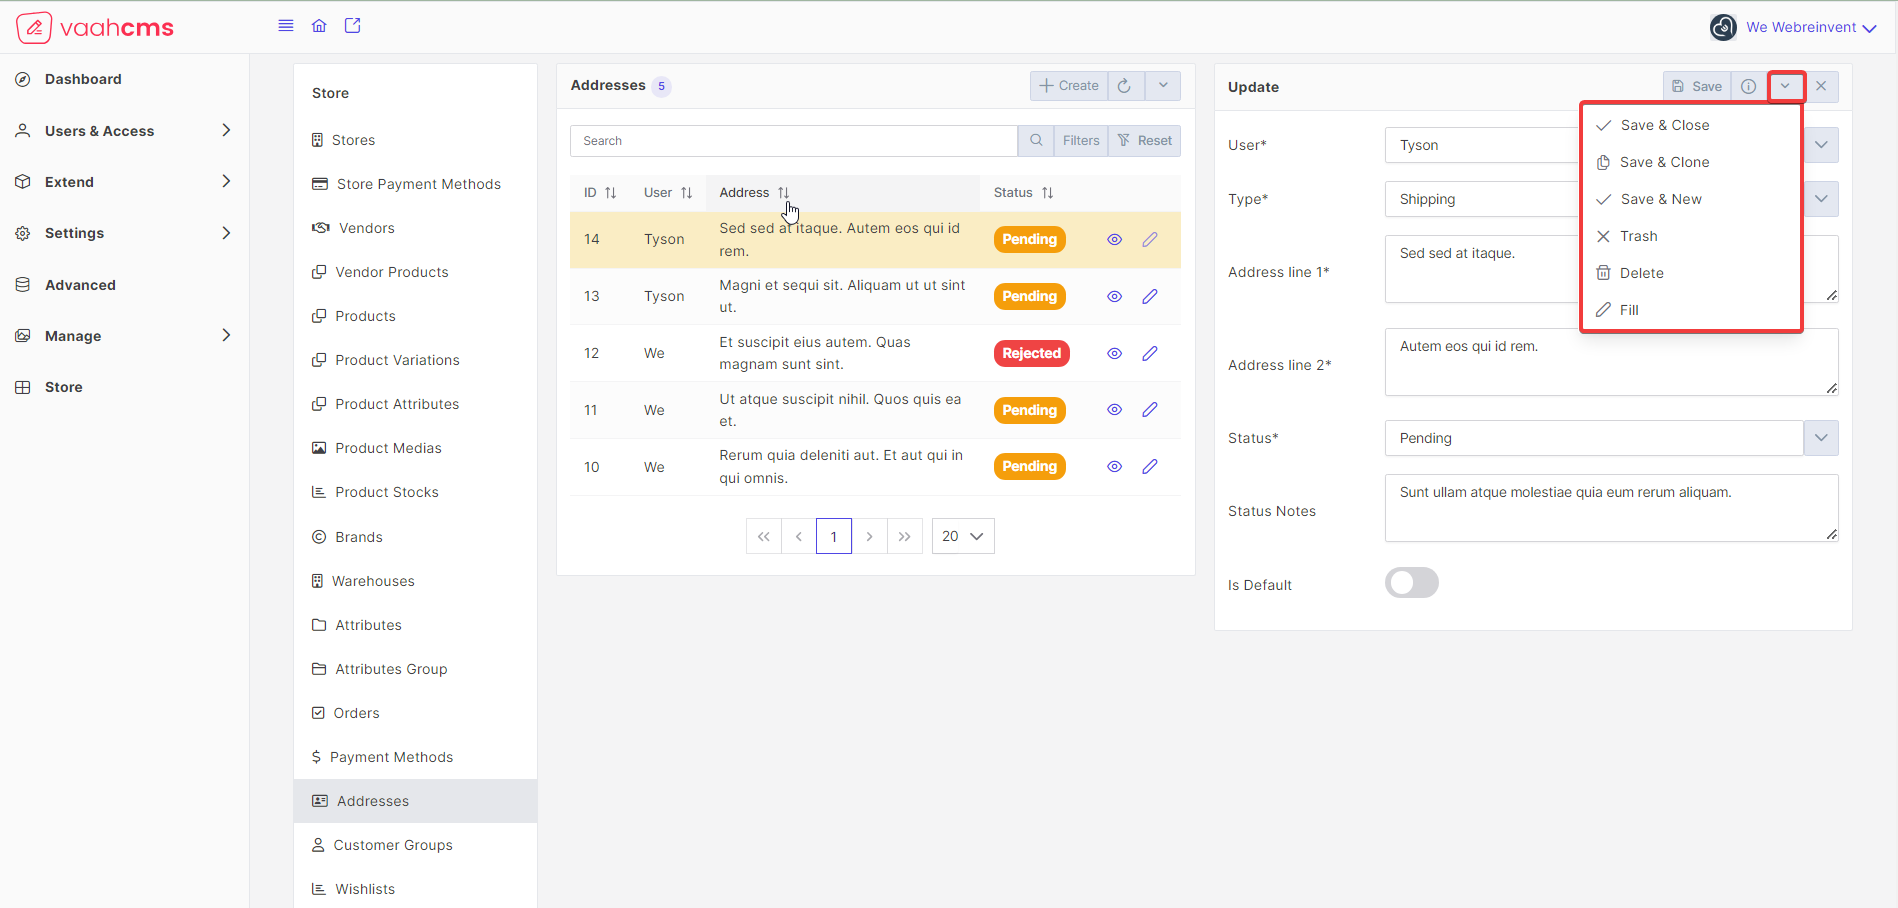
Save & Close: It will save the record and redirect you to the list page ofAddressescrudSave & Clone: It will save the record and clone all the details of that particular Address and prefill all the values in a new formSave & New: It will save the record and open a new form for you to add newAddressTrash: It will trash that particularAddressbut give you the option to restore thatAddresswith arestorebuttonDelete: It will ask for your confirmation before deleting that particularAddressFill: It will fill all the fields with a valid value
NOTE
When you enable a address as default for a particular user it means that previous default address for that particular
user now no longer the user's default address.
Trash
Meaning : When a address is moved to the Trash, it is not immediately deleted from the system. Instead, it is temporarily
stored in the Trash, allowing users to recover or restore the address if needed. This provides a safety net in case the
address was deleted accidentally or if the user wants to retrieve it at a later time.
Visit the list page of address, here you will have the various options to trash a address.
- Trash the
Addressfrom selected menu list : just click on thedropdownmenu present on the list page. You will have various options to choose from.
Follow the below image for reference: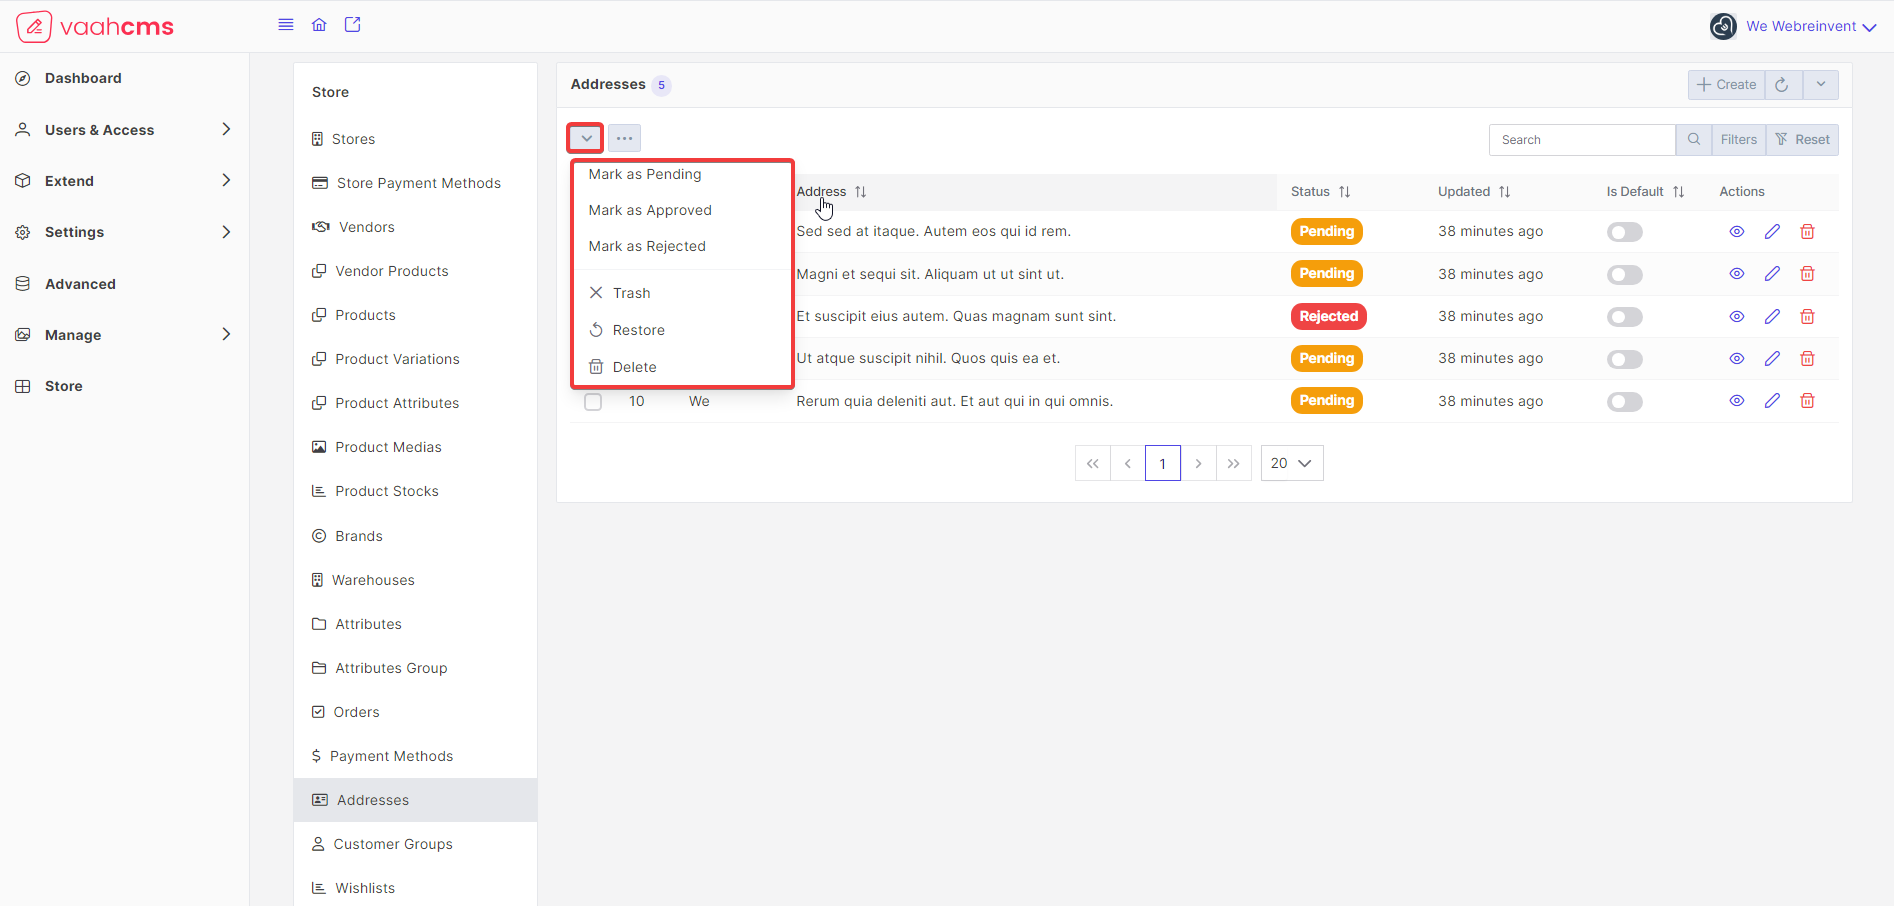 To trash the
 Addressfrom here you just need to select that particular address and select the checkbox in front of the address that you want to trash and choose theTrashoption from the options available in the menu, you will get the messageaction was successful
Follow the below image for reference: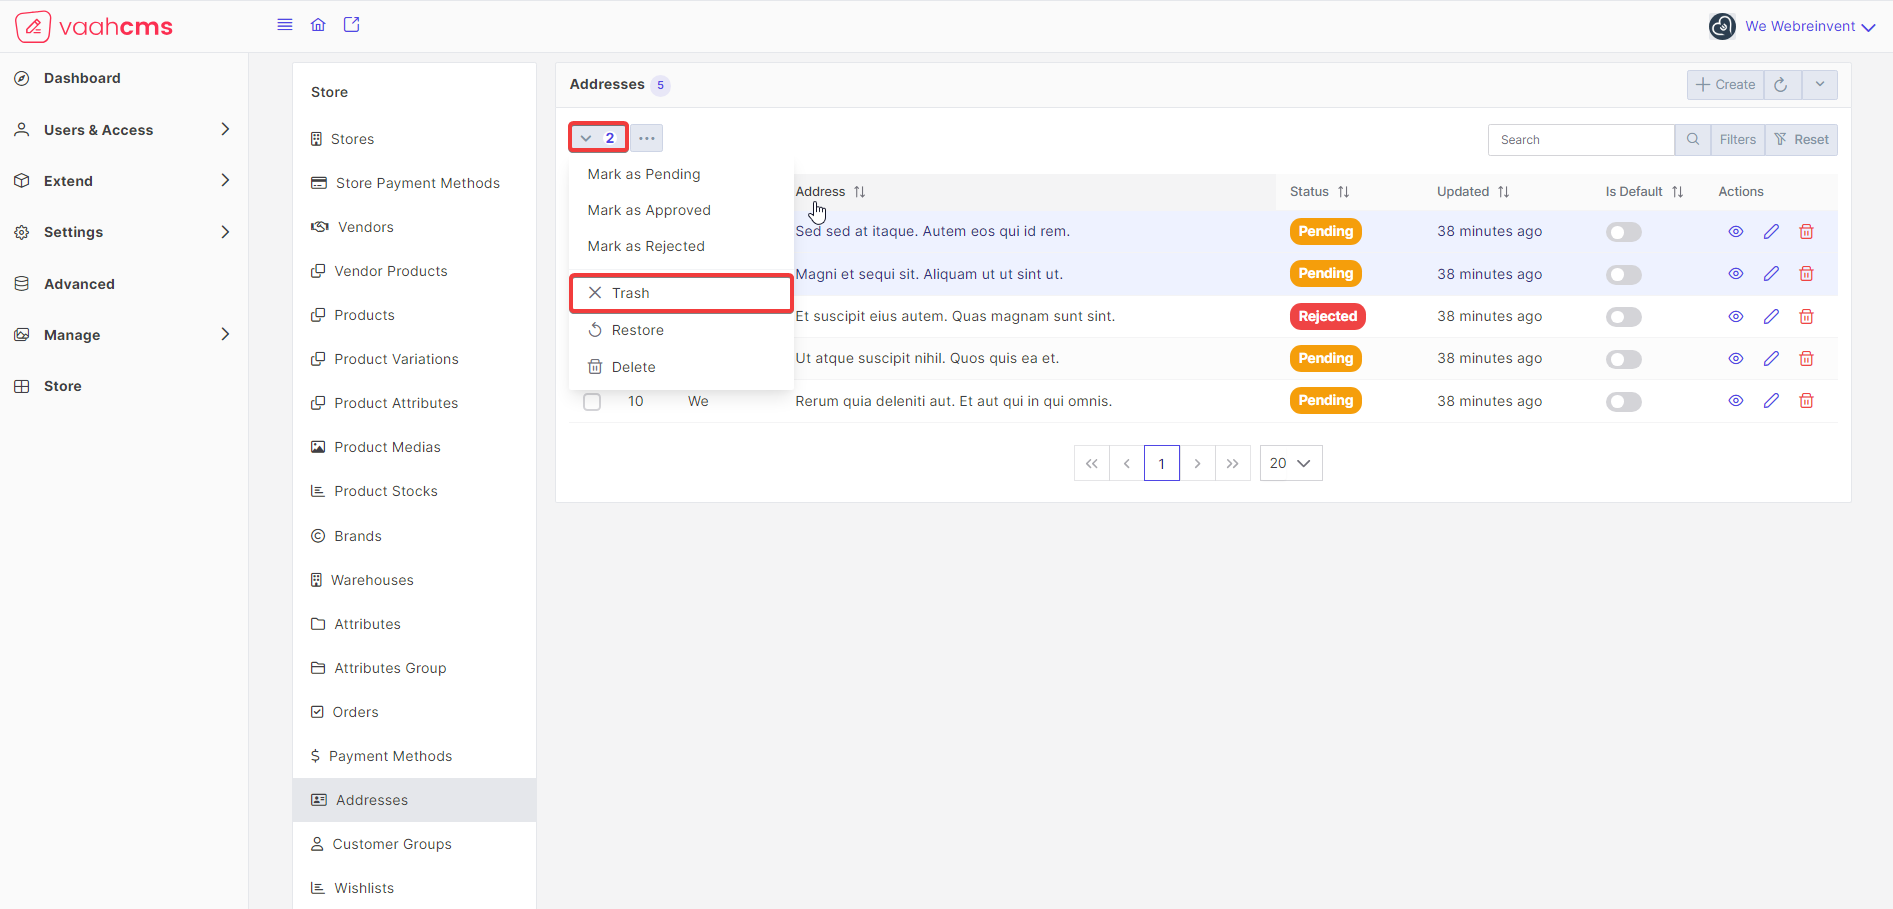
- Trash the
Addressfrom bulk menu list: ToTrashaAddressfrom here, just click on three dots available on the list page ofAddressescrud.
Follow the below image for reference: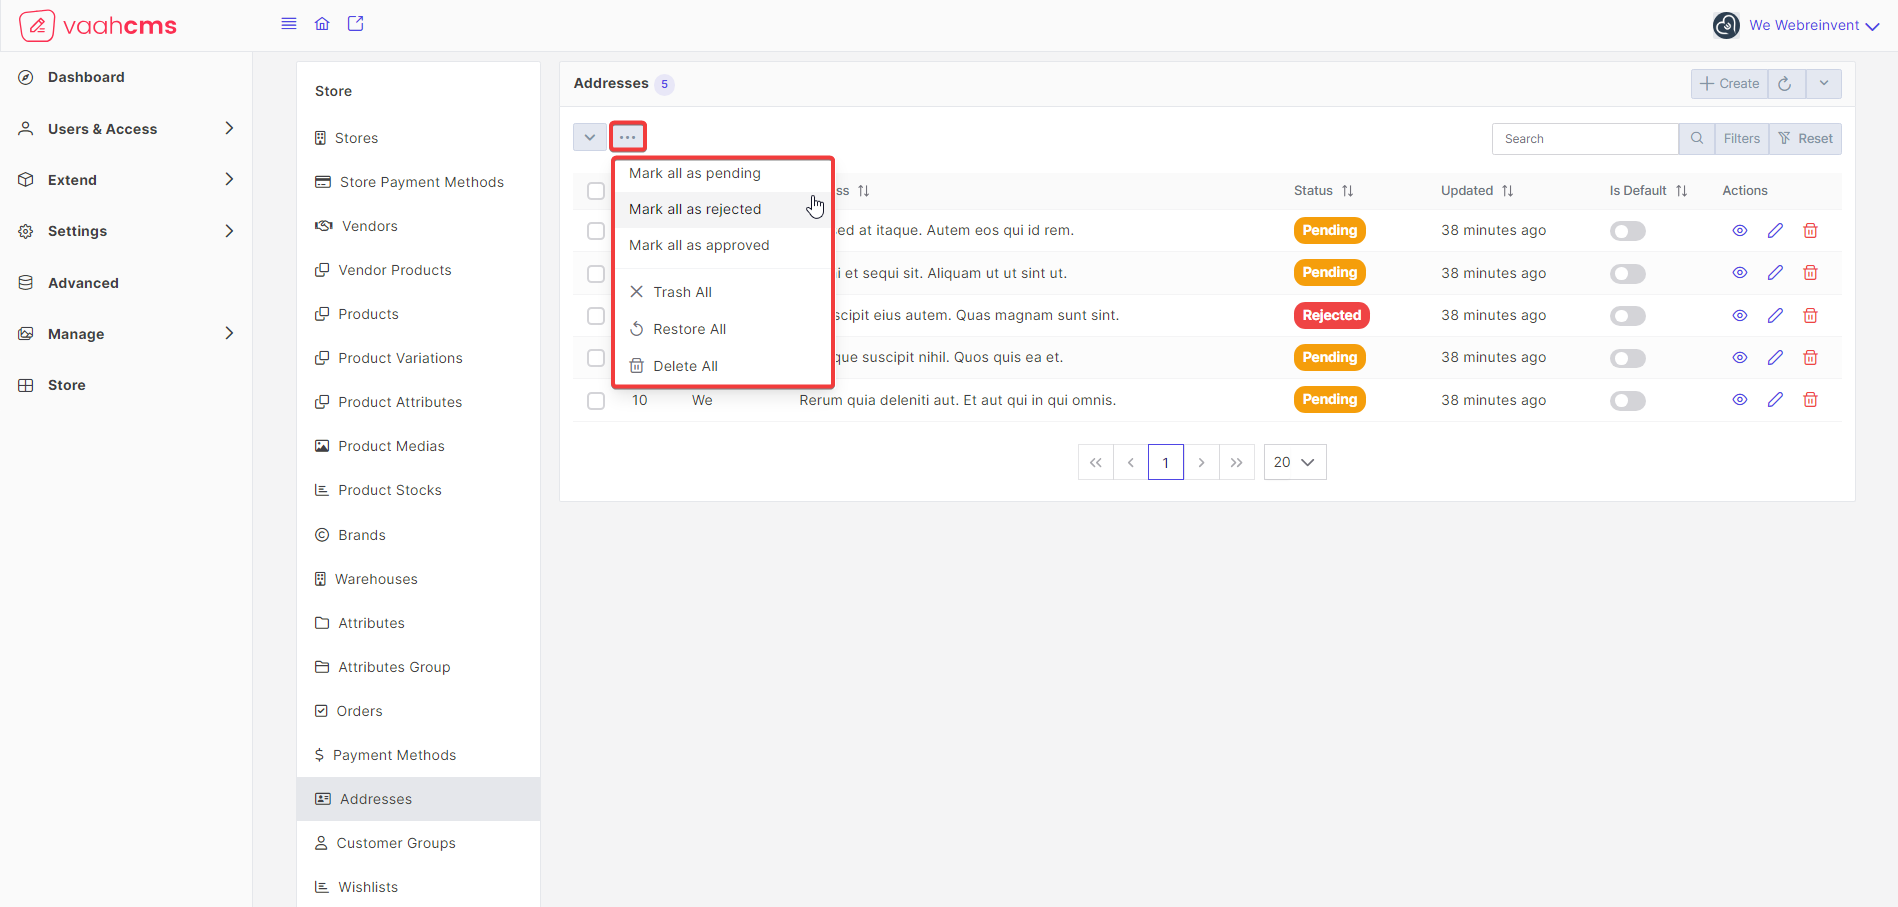 To trash the
 Addressesfrom here you just need to select theTrash Alloption from the options available in the menu, you will get the popup which will askDo you want to Trash all the record(s)?choose the yes option from there you will get the messageaction was successful
Follow the below image for reference: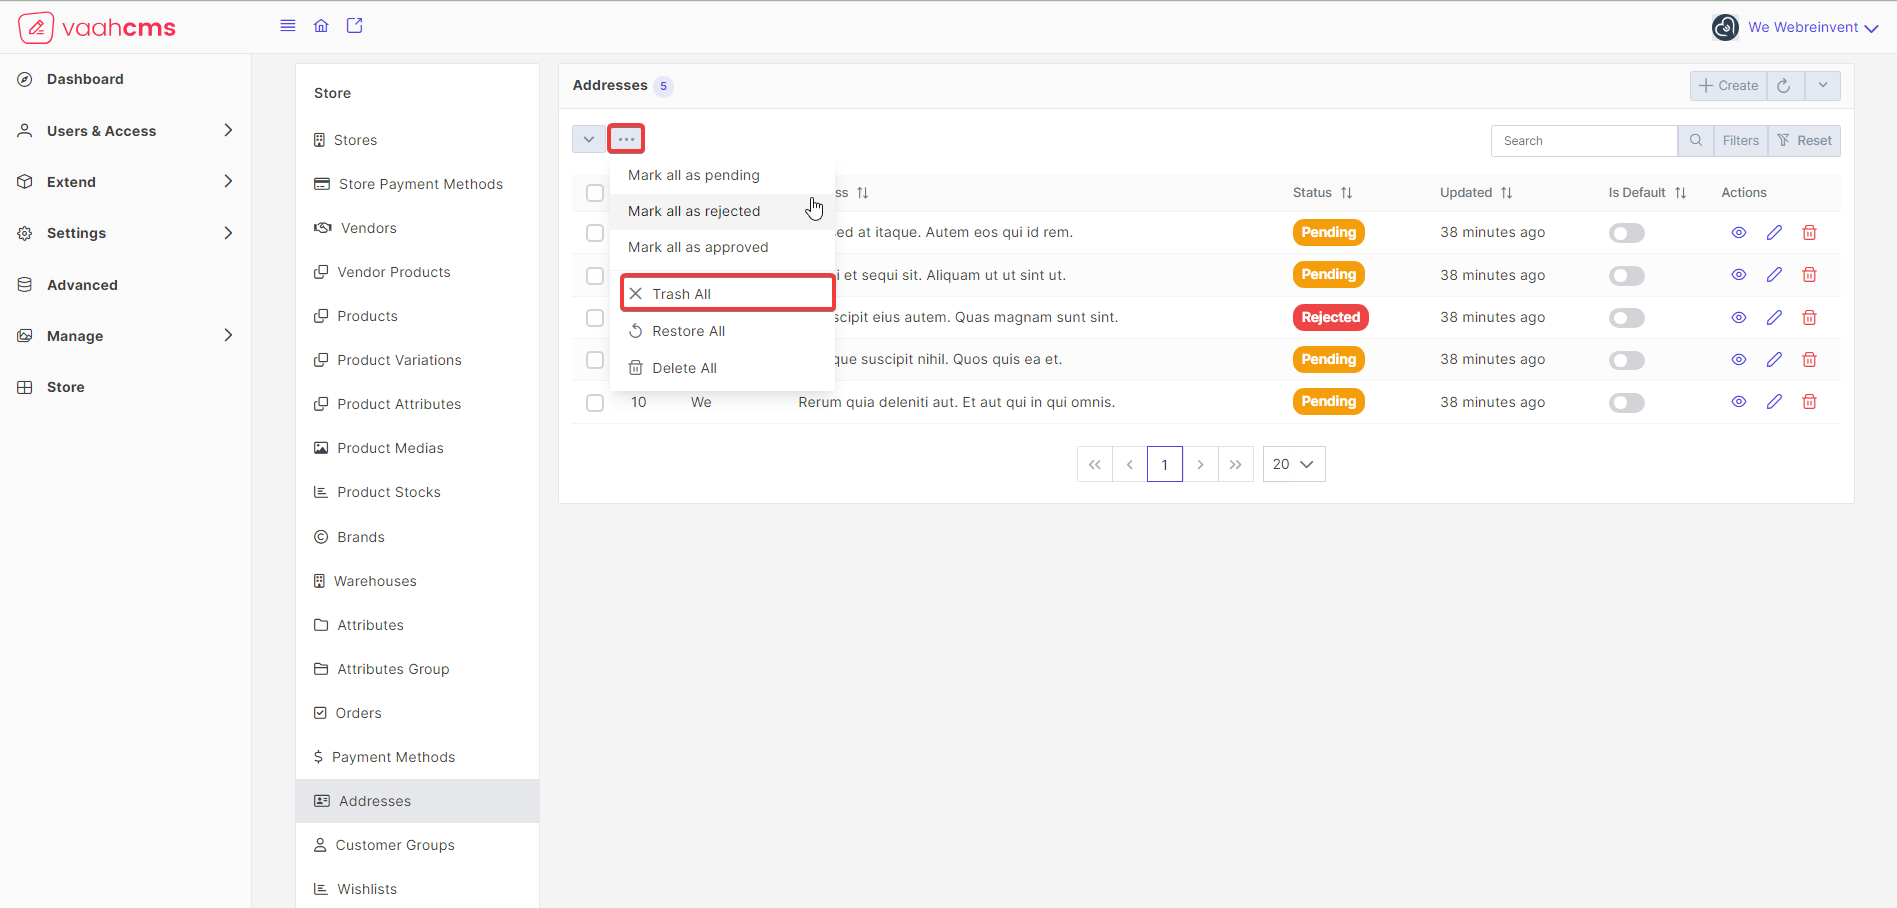
- Trash the
Addressfrom Action Column present on the list page :
Follow the below image for reference: To
To TrashtheAddressfrom here you just need to click on trash icon present under theActionscolumn on the list page ofAddressyou will get the messageaction was successfuland that particularAddresswill be trashed successfully
NOTE
When you trash a default address for a user, that address will be removed from default address
before saving it into the database, it means whenever you will restore that address that address will be no longer
be the default address for that particular user.
Delete
Meaning : Delete refers to the action of removing a address from the system or marking it as inactive.
Deleting a address is useful when you no longer want use that address for customers.
There are various options to Delete a Address
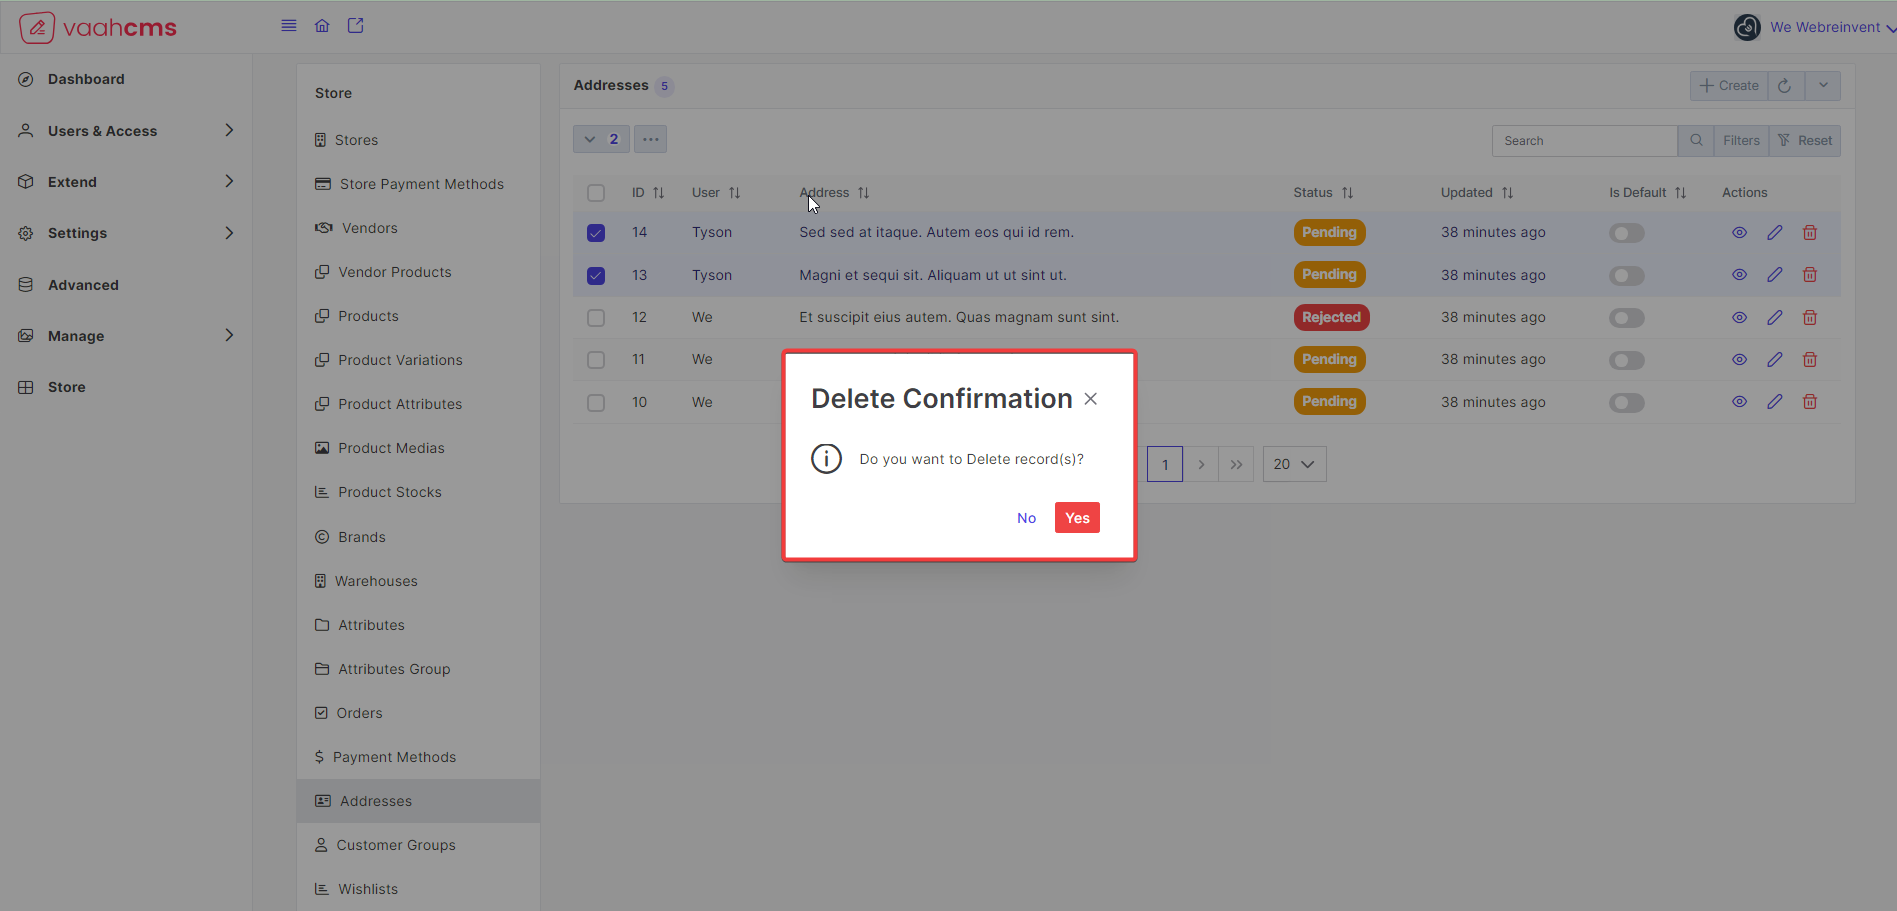
- Delete the
Addressfrom selected menu list : click on thedropdownicon present on the list page, you will have various options to choose from
Follow the below image for reference: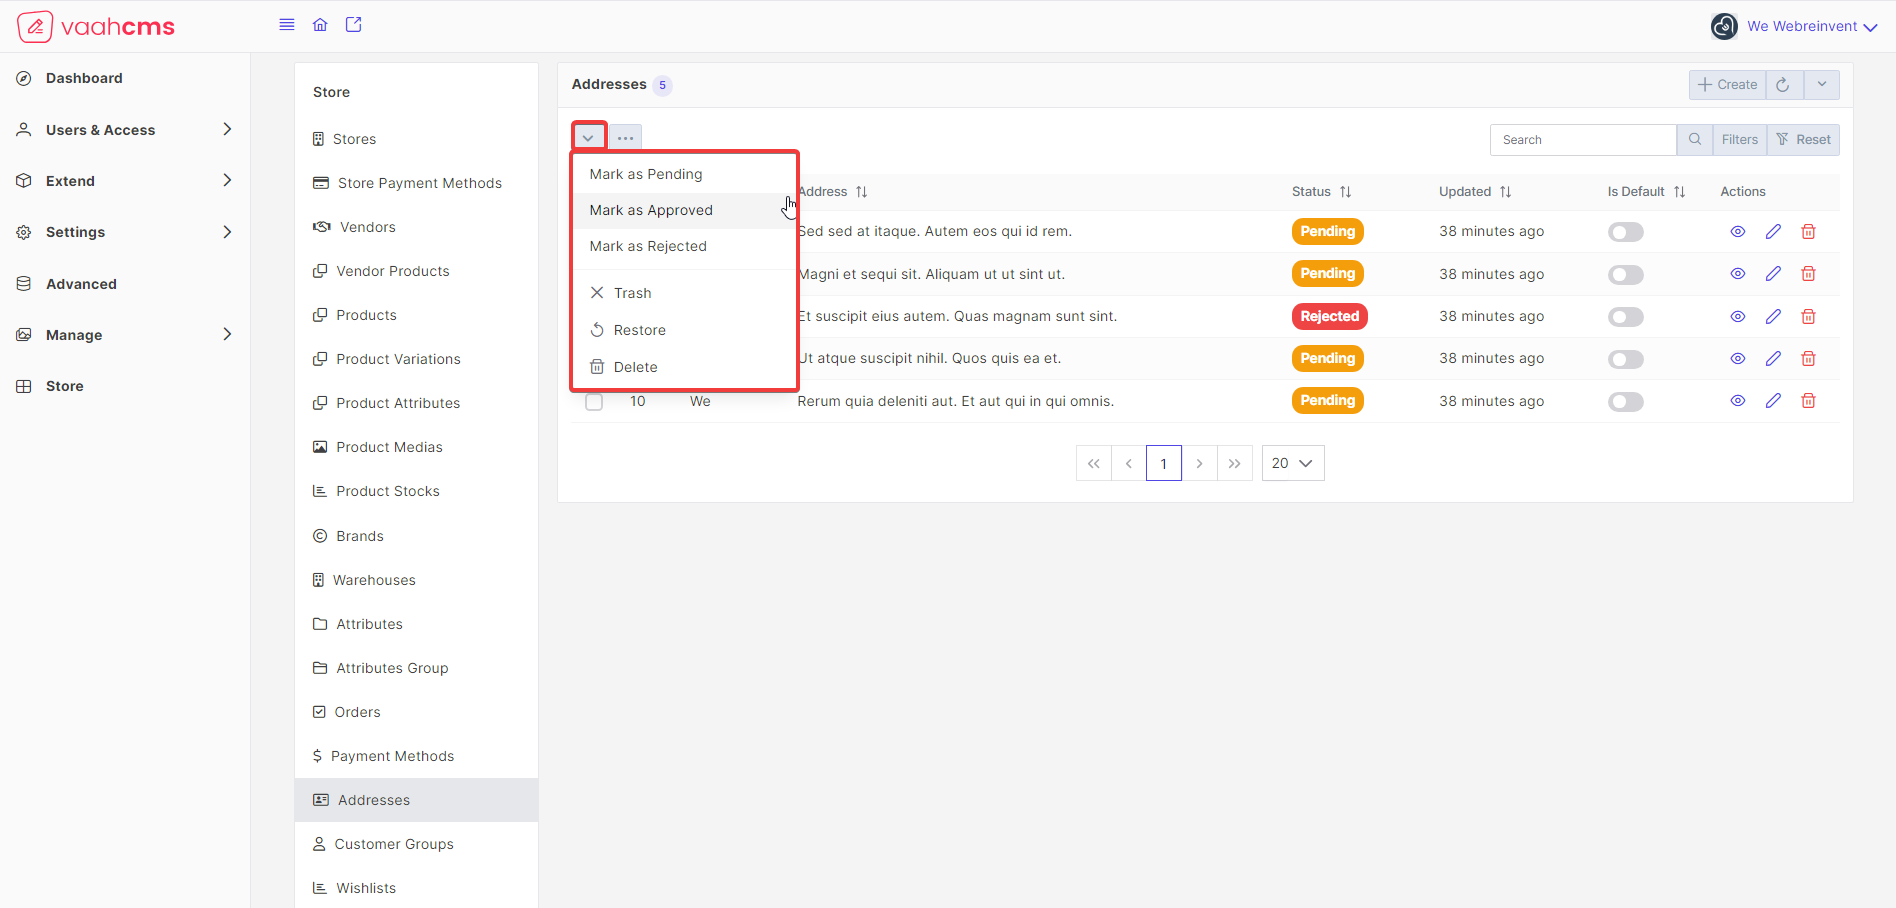 To
To DeletetheAddressfrom here you just need to select that particular address by selecting the checkbox in front of theAddressthat you want to delete and choose theDeleteoption from the options available in the menu, it will ask forDo you want to Delete records,click on yes and you will get the messageaction was successfuland that particularAddresswill be deleted successfully.
Follow the below images for reference: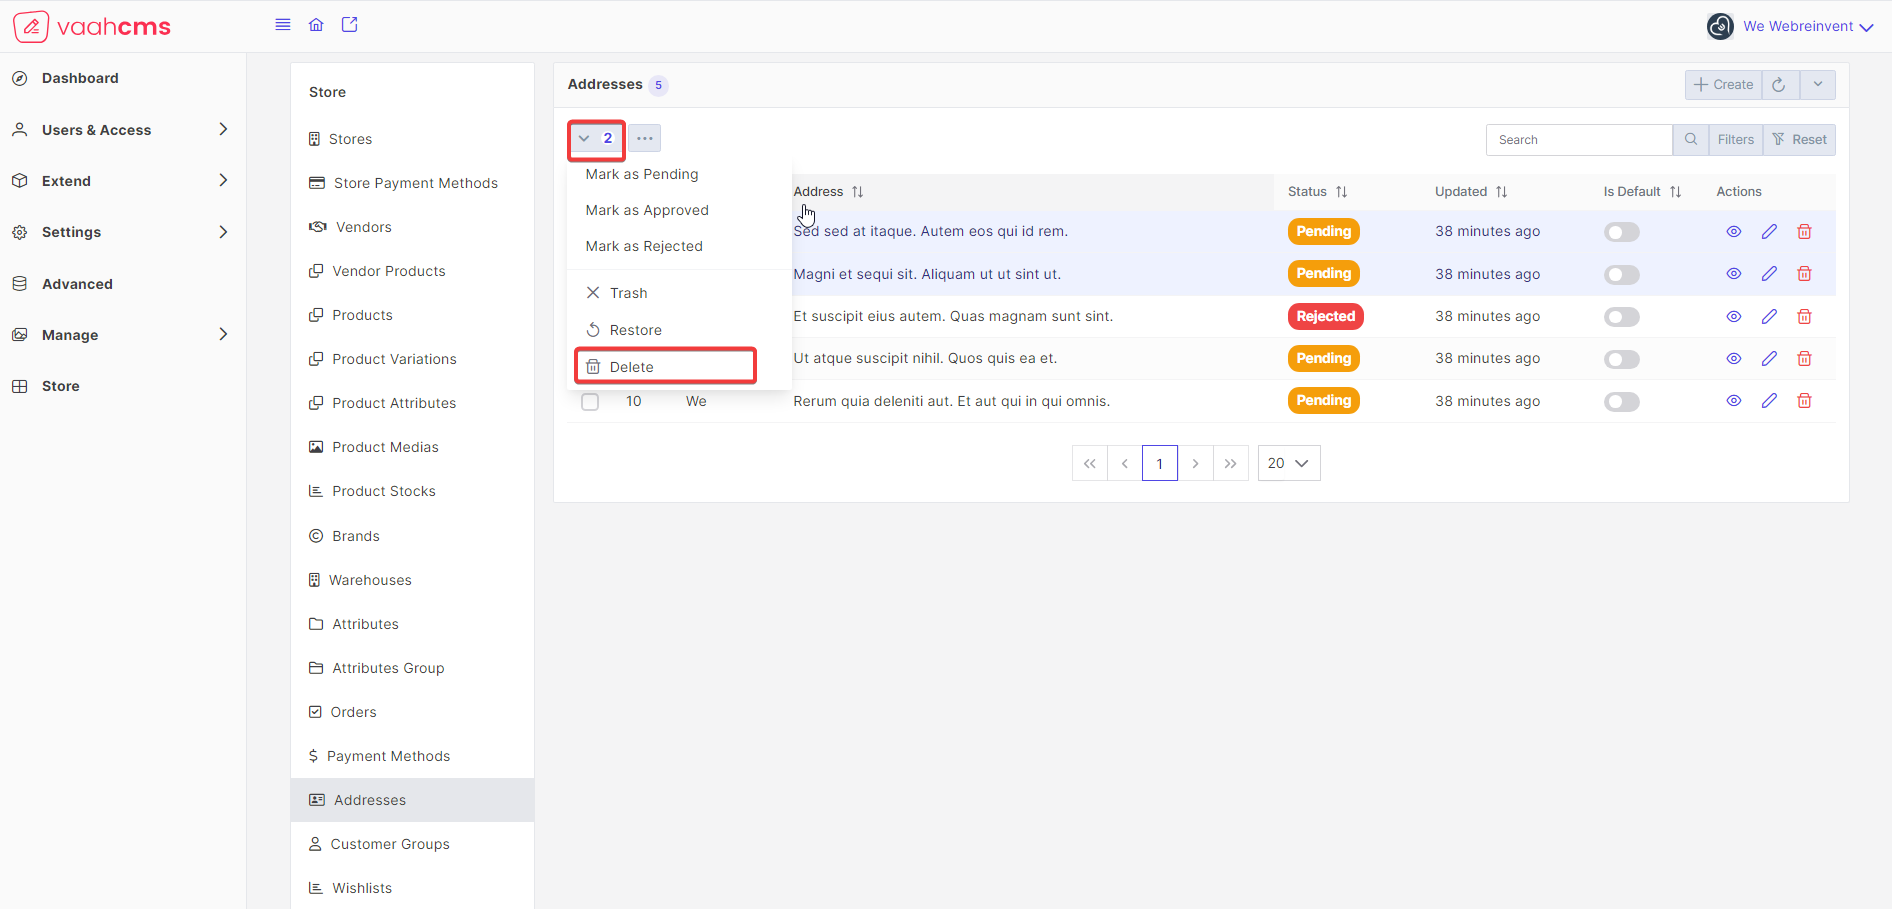
- Delete the
Addressfrom bulk menu list Follow the below image for reference: To
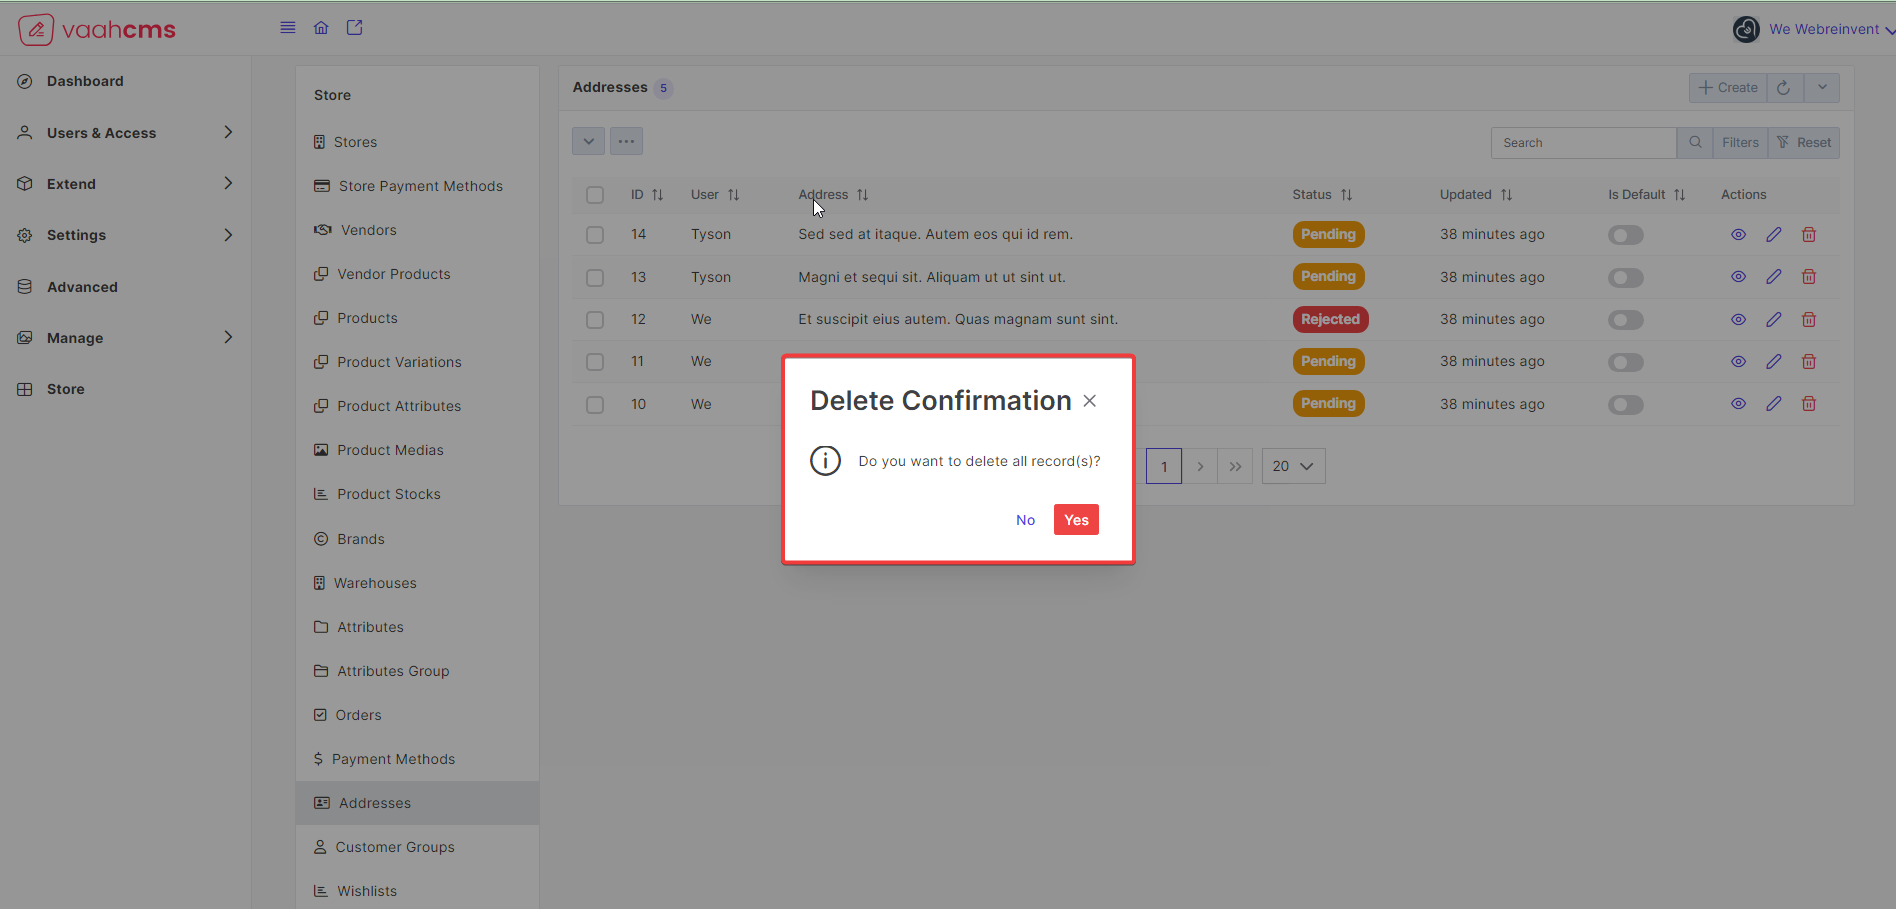
To DeletetheAddressesfrom here you just need to select theDelete Alloption from the options available in the menu, you will get the popup which will askDo you want to Delete all the record(s)? choose the yes option from there you will get the messageaction was successful`.
Follow the below images for reference: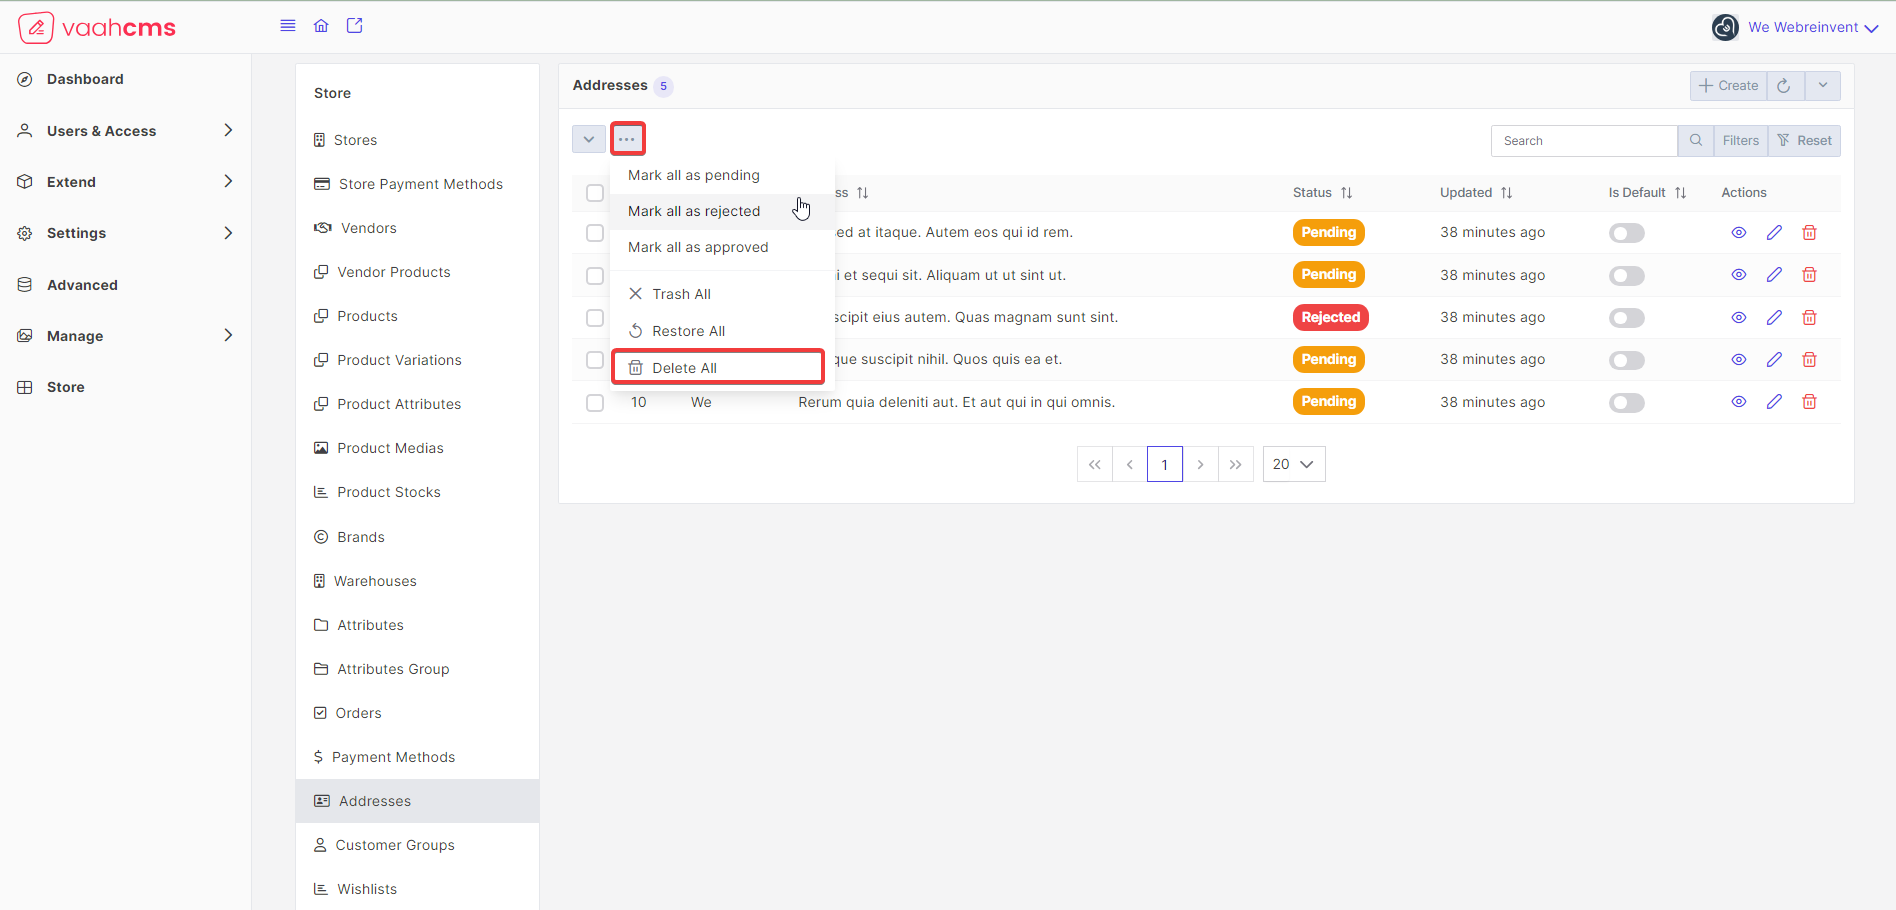
Restore
Meaning : The Restore option allows you to bring back a previously deleted or trashed Address and make it active
again. This can be useful if you accidentally deleted a Address or if you need to retrieve a Address that was
temporarily removed from your store but still has relevant information or data associated with it.
Visit the list page of Address, here you will have the various options to restore a address.
RestoretheAddressfrom selected menu list, just click on thedropdownmenu present on the list page. You will have various options to choose from.
Follow the below image for reference:
To RestoretheAddressfrom here you just need to select that particular address and select the checkbox in front of the address that you want toRestoreand choose theRestoreoption from the options available in the menu, you will get the messageaction was successful.
Follow the below image for reference: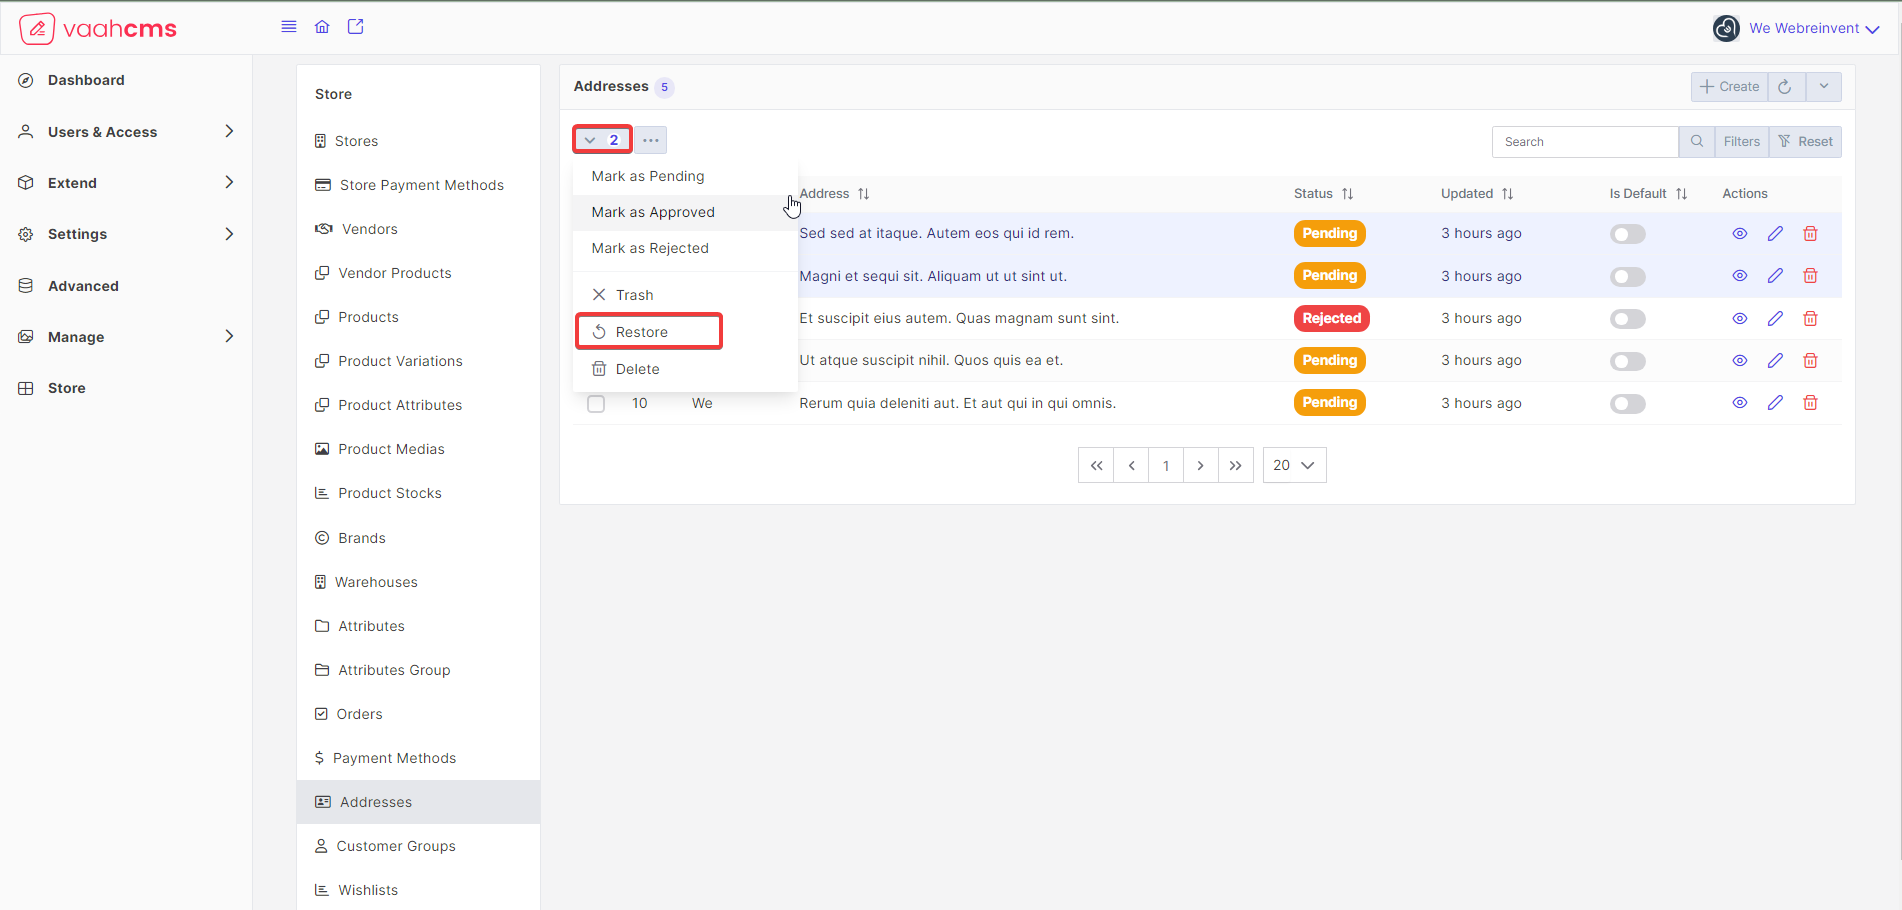
- Restore the
Addressfrom bulk menu list: To RestoreAddressesfrom here, just click on three dots available on the list page ofAddresscrud.
Follow the below image for reference:
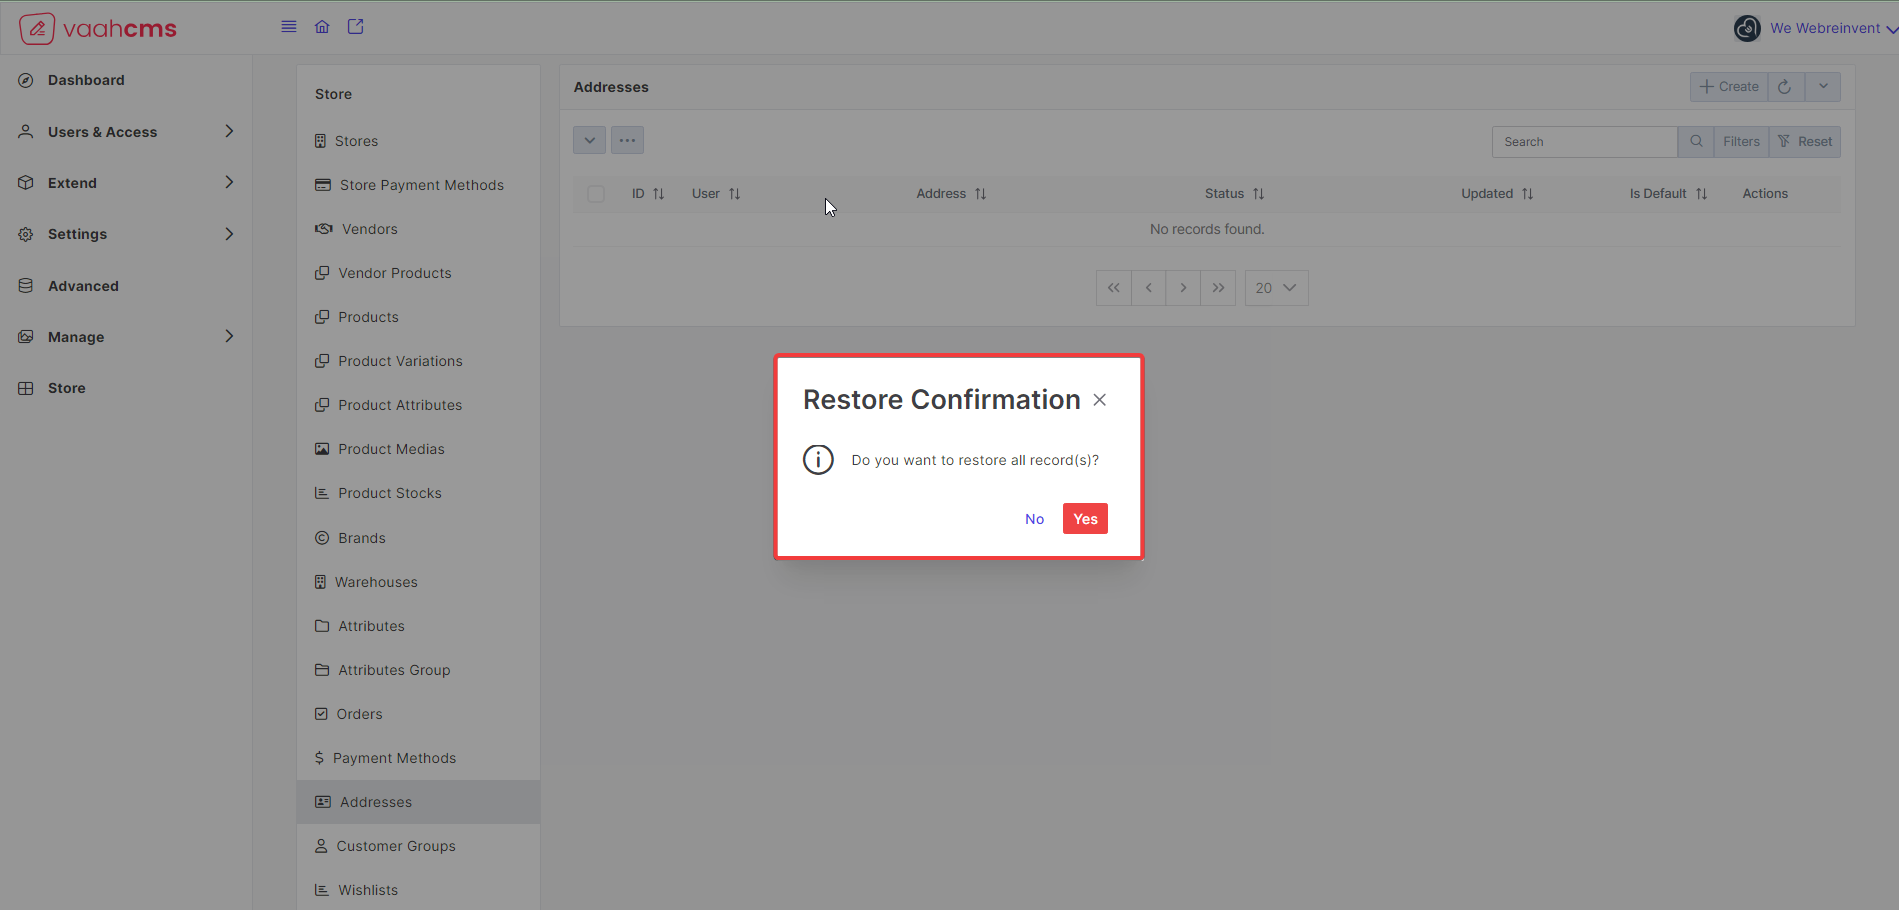
To RestoretheAddressesfrom here you just need to select theRestore Alloption from the options available in the menu, you will get the popup which will askDo you want to Restore all the record(s)?choose the yes option from there you will get the messageaction was successful
Follow the below image for reference: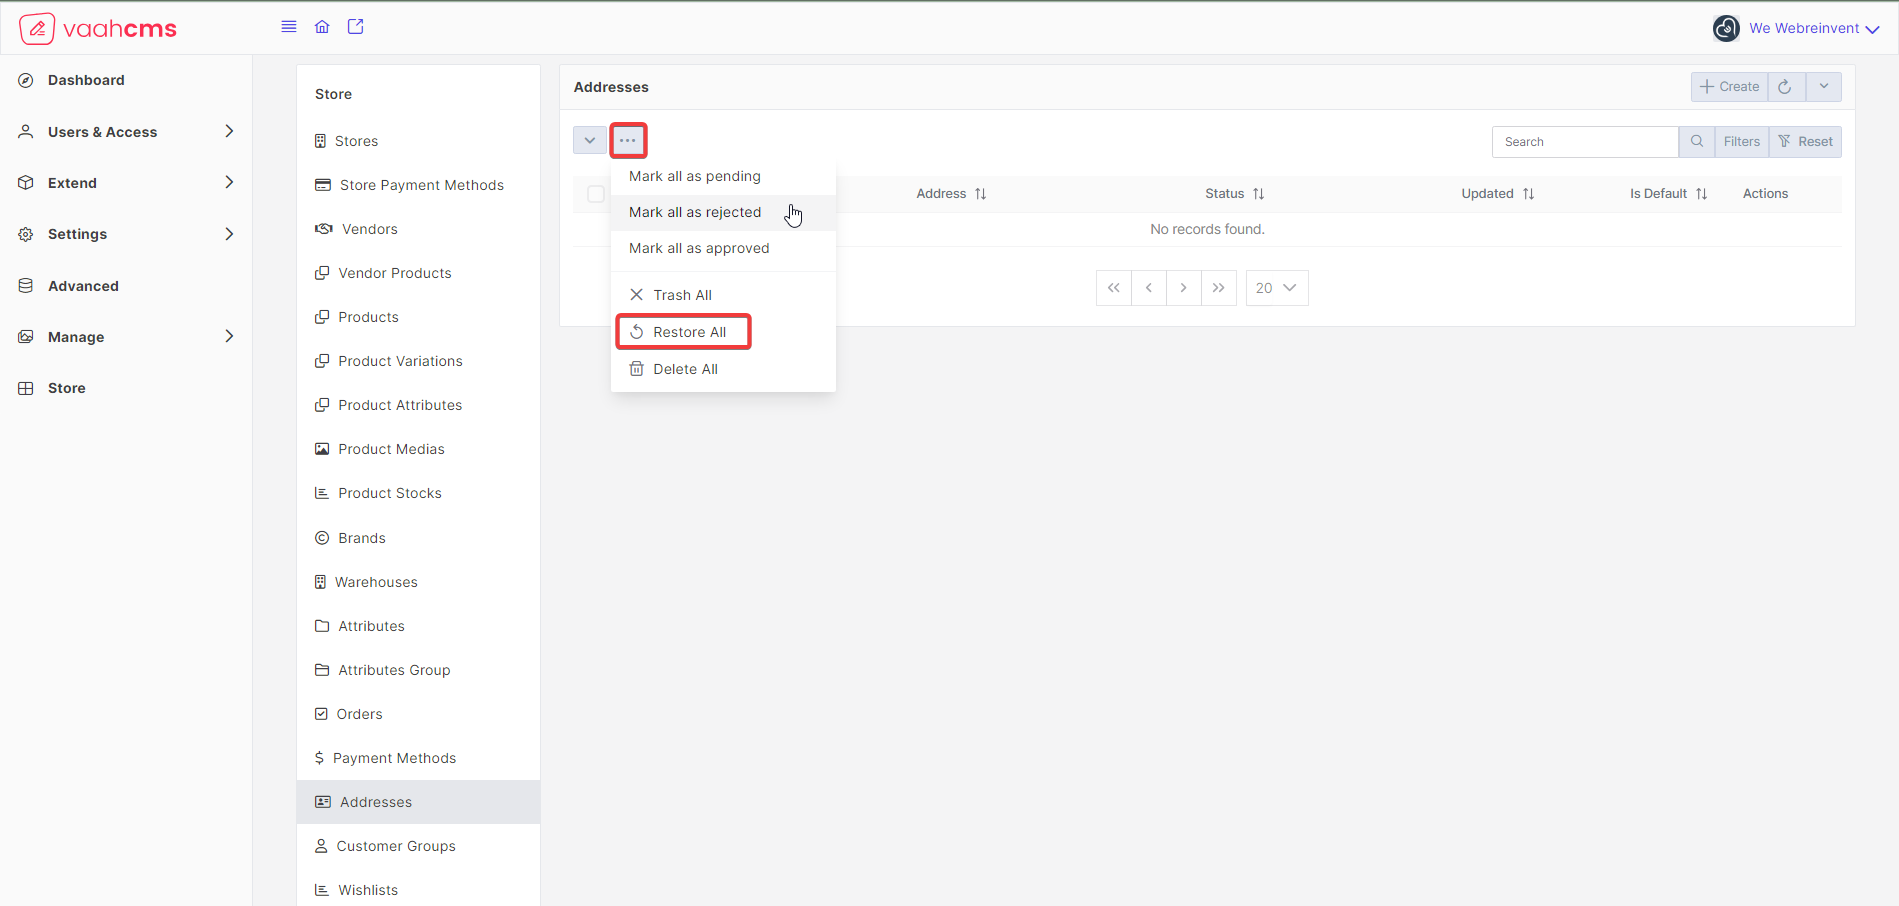
NOTE
When you restore a address that was earlier marked as default address for a user, that address will be removed from
default address before restoring, it means whenever you will restore that address that address will be no longer
be the default address for that particular user.
View
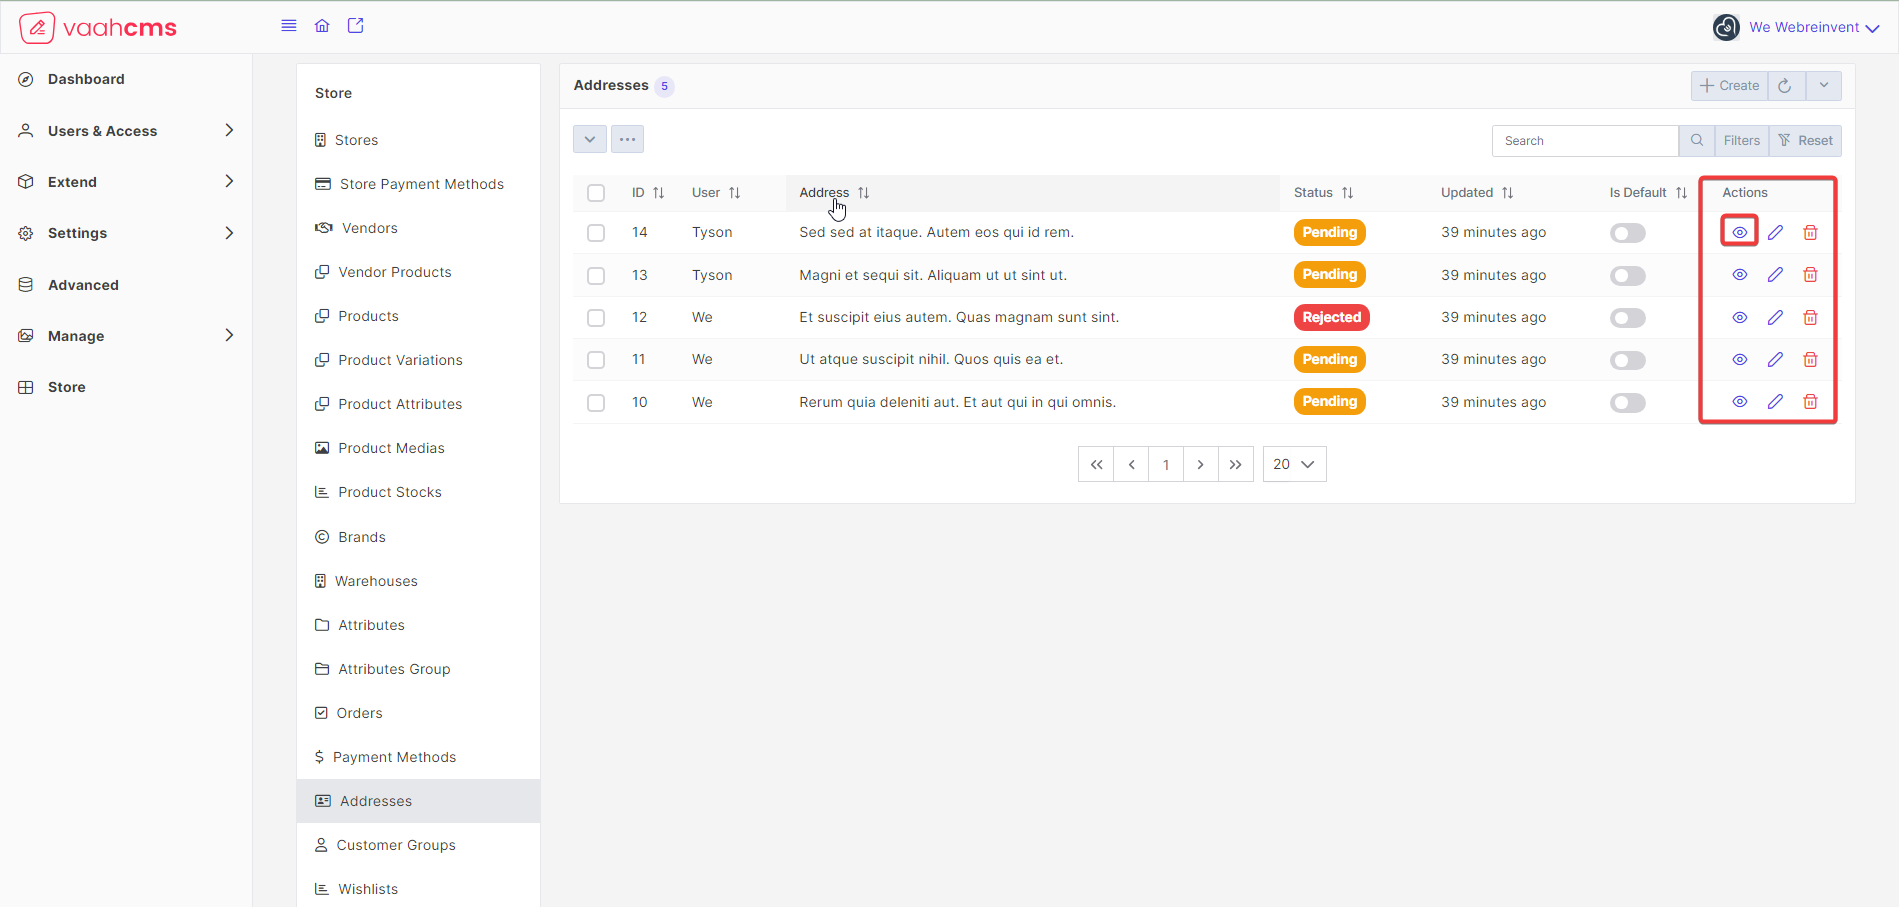
Visit the list page of Addresses CRUD, here you will have the option to view the details of a particular address
In the list page of Addresses CRUD, under the Actions Column, click on the eye icon, a new page will open to the
right side of your screen.
Follow the below images for reference:

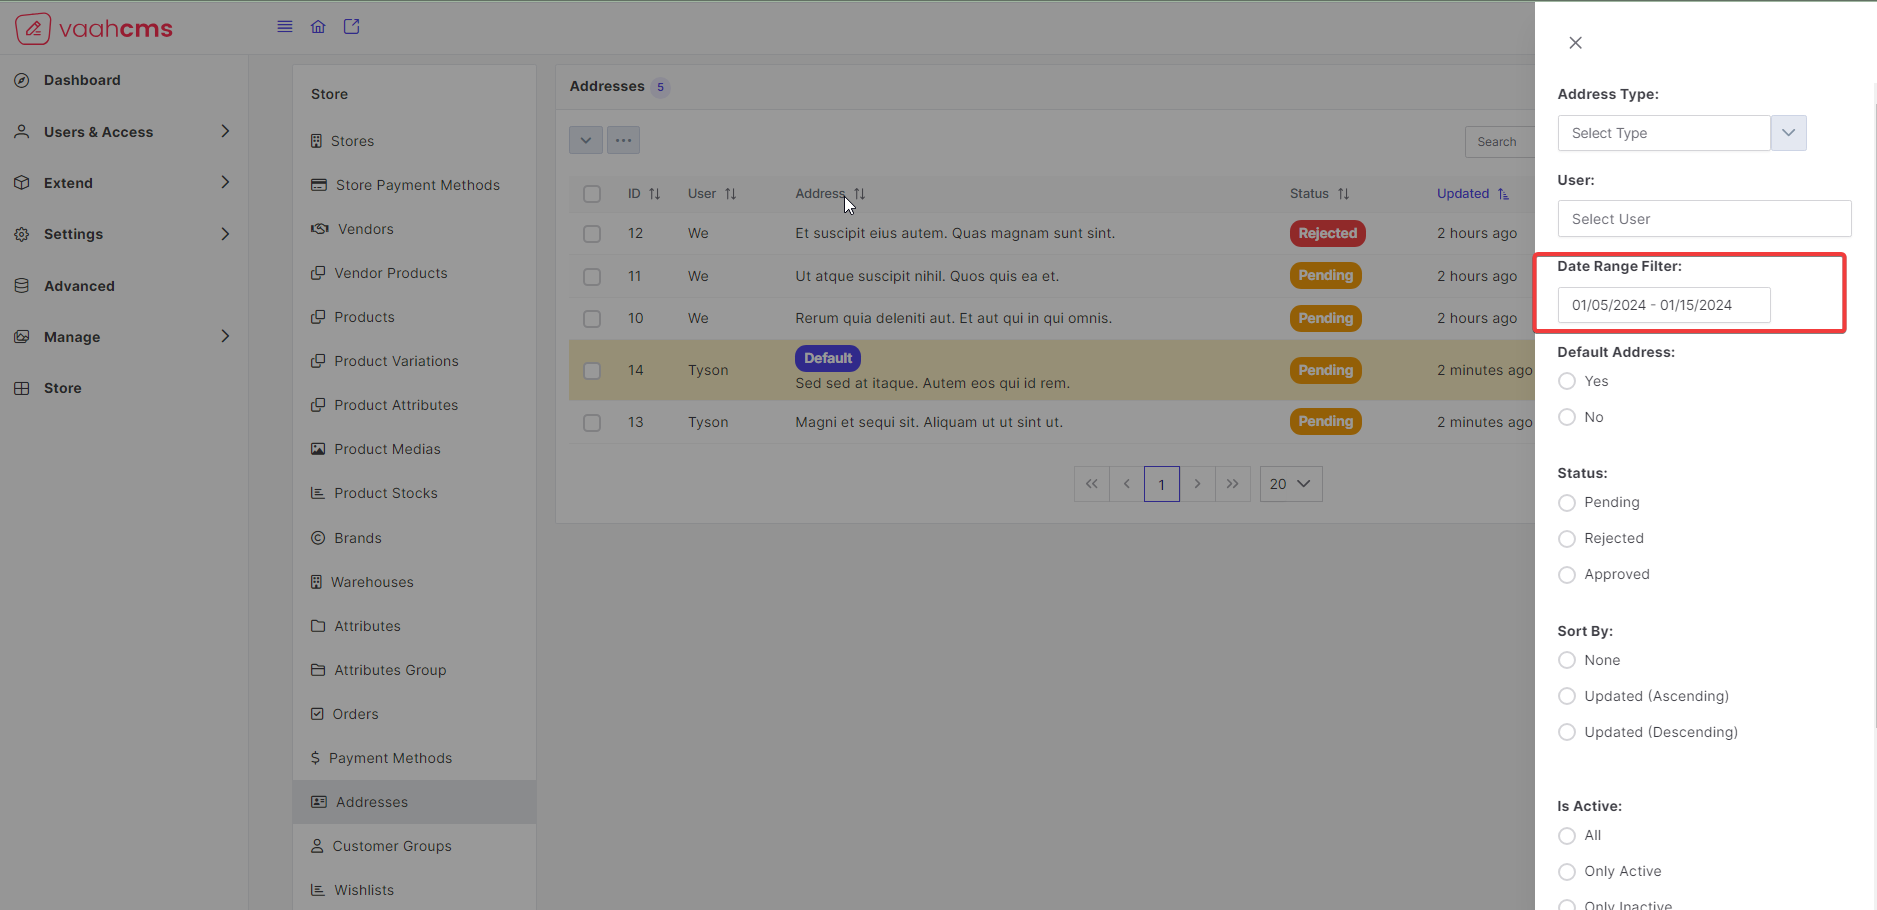
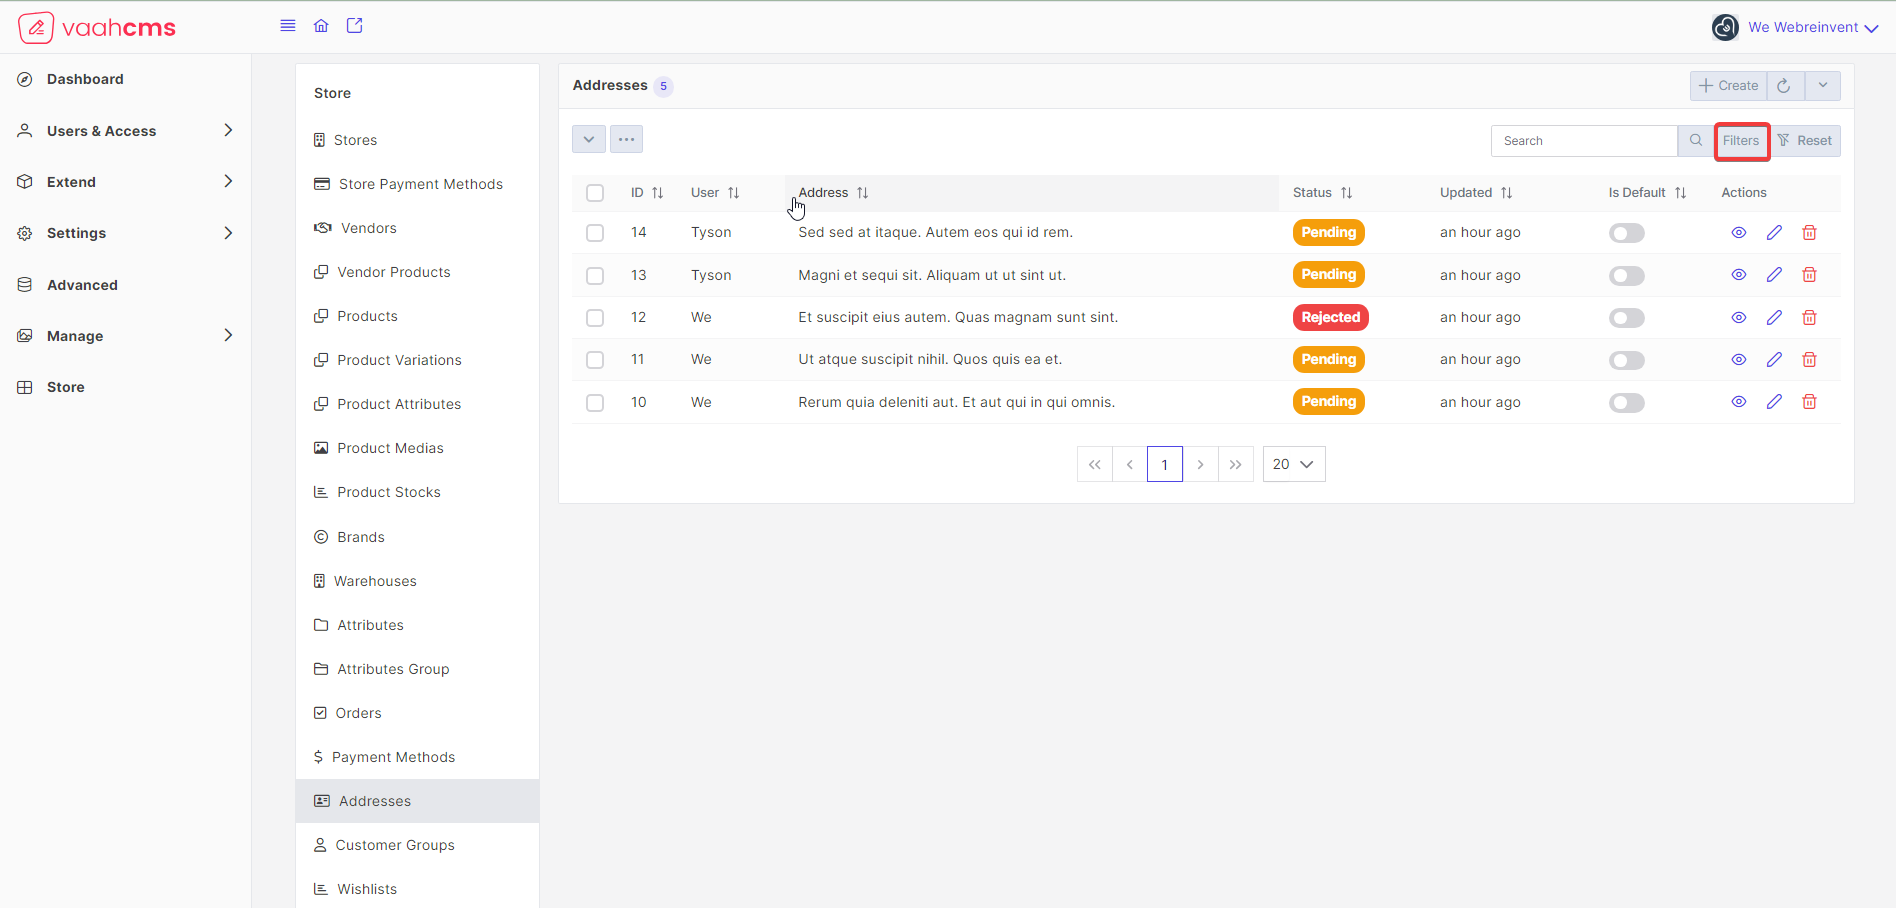
Filters
Meaning : In the context of VaahStore, filters refer to the criteria or conditions used to narrow down the search results or data displayed in a list or table. Filters allow users to specify specific attributes or values to retrieve only the relevant information they are interested in.
Steps to apply filters:
Visit the list page of Addresses CRUD, from the list page click on filters button available on the top right corner
of your screen. A new page will open with various filters section in it.
Follow the below images for reference:
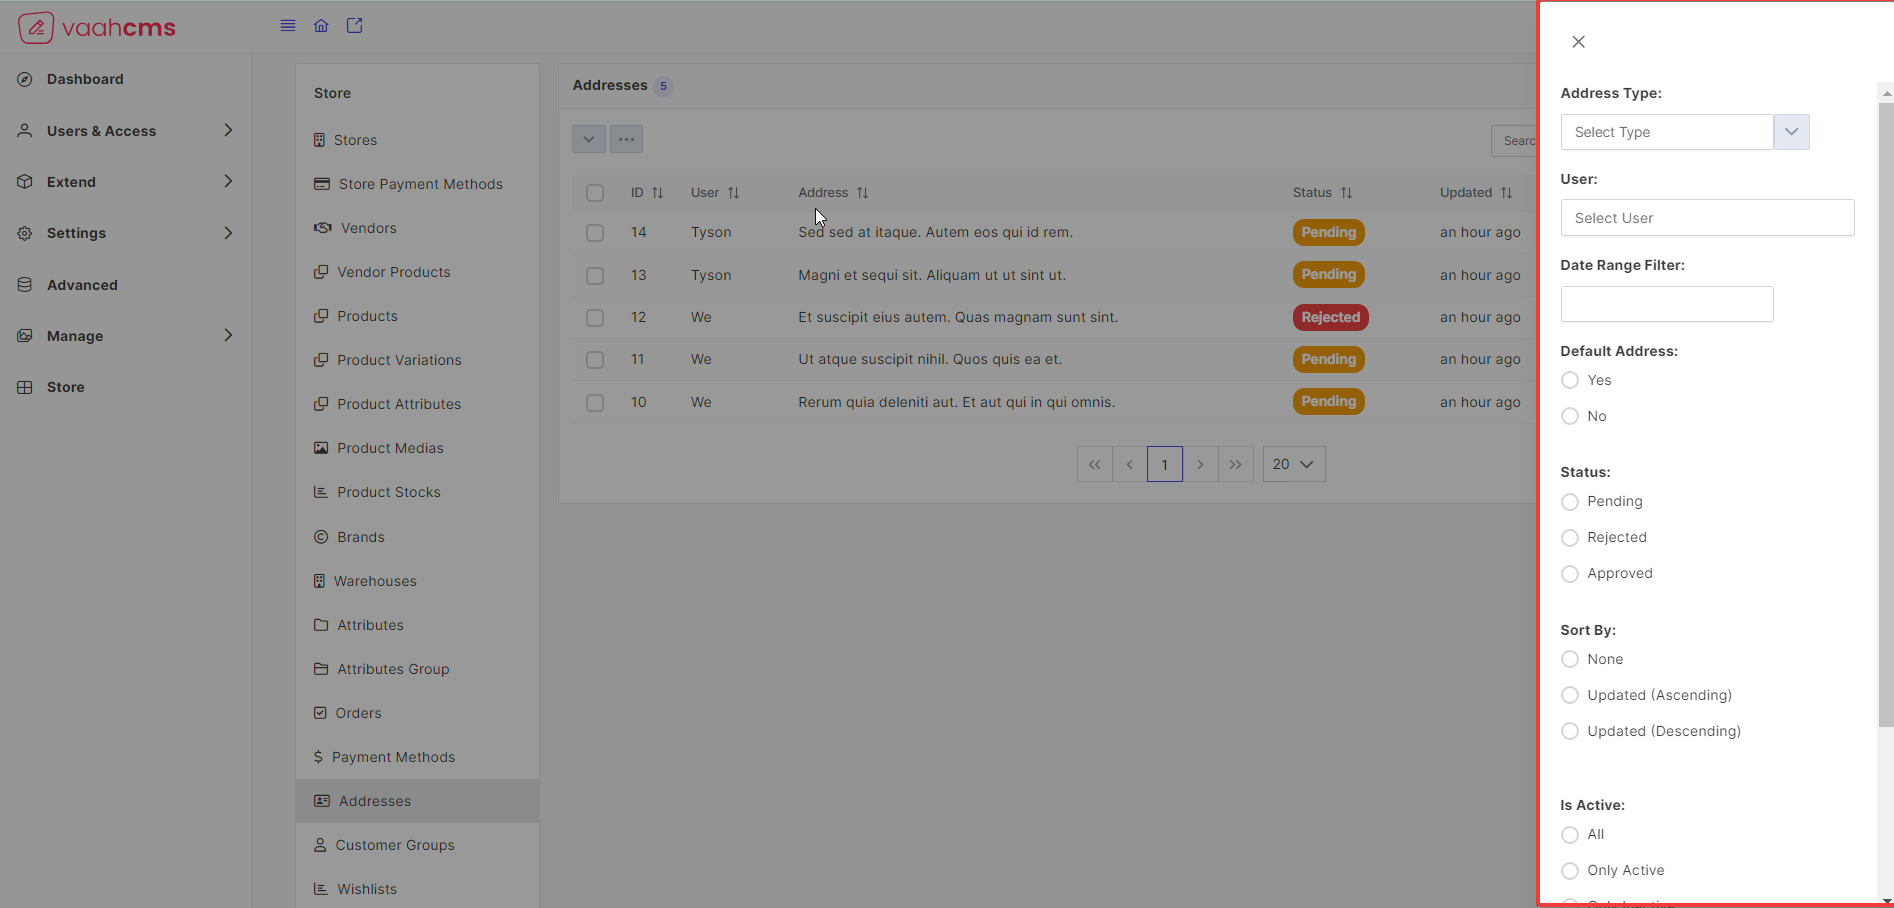
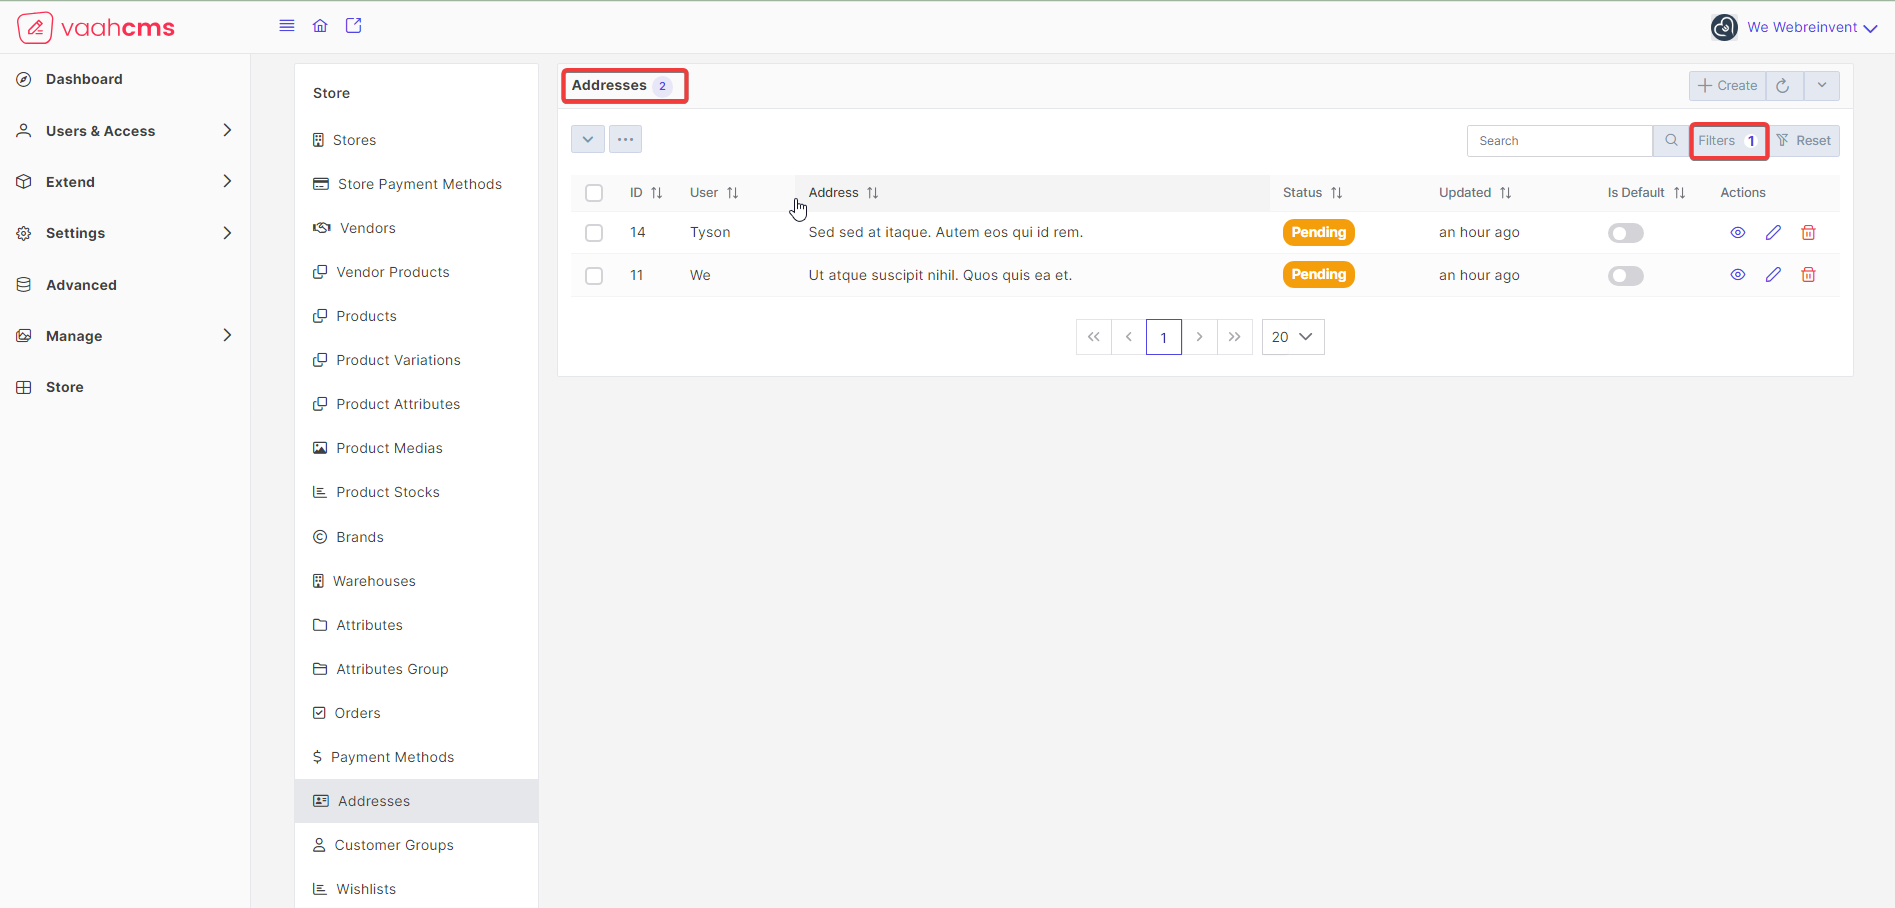
Address Type: In this filter you need to provide theAddress Type, just select a option out of available options, it will filter the records on the basis ofAddress Type.
Follow the below images for reference: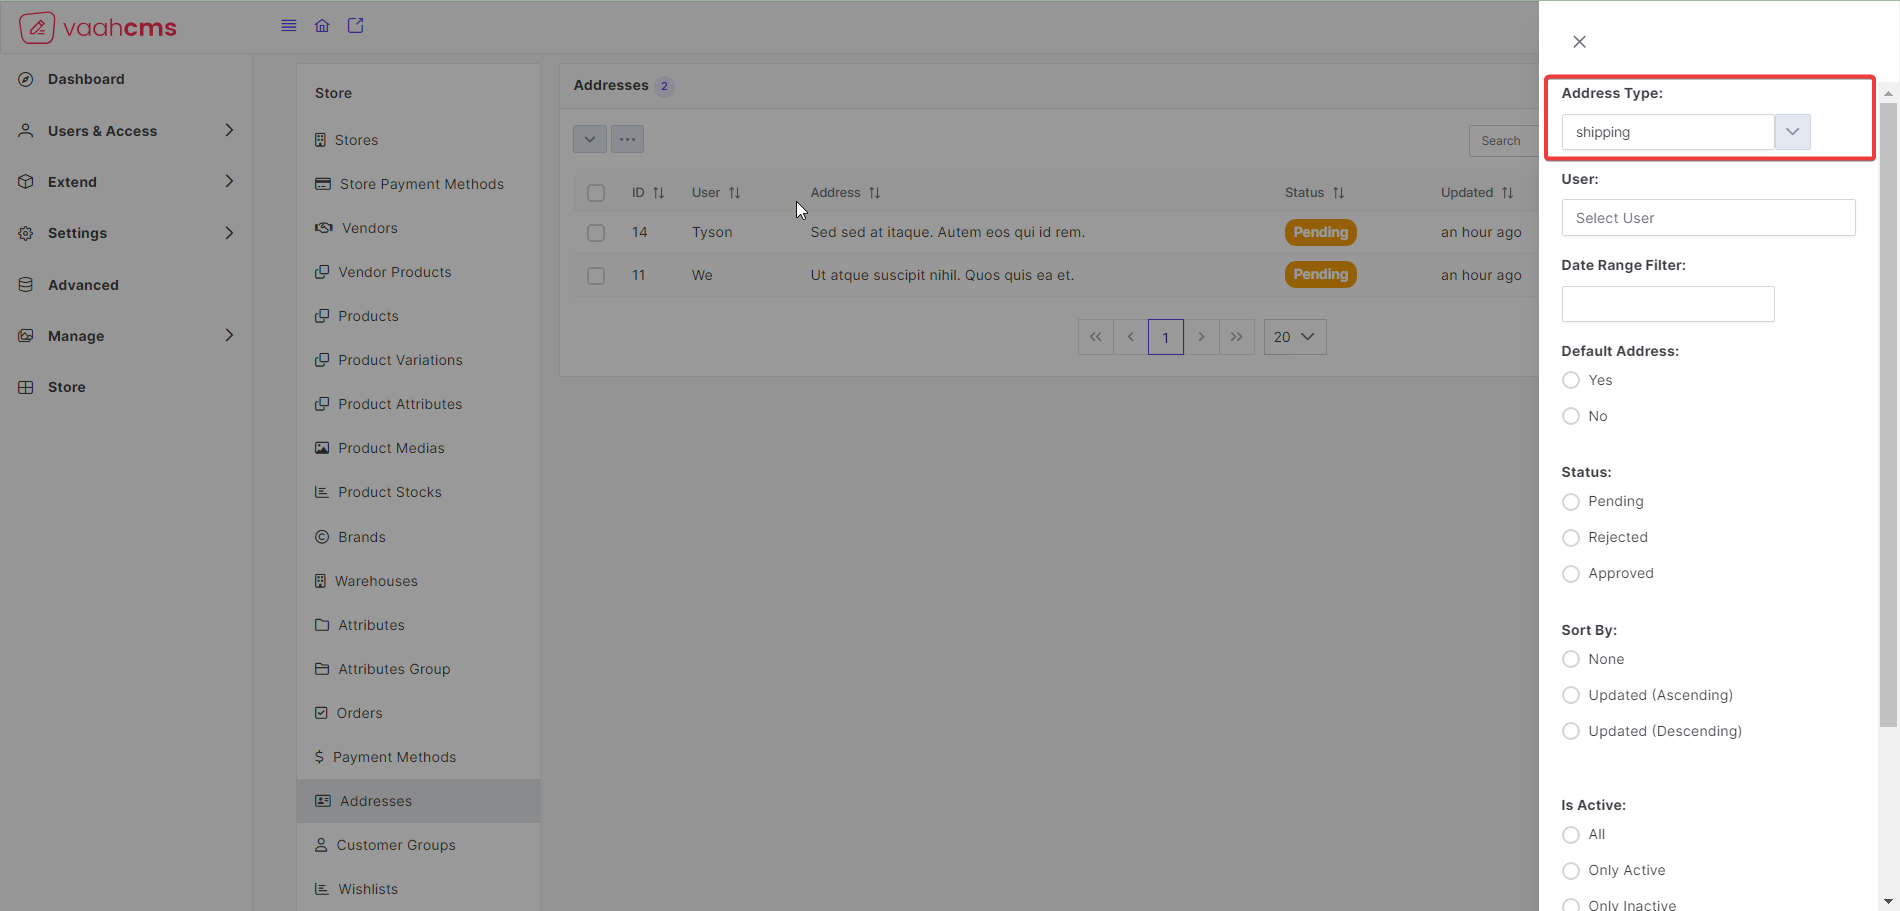
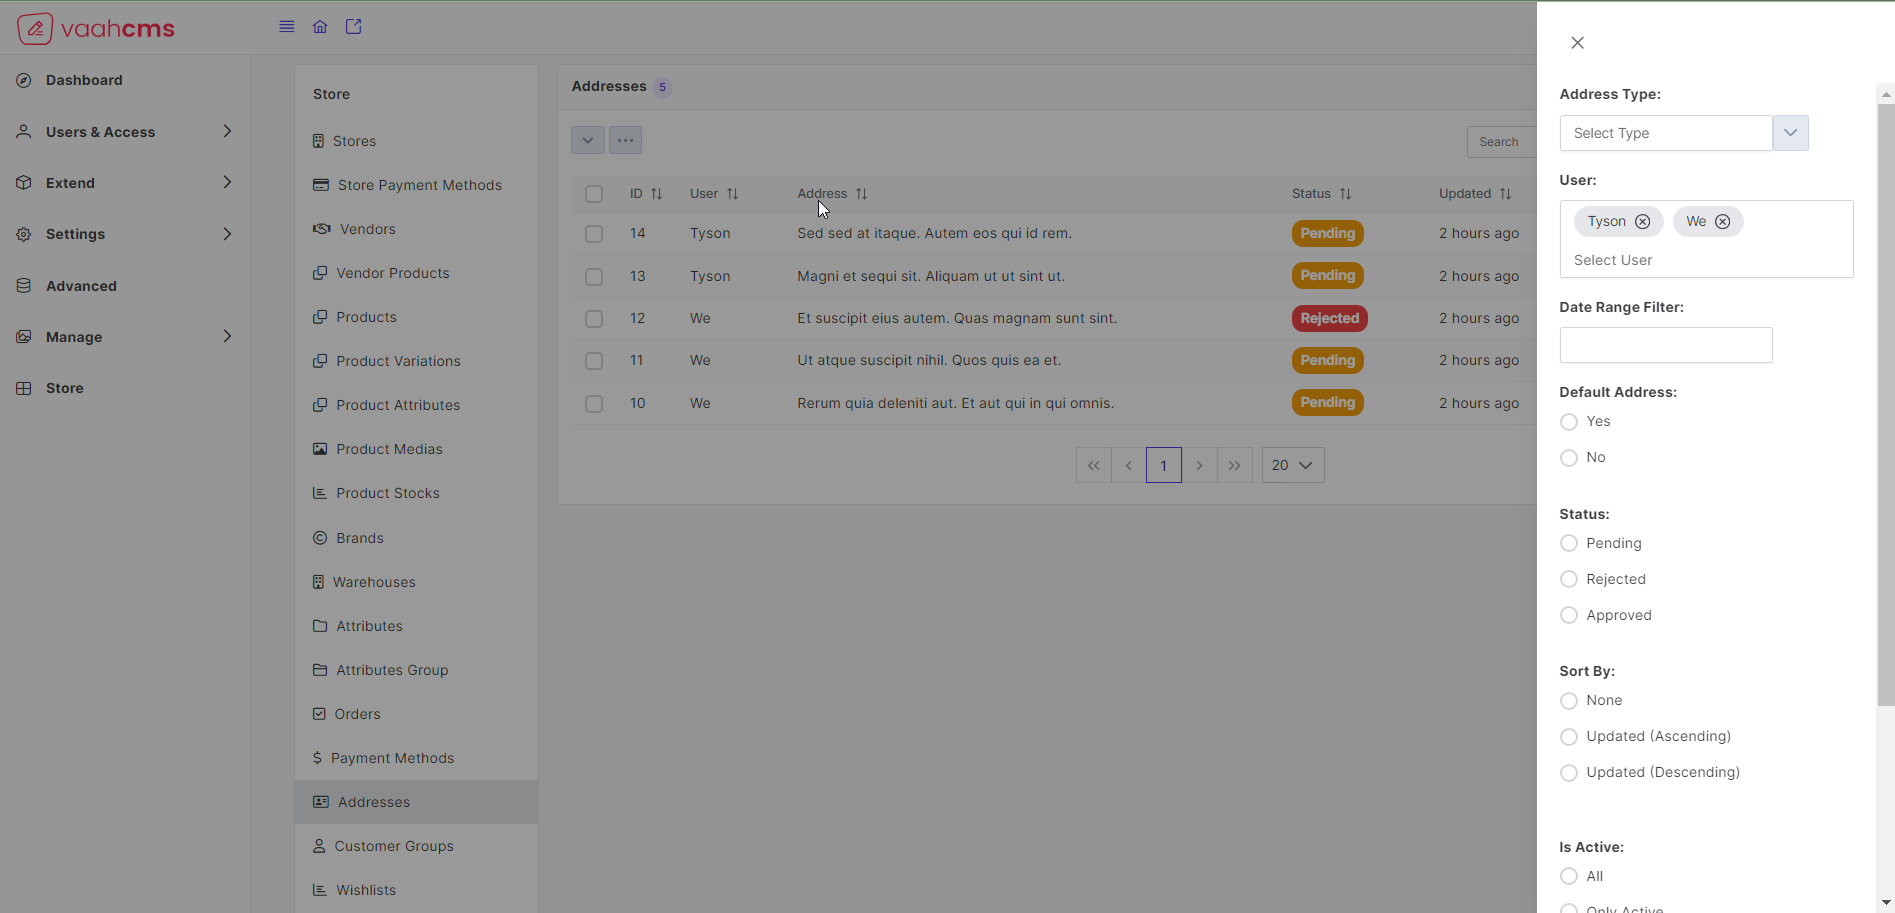
User: In this filter you need to provide theUser. Since this is a autocomplete component you can also search users on the basis of user name, just type the letter user's name starts with it will give you all the options related to that word. Select the user from the list of users available, filter will be applied on the basis ofuserselected.NOTE
Here you can select multiple users also, and it will give you the filtered list on the basis of users selected.
Follow the below images for reference: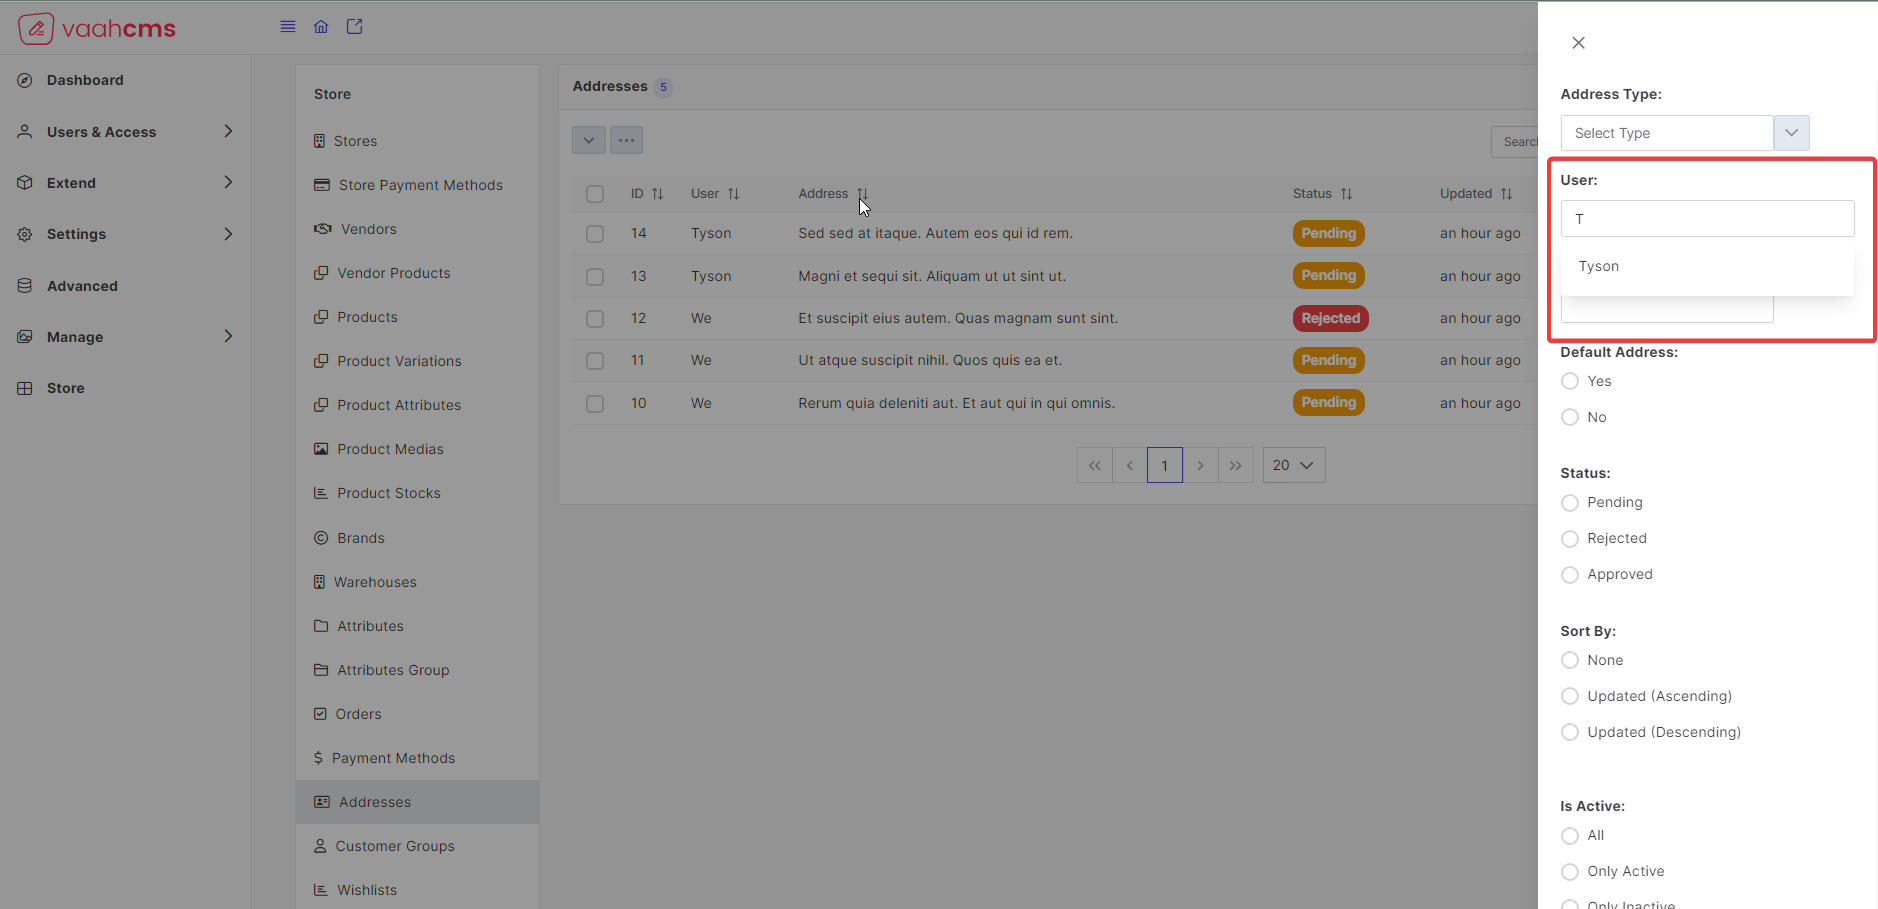
Date: In this filter you need to select the date range i.e from and to, it will filter the records on the basis ofcreated_atcolumn values which will fall between the date range provided by the user.
Follow the below image for references: