Setup New Project
Introduction
Welcome to the WebDriverIO Setup Documentation! In this comprehensive guide, we will walk you through the essential steps and best practices for setting up WebDriverIO, a powerful and flexible JavaScript automation framework, to supercharge your web testing efforts.
Requirements
- Node.js should be installed on your computer.
Note:
- To install Node.js. Download the Node.js installer from nodejs.org;
- Once the installer is downloaded. Click on it and install Node.js.
- After the installation is complete. Verify it by entering the command
node -von the terminal. It will display the version of the Node.js installed.
- Knowledge of JavaScript.
- Package Manager: npm or yarn (npm comes bundled with Node.js)
- Code Editor: A code editor like VSCode or PHPStorm.
- WebDriver-Compatible Browser: Common choices are Google Chrome and Mozilla Firefox.
Setup WebDriverIO Project
- Open Code Editor.
- Create a folder with project name.
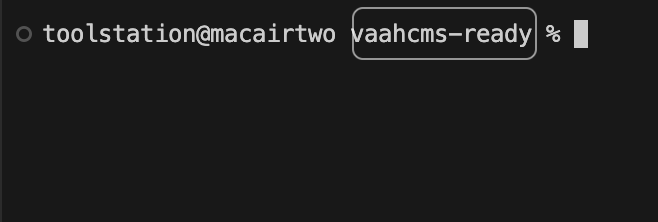
- Open the terminal of that folder. Look for the terminal option on the Code Editor.
- The path in the terminal window should contain the project folder name. Refer to the image below:

- Run command: (This creates a node project in that folder that will have a package.json file.)
npm init -y - Run command: (This will install webdriverIO on the project)
npm init wdio - When prompted whether to continue or not. Type Y and press Enter.
- For "What type of testing would you like to do?". Select E2E Testing.

- For "Where is your automation backend located?". Select On my local machine
- For "Which type of environment would you like?". Select Web.

- For "With which browser should we start?". Select Chrome.

- Choose Mocha Framework for framework.
- For "Do you want to use a compiler?". Select No.
- Press Enter for the four commands to generate sample test cases and page object files.
- Choose spec reporter for test case reporting.
- For "Do you want to add plugins to your test setup?". Select wait-for.

- For "Do you want to add service to your test setup?". Navigate through the option and choose Appium using Spacebar and Press Enter.
- For "What is the base url?". Press Enter.
- When "Do you want me install
npm install" is prompted. Press Enter. - Wait for the command
npm installto complete. - After the setup is complete, a success message will be shown. Refer to the image below:

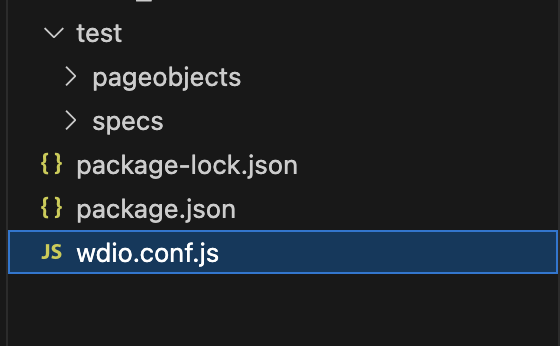
- The setup will install some directories and files on the project.
- Verify whether the
wdio.conf.jsfile are created or not.
- There should be some sample test cases which were created during the setup. Verify the same in
test/spec/directory.
Note:
- The points in the Requirement section must be fulfilled before working on the setup.
- Carefully choose the options during the WebDriverIO setup.
- Some commands may take longer time to execute which is expected. Just wait for it to complete.
- Previous commands must be completed successfully before running the next command.
Configuration
Now, before running the test scripts we need to install several packages, configure the wdio.conf.js file. We also need to create env file so that the capabilities for different platforms can be added.
Install Dependencies
To install the required dependencies and configure package.json file, follow the steps given below:
- Run following commands in the terminal of the Code Editor (Make sure the path is set to your project directory. Refer Step 4 of the Project Setup section).
- First, we need to install devtool package. It is used for DOM manipulation and network control. To know more, refer to this documentation by webdriver.io.
npm install @wdio/devtools-service --save-dev - After this appium and appium service package is installed. These are used for mobile testing. Refer to this documentation by webdriver.io.
npm install appium --save-dev npm install @wdio/appium-service --save-dev - Now, we need to install various drivers for mobile testing.
npm install appium-chromium-driver appium-mac2-driver appium-safari-driver appium-uiautomator2-driver appium-xcuitest-driver --save-devNote:
appium-chromium-driveris used to automate chrome browser on mobile.appium-mac2-driveris used to automate applications on MacOS.appium-safari-driveris used to automate apps on safari browser in iOS device.appium-uiautomator2-driveris used to automate apps on Android device.appium-xcuitest-driveris used to automate apps on iOS device.
- Finally, run this command:
npm install axios chalk cli-color cross-env ts-node typescript wdio-wait-for --save-dev
- First, we need to install devtool package. It is used for DOM manipulation and network control. To know more, refer to this documentation by webdriver.io.
- In
package.jsonfile, replace the code in script with the below code:"scripts": { "wdio": "cross-env wdio run ./wdio.conf.js", "wdio debug": "cross-env NODE_WDIO_DEBUG=true wdio run ./wdio.conf.js", "wdio is_human": "cross-env NODE_WDIO_IS_HUMAN=true wdio run ./wdio.conf.js", "wdio mac": "cross-env NODE_WDIO_OS=mac wdio run ./wdio.conf.js", "wdio ios": "cross-env NODE_WDIO_OS=ios wdio run ./wdio.conf.js", "wdio windows": "cross-env NODE_WDIO_OS=windows wdio run ./wdio.conf.js", "wdio linux": "cross-env NODE_WDIO_OS=linux wdio run ./wdio.conf.js", "wdio android": "cross-env NODE_WDIO_OS=android wdio run ./wdio.conf.js" } - Also add
"type":"module"inside package.json file. Refer to the code below:... "type": "module", "devDependencies": { ... }
Configure ENV file
- Create a new file in the root folder of the project, where the file
wdio.conf.jsfile is located. - Name the file
wdio.env.js. - Add the code given below inside the file:
class Env {
    constructor() {
            this.params = {
            debug: false,
            is_human: true,
            is_human_pause: 1000,
            env: null,
            log_level: 'error',
            base_url: '',
            version: null,
            capabilities: [
                {
                    platformName: "Linux",
                    "appium:automationName": "Chromium",
                    browserName: 'chrome',
                    acceptInsecureCerts: true,
                },
            ]
        };
        if(process.env.NODE_WDIO_IS_HUMAN){
        this.params.is_human = true;
        }
        if(process.env.NODE_WDIO_DEBUG){
            this.params.debug = true;
        }
        if(process.env.NODE_WDIO_OS){
            this.setCapabilities()
        }
        if(this.params.debug === true){
            this.params.log_level = 'debug'
        }
    }
    //-------------------------------------------------
    setCapabilities(){
        switch(process.env.NODE_WDIO_OS){
            case 'mac':
                this.params.capabilities = [
                    {
                        platformName: "mac",
                        "appium:automationName": "Chromium",
                        browserName: 'chrome',
                        acceptInsecureCerts: true,
                    }, {
                        platformName: "mac",
                        "appium:automationName": "Safari",
                        browserName: 'Safari'
                    }
                ]
            break;
            case 'ios':
                this.params.capabilities = [
                    {
                        platformName: 'iOS',
                        browserName: 'Safari',
                        'appium:platformVersion': '17.0',
                        'appium:automationName': 'XCUITest'
                    }
                ]
        break;
            case 'android':
                this.params.capabilities = [
                    {
                        platformName: 'Android',
                        browserName: 'Chrome',
                        acceptInsecureCerts: true,
                        "appium:deviceName": "P7A34", //this should match with emulator name
                        'appium:automationName': 'UIAutomator2',
                    }
                ]
                break;
            case 'windows':
                this.params.capabilities = [
                    {
                        platformName: "Window",
                        "appium:automationName": "Chromium",
                        browserName: 'chrome',
                        acceptInsecureCerts: true,
                    }
                ]
                break;
            case 'linux':
                this.params.capabilities = [
                    {
                        platformName: "Linux",
                        "appium:automationName": "Chromium",
                        browserName: 'chrome',
                        acceptInsecureCerts: true,
                    }
                ]
                break;
        }
    }
    //-------------------------------------------------
    getCapabilities(){
        let capabilities = this.params.capabilities;
        if(this.params.is_human === false){

            for(let i in capabilities)
            {
                switch(capabilities[i].browserName)
                {
                    case 'chrome':
                        capabilities[i]['goog:chromeOptions'] = {
                            args: [
                                '--no-sandbox',
                                '--disable-dev-shm-usage',
                                '--disable-infobars',
                                '--headless',
                                '--disable-gpu',
                                '--window-size=1440,735',
                                '--disable-extensions'
                            ]
                        }
                    break;
                }
            }
        }
        return capabilities;
    }
    //-------------------------------------------------
    getParams () {
        this.params.capabilities = this.getCapabilities();

        console.log('params-->', this.params);

        return this.params;
    }
}
export default Env;
Configure wdio.conf.js file
After this, we need to configure the wdio.conf.js file. Open the file and follow the steps mentioned below:
- Add the following code at the top of the file in order to import
wdio.env.jsfile created in step 3 of Configure ENV File section.import env from "./wdio.env.js"; const envObj = new env(); const params = envObj.getParams(); - Replace
exports.configtoexport const config. Refer to the code snippet below:export const config = { ... } - Enter this code:
env: params,inside exports.config. Refer to the code below:export const config = { env: params, // // ==================== // Runner Configuration // ==================== ... } - For the
capabilitiesreplace the code withcapabilities: params.capabilities,. Refer to the code below:export const config = { ... capabilities: params.capabilities, ... } - Similarly replace the baseUrl with
baseUrl: params.base_url,. - Search for
servicesinside "export const config". If it is not present add the code mentioned below. If it is present, replace theserviceswith the below code.export const config= { ... services: [ [ 'appium', { args:{ allowInsecure: ['chromedriver_autodownload', 'adb_shell'], } } ] ], ... }
Now, the configuration is completed. But we still need to do some changes with the test files before we can start running our script.
Configure test scripts
Follow the steps mentioned.
- Open the file
login.page.jsinside the directorytest/pageobjects. Replace the "require" code at the top with the code given below:Also replace theimport { $ } from '@wdio/globals' import Page from './page.js'module.exports = new LoginPage();code at the bottom withexport default new LoginPage(); - Open the file
secure.page.jsin the same directory. Do the same replacements. - Open the file
page.js. Replace the "class Page" withexport default class Page. Refer to the code snippet below. Rest of the code inside Page class should remain unchanged.Also replace theexport default class Page{ /** * Opens a sub page of the page * @param path path of the sub page (e.g. /path/to/page.html) */ }const { browser } = require('@wdio/globals')withimport { browser } from '@wdio/globals'. - Finally open the file
test.e2e.jsin the directorytest/specs. Replace the "require" codes with the code snippet below:import { expect } from '@wdio/globals' import LoginPage from '../pageobjects/login.page.js' import SecurePage from '../pageobjects/secure.page.js'
The configuration is now complete. You can start running the test scripts now.
Running the test script
- Before running the test script. We need to verify the path under the specs keyword in file
wdio.conf.js.
Note:
- In the path "*" symbol indicates that the run command will run all the test cases inside the spec folder.
- You can replace "*" symbol with a specific test file. Run comand will run only that test file.
- For run command refer to the steps given below.
- To run the test script, run command:
npm run wdio - After the test script ran successfully, a spec report will be generated. Refer to the image below:

- To run a specific test script: Run the command:
npx wdio run wdio.conf.js --spec test1.jsNote:
- In the code above you can change the test1.js with your test file name.
- Once the sample test scripts are running successfully, you can modify and create your own scripts.
Possible Error:
- Error: Request failed with status 500 due to unknown error
- Solution: To solve this error. Follow these steps:
- Update the chrome browser to the latest version.
- Run the following command to update the appium-chromium-driver.
npm i appium-chromium-driver --save-dev - If the issue remains, follow these steps to solve the issue:
- Change the version of
appium-chromium-driverfrom ^1.3.7 to 1.2.60 package inpackage.jsonfile. - Run
npm install. - Then the run the test cases using
npm run wdio. - To find the campatible chrome driver for appium, refer to the list of released versions of
appium-chromium-driver.
- Change the version of
Mocha Framework
Mocha is a feature-rich JavaScript test framework running on Node.js and in the browser, making asynchronous testing simple and fun. Mocha tests run serially, allowing for flexible and accurate reporting, while mapping uncaught exceptions to the correct test cases. Hosted on GitHub.
If you completed the previous steps and installed the mocha framework during setup then ignore the steps given below. This is only for those who do not add mocha during installation and want to install after setup.
First, install the adapter package from NPM:
npm install @wdio/mocha-framework --save-dev
After a successful installation of the mocha framework. Verify the package.json file the presence of mocha framework:
"@wdio/mocha-framework": "^8.16.12"
Advantages of Mocha
- Feasibility: Mocha is simple to install and get started with. It can be easily integrated into JavaScript projects, quickly incorporating testing into the development workflow.
- Versatility: Mocha can be used in browser and server-side environments, making it suitable for various JavaScript applications. Mocha can efficiently test code when developing a back-end server or front-end web application.
- Accuracy: Mocha generates detailed and accurate test reports, clearly indicating the success or failure of each test. Mocha provides informative error messages, and stack traces when a test fails, making it easier to pinpoint and debug issues in code.
To know more about the mocha framework refer to this documentation by mochajs.org