Common Issues and Solutions
Before we start
All the major issues related to the automation testing have been listed down below. Each issue contains a possible solutions as well with detailed description and reference screenshots.
Issues and Solutions
1. Error Message: "No matching capabilities found"
Description: This error mostly occures when the capabilities passed by the script does not match the system's configuration.
Solution:
- Verify the platform you are using. Eg. mac, linux or windows
- Open
wdio.conf.jsfile. And search for capabilities.Note: Reference for the capabilities have been added in
wdio.env.jsfile. - Open
wdio.env.jsfile. - Look for capabilities inside this.param.
- Verify the capabilities.
- The attribute
platformNameshould contain the name of the platform you are trying to test. If it is wrong, update theplatformName.platformName: "windows", // For Windows platformName: "mac", // For MacOS platformName: "Linux", // For Linux platformName: "Android", // For Android platformName: "iOS", // For iOS - Similarly check the other attributes as well.
- After updating the capabilities. Try to run the script using the command below.
npm run wdio - The issue should have been solved.
2. Error Message: "Details: session not created: This version of ChromeDriver only supports Chrome version"
Description: This issue occures when the package: appium-chromium-driver is outdated. Due to this there is a mismatch in the chrome browser version and the package.
Solution:
- Open the terminal in your project.
- Run the command given below to update the package:
appium-chromium-driver.npm i appium-chromium-driver --save-dev - Update the chrome browser to the latest version. Open Chrome > Settings > About Chrome
- Now excute the script by the running the commnd below:
npm run wdio - The issue should have been resolved.
3. Error Message: "The requested port may already be in use."
Refer: 
Description: This error occurs when the HTTP server component of the application you're trying to start is unable to bind to the specified port because another process is already using it.
Solution:
- Open the terminal in your project folder.
- Run the command mentioned below based on your system:
killall -KILL node // For MacOStaskkill /F /IM node.exe // For Windows - Now, run your tests again and verify.
4. Error Message: "ECONNREFUSED 127.0.0.1:4723"
Description: The error ECONNREFUSED 127.0.0.1:4723 typically indicates that the connection to the Appium server running on localhost (127.0.0.1) at port 4723 was refused. This error commonly occurs in WebDriverIO Appium tests when the Appium server is not running or is unable to accept connections.
Solutions:
- Restart your IDE.
- Execute the tests again and verify.
5. Error Message: "ERROR @wdio/appium-service: dbug"
Refer: 
Description: This issue occurs when there is a problem in the node modules for appium service.
Solution:
- Delete the
node modulesdirectory andpackage.lock.jsonfile. - Run the below command:
npm install - Wait for the command to finish.
- Run the below command to execute the script:
npm run wdio
6. Error Message: "Neither ANDROID_HOME nor ANDROID_SDK_ROOT environment variable was exported."
Refer: 
Description: This issue occurs when the ANDROID_HOME path is not added in the environment variables for Windows.
Solution: The solution for this issues have to be done in three steps:
- Set ANDROID_HOME in enviroment variables
- Press Windows+R and type the command
%appdata%and press run. - Navigate to the AppData folder.
- Click on the Local folder.
- Then, select the Android folder followed by the sdk subfolder.
- Copy the path of this folder.
- Proceed to Settings and navigate to About section.
- Click on Advanced Settings.
- Access Environment Variables.
- Create a new variable named ANDROID_HOME and paste the previously copied URL.
- Additionally, add this path to the system's PATH variable.
- Press Windows+R and type the command
- Set ANDROID_SDK_ROOT in environment variables
- Press Windows+R and enter the command:
%appdata%. - Navigate to the AppData folder.
- Open the Android folder, then locate and enter the sdk subfolder.
- Inside that, access the tools folder.
- Copy the path of this folder.
- No separate variable creation is necessary for
ANDROID_SDK_ROOT. - In the system variables section, select the PATH variable and click on the edit button.
- Add the copied path to the system's PATH variable.
- Press Windows+R and enter the command:
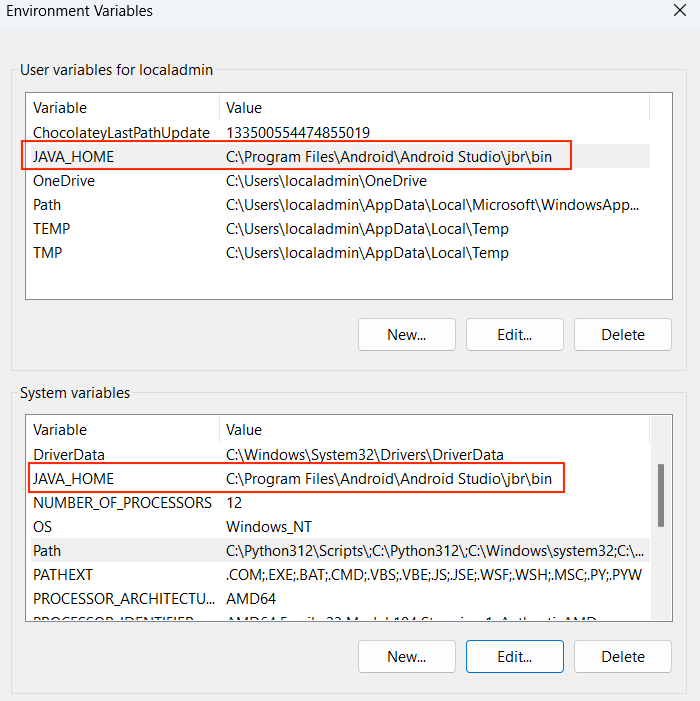
- Set JAVA_HOME in environment variables
- Navigate to Program Files directory in your C: drive.
- Open the Android folder, then locate and navigate to Android Studio directory.
- Locate the jbr folder inside it and proceed to the bin subfolder.
- Copy this path.
- Create a new variable named JAVA_HOME in environment variables and paste the copied URL.
- Additionally, append this path to the system's PATH variable.
- To verify, open Command Prompt and type: java -version
- The command should display the version of java installed on your system.
- After setting the path, the environment variables should look something like this:

After performing the steps mentioned above. The issue should have been fixed.